Add LEDs To Your Stained Glass

Stained glass is an art form that goes back many centuries, with the churches and cathedrals of Europe boasting many stunning examples from the mediaeval masters of the craft. You do not however have to go to York or Chartres cathedrals to experience stained glass, for it remains a vibrant and creative discipline with many contemporary practitioners. One thing the stained glass of today has in common with that of yesteryear though is that it remains static, being composed of pieces of glass held together by metal strips. This is something that [Frank Zhao] has addressed as he has evolved a technique that allows him to incorporate LEDs into static stained glass, making for a particularly eye-catching effect.

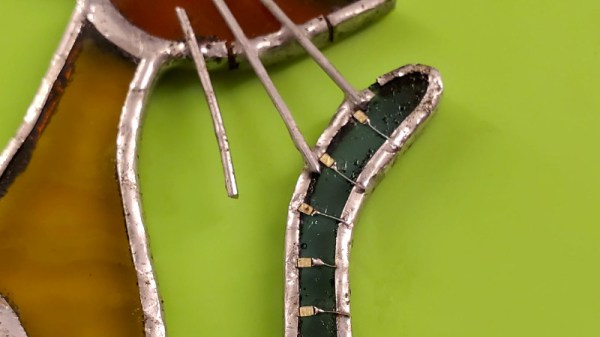
It’s likely that we join many readers in not knowing the intricacies of making a piece of stained glass, so his is a fascinating write-up for its step-by-step run-through. His stained glass cat has pieces of glass edged with copper tape, which he then solders together. Driving the LEDs is not something that should be alien to us, but his method of using the copper-and-solder stained glass joints as conductors for them by creating strategically placed cuts is very effective. The final effect is of a homogeneous piece without the cuts being particularly visible , but with a pleasing array of lights on the cat’s tail. Those of us for whom stained glass production is new have learned something of the technique, and stained glass artists have seen their craft do something completely new.

Stained glass hasn’t featured here too often, the closest we’ve come is this striking fake stained glass Iron-Man themed panel a few years ago.

A Printed Case For Your ESP Environmental Sensors

We’ve said it before but it’s worth repeating: rolling your own hardware solution is ridiculously easy these days. If you want to make a network attached environmental sensor, you wire a DHT11 up to an ESP8266 and you’re done. Time to move onto the software. In fact, it can take longer to come up with some kind of suitable enclosure for your hardware project than it does to assemble the thing.

Which is why [Pixel Hawk] has come up with this elegant 3D printed enclosure for the ESP8266 and ESP32. It’s designed to hold the microcontroller in the bottom compartment, while the environmental sensor (either the DHT11 or DHT22) is mounted to the top so it’s exposed to the outside. The case snap fits together so you don’t have to worry about gluing it, and there’s even an opening so you can keep the USB cable plugged in.

In the notes for the design, he mentions that in testing it was determined that the heat of the ESP itself can skew the temperature readings. So he recommends putting the microcontroller to sleep whenever possible, and keeping reads short so the enclosure doesn’t have time to heat up. He’s also created an alternate version of the case with more openings which should help combat this issue if you need to keep the chip awake.

If you’re looking for a complete solution, [Pixel Hawk] has included the source code he personally used to get his ESP32 sensor talking to Blynk, but you certainly don’t have to go that route if you don’t want to. There’s no shortage of existing projects out there that will help you get started with whole-house environmental monitoring. Our very own [Elliot Williams] happens to be partial to MQTT when he wants to get all his gadgets to play nice.