If you’ve got a 3D printer, you’re probably familiar with the reinforced belts that are commonly used on the X and Y axis. These belts either come as long lengths that you attach to the machine on either end, or as a pre-sized loop. Traditional wisdom says you can’t just take a long length of belt and make your own custom loops out of it, but [Marcel Varallo] had his doubts about that.
 This is a simple tip, but one that could get you out of a bind one day. Through experimentation, [Marcel] has found that you can use a length of so-called GT2 belt and make your own bespoke loop. The trick is, you need to attach the ends with something very strong that won’t hinder the normal operation of the belt. Anything hard or inflexible is right out the window, since the belt would bind up as soon as it had to go around a pulley.
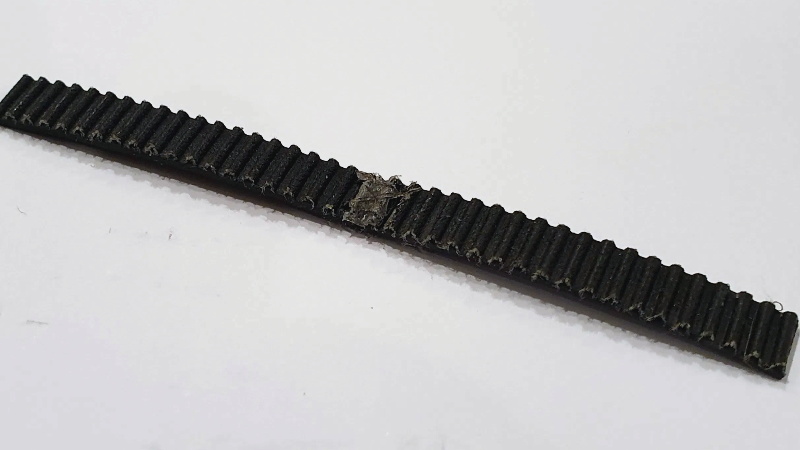
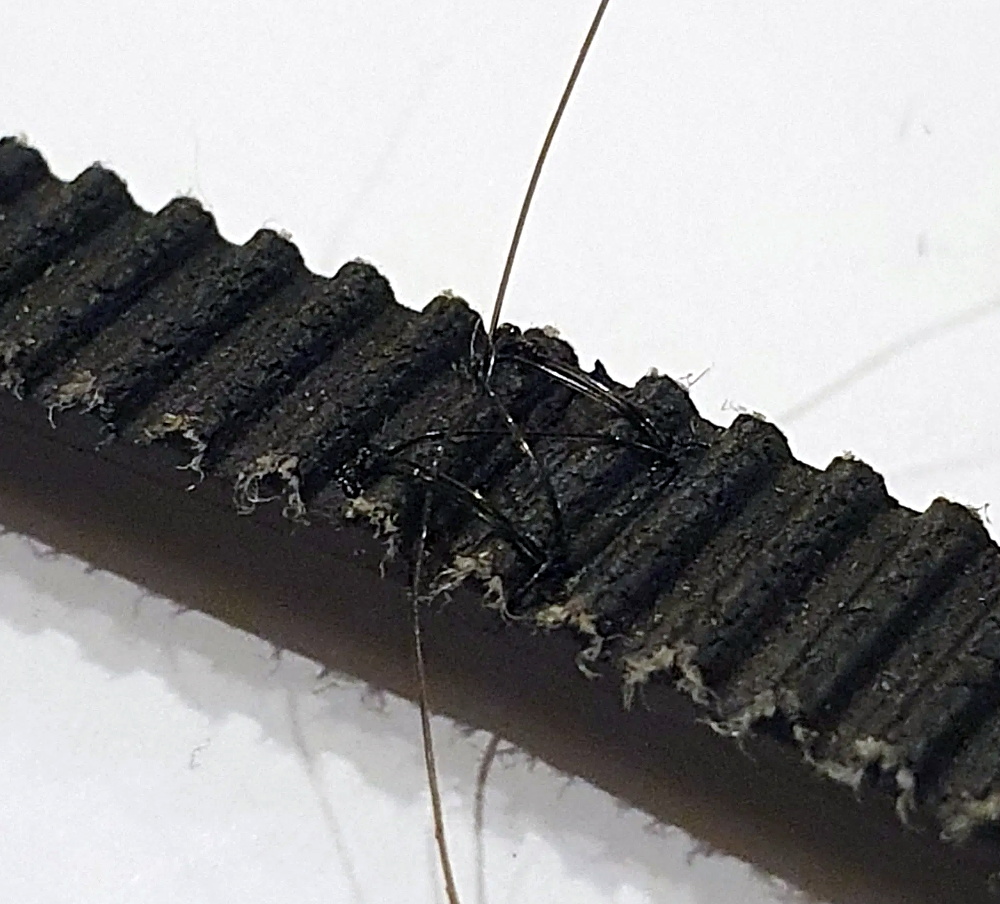
It seems the key is to cut both ends of the belt very flat, making sure the belt pattern matches perfectly. Once they’ve been trimmed and aligned properly, you stitch them together with nylon thread. You want the stitches to be as tight as possible, and the more you do, the stronger the end result will be.
[Marcel] likes to follow this up with a bit of hot glue, being careful to make sure the hardened glue takes the shape of the belt’s teeth. The back side won’t be as important, but a thin layer is still best. The end result is a belt strong enough for most applications in just a few minutes.
Would we build a 3D printer using hand-stitched GT2 belts? Probably not. But during a global pandemic, when shipments of non-essential components are often being delayed, we could certainly see ourselves running some stitched together belts while we wait for the proper replacement to come in. Gotta keep those face shields printing.


Good to see an article on stitching and binding, one of the most effective repair techniques you can use. Often the repair can be stronger than the original part. Looks like the belt will hold up for some time.
I’ve been stitching and binding things for many years such as sewing machine belts, broken RC car chassis and steering arms, broken gears, wheels, reflector telescope mounts, laser printer tray arms, fishing rods, broken headphone headbands, LEGO Technic parts and other stuff I can’t recall right now.
I will suggest something better than nylon and that is Kevlar. You can readily buy Kevlar thread cheap on eBay, a packet of a few small cotton reel-sized spools (they come in different colours) will last for many years. It is sold for fishing rod constructors, I bought my first spool of Kevlar thread 20-odd years ago in a fishing supplies shop then eBay after that. Get the unwaxed thread perferably.
Whilst wrapping or stitching with Kevlar, use a drop of cyanoacrylate every so often to hold the tension, then when done, smear a thin layer of epoxy over the thread.
Last i seen on Alaska something…that they use dental floss for stitching… the best they say…
I think I’d try this method first:
https://www.youtube.com/watch?v=YDNXlYpdpM8
This is an awesome idea but it will intruduce errors. Every time that splice rolls over the pully, it will induce a slight difference in travel around it. If you just need this for a basic mechanical drive (like a timing belt) it would work fine. For translation movement like in 3D printing or CNC work, this will show up in the piece as small repeating patterns. I applaud the idea, it’s like pinning a chain. He might be able to pull this off with thinner pins. Those finishing nails are massive compared to the area they are nailed into. It causes a clear bulge.
I just use contact cement, the shit quality of belts ensures the future fault will happen in the most inconvenient place of the loop
This method looks cumbersome to me. A proper scarf joint will give a large gluing area and not affect the tooth profile. In a high precision application I see the nylon thread impacting accuracy.
With a scarf joint you could also do the nylon stitches in the width direction, to minimize the effect on the tooth profile.
Why not simply 3d print belts using tpu filament? I’m using diy timing belts all over one of my robots right now and they handle a lot more torque than my 3d printer axis belts do.. assuming you have a working belt otherwise yes I could easily see myself attempting this!
Quite a bit of stretch in a pure TPU belt which might cause issues on something like a 3d printer where it would show up as really bad ringing or other defects.
Depends on the TPU. Some blends are excellently strong but a pain to print! TPU is a blanket term for a variety of flexible plastics. The stuff I ended up settling on after trial and error unfortunately does not list the composition on the spool (as most tend to not it seems) but if you get the right stuff its pretty usable for short term. I can’t say it would be a perfect substitute but you can get pretty close with step counts.
I’m surprised carbon fiber TPU filament isn’t more popular for this kind of thing. It’s very rep-rap to print your own belts.
I found cutting a scarf joint then stitching across the joint parallel with the tooth works well. The thread is completely out of the way of the tooth surface amd only protrudes at the belt sides.
Another technique is to cut a tongue and groove, then use pieces of needle itself. Put the needle in line with the tooth and cut the end off. I’ve done it with gt2 belts but works better with t5.
What ‘Traditional wisdom’? It’s commonly done and there are many ways!
Done this many times, you make an overlapping joint by cut the belt back on both sides(One side removing the teeth, one side removing the backing) until you have exposed about 3-4 teeth worth of the core fibers, you can even thin them together then using neoprene glue(Wetsuit repair glue).. And a 3d printed jig to align the teeth.. The result is pretty much as strong as the original belt.
I like the sound of that neoprene glue MUCH better than all the ppl up there mentioning cyano and epoxy for something that’s supposed to remain flexible. Makes me think they’ve never so much as done a shoe repair before.
Cyano would work well in a similar fashion. Just simply chopping a belt in half and gluing it back together won’t be strong enough. It will break. Cyano works best when it has large amounts of surface area, like how Electra explained trimming away the belt to expose more surface to contact. This will create a thin layer of glue that should promote flexibility while being as hard as ripping velcro apart by pulling side to side, rather than peeling.
Is it something similar to bike tube repair patch glue? I believe both would be vulcanizing glue formulas.
What about using a piece of belt and stick the back over the part that needs to be fixed? And glue/stitch that? Belt will be a bit thicker but most of the time that shouldn’t be an issue.