We’ve seen plenty of simple reflow ovens, and there’s an excellent chance that some of the people reading these words have even thrown their own together. A minimal example isn’t much more than a old toaster oven, a Solid State Relay (SSR), a thermocouple, and a microcontroller to get them all talking. But if you’re like [Mangy_Dog] and willing to put in a bit more effort, the final result can be a capable piece of equipment that will be the envy of the hackerspace.
 This build started as most do, with a search for a used toaster oven. But in the end he actually found a German model cheap enough that he could buy it new without going over budget for the project. Though he soon found out why: when it arrived, the so-called “pizza oven” was far smaller than he’d imagined. Luckily, it ended up being the perfect size for PCBs.
Unfortunately, the heating elements weren’t quite where he wanted them. Even after wrapping the heating chamber with ceramic insulation, a feature that was likely left off the original oven to cut costs, he says the temperature would only rise about 1 degree per second. So he added an additional halogen heating element at the top of the oven which pushed that rate up to 6 degrees per second.
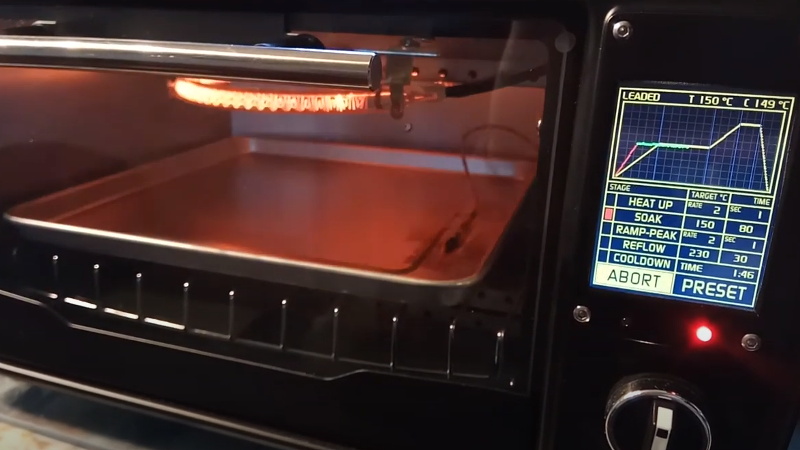
Control is provided by an Arduino Pro Mini and a touch screen display with some very slick graphics. There’s the expected thermocouple to detect the current temperature, but while the earlier versions of the electronics used the aforementioned SSR to control the heating elements, [Mangy_Dog] eventually replaced it with a dimmer module rated for 4000 watts. After coming up with a circuit that allowed him to control the dimmer with the Arduino, this module gave for much finer control over the chamber temperature. Plus it apparently kept all the lights in his house from flickering when the elements kicked in at 100%, which was a nice bonus.
This isn’t the first time we’ve seen somebody shoehorn an LCD into an off-the-shelf toaster oven, but it’s certainly one of the most polished examples to ever come our way. When even commercially available units need some hacking to reach feature parity with DIY versions, building your own reflow oven still seems like the way to go in 2020.


Whoa, that’s super well put together!
Way better than the time I hacked together a reflow oven out of an old pizza oven and took an angle grinder to the thing to make holes for the temperature controller haha.
I agree it’s an impressive build but the real question is will it still make pizza? We must keep our priorities straight.
Regarding powder paint ovens, and reflow ovens, they should never be used for any other purpose.
For that reason, tell your wife, you need all three.
Thermocouple @5:24 is unusable for a reflow oven. It’s thermal mass is much to big. for a reflow oven, you also want to measure the temperature very near to the PCB itself. The “ugly” thermocouples which looks (and are) just 2 wires welded together are the best for this application.
@13:13 “halogen might cause some issues”. Yep, you don’t want too much IR in your oven for heating. Different part of your board have different absorption rates, which will result in temperature differences. Just shielding your PCP partly from direct IR irradiation would be the simplest modification.
I’m amazed I made it to the end, the background noise was quite annoying in this video.
i swapped out the nut type couple for the bare bead down the line
The IR so far has not been an issue done a few boards with the oven now.
A little more than 10 yr ago we had a professional/commercial built reflow oven in the company – about €3000,- which also used 3 or 4 halogen “sticks” as heaters. It worked quite OK. It only was not fully automatic. At the end of the process it beeped and you had to open the drawer to allow the PCB to cool down.
“flickering when the elements kicked in at 100%”
You should use a zero crossing detector and only switch the triac on when the mains voltage crosses through zero.
You should use a 1-2Hz pwm so you’re not trying to turn on the triac more than once per 8.3mS.
it was all covered in the video, the flickering was from inrush current not slow pwm timing…
I’m a real wally sometimes.
Please excuse my ignorance but I am trying to learn. I haven’t seen any of the other DIY ovens Usually 1500W or less) that use steel resistance elements have to use a dimmer or have issues with flickering. Is the main reason this was caused due to using a 2400w element? Could the flickering be avoided and the dimmer omitted from the build if the element watts were lower?
Of course not. I would even say: not more than once per mains period of 20ms.
We’ve used “Pizza Ovens” for a while now. Never quite happy with the results. Sometimes you get good results, and sometimes not. We’ve now decided to invest a little bit more in a better setup with good thermal isolation, better control thanks to individual heaters and multiple sensors, and a fume hood to exhaust most the flux smokes out of the room immediately.
That’s one thing I need to figure out, smoke extraction…. Damn the fumes are strong when it’s done all in one go…
Beautiful build.
“A minimal example isn’t much more than a old toaster oven, a Solid State Relay (SSR), a thermocouple, and a microcontroller”
Toaster oven retrieved from trash, SCR, RTD, handful of passives and transistors, and an Atmel 2313. Replaced the fan last year. Been running for 12 years. But I am rather simple minded…
Electric skillet with glass lid which acts as an IR reflector and allows the board to be seen. Bought mine for <$20 when it was on sale because the manufacturer was switching from Teflon coatings to some other non-stick coating. Teflon has a very high emissivity, so an IR thermometer will read its temperature accurately enough. Use that and a stopwatch to come up with timed full-on/off cycles that closely approximate the desired reflow temperature curve. The cool-down portion of the cycle is an issue, so remove the PCB as soon as solder solidifies. Good enough for occasional hobbyist use.
I’ve had pretty good results with just a piece of flat steel on an electric stove. Pieces of kapton tape to hold the PCB on, heat on full power until paste melts and then just take it off the stove.