Smooth(er) Text Scrolling On HD44780 LCDs

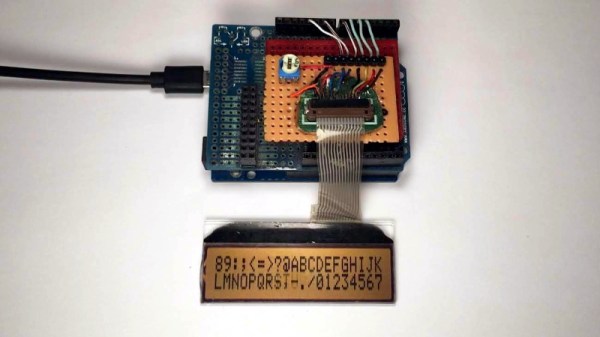
Most Hackaday readers are likely to be familiar with character LCDs driven by the extremely common Hitachi HD44780 controller chip. If you’re looking for a cheap and easy way for your microcontroller project to display some data, they’re pretty much the go-to solution. But as popular as these displays are, there’s no denying that they’re starting to look a bit dated in 2020. Which is why the tweaks [Joseph Rautenbach] is working on are so interesting.

With one of these displays, the controller puts a single character on each 5×8 block of pixels. There’s also support for creating custom characters, which can be used for rudimentary icons. You’re pretty limited by the per-block resolution, but with a little imagination, you can usually get the point across. With a bit of dead space between each block of the display there’s little point in trying to make icons that “bridge” multiple blocks, as they’ll always be segmented.

Hardware support is not guaranteed.

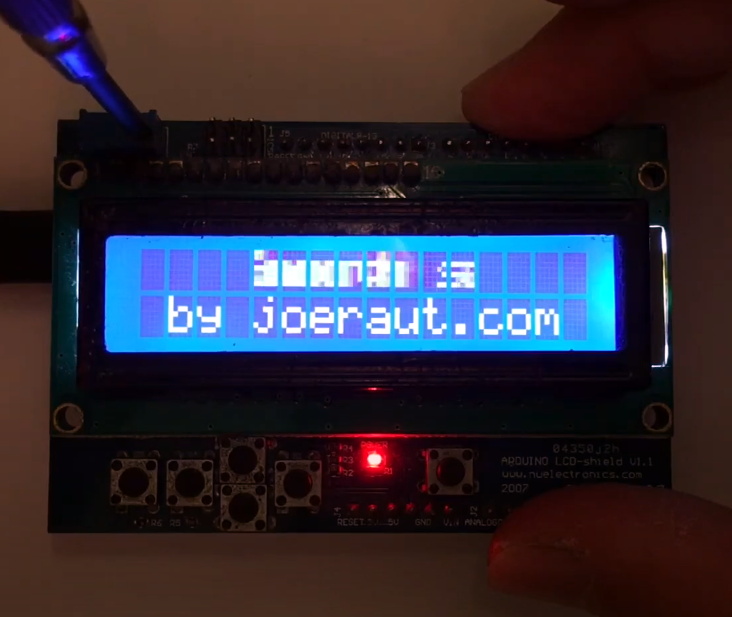
But as [Joseph] realized, that’s less of a problem for scrolling text. So he wrote some code that takes an ASCII string and breaks it down into partial letters and numbers which can be displayed as custom characters. The controller only has space for 8 of these characters though, so the code needs to continually step through the string and generate the appropriate offset characters as the position of the text changes.

While the effect looks pretty good in the video after the break, [Joseph] has found that real-world utilization is a bit finicky. He tried the same code on one of the displays that uses white text on a blue background, and the scrolling text ended up ghosting together so it looked like gibberish. So while he’s released the source code for others to experiment with this trick, your mileage may vary.

This certainly isn’t the first time we’ve seen somebody make clever use of custom characters on the HD44780. We’ve seen it used for an exceptionally tiny game of Tetris, a rendition of Conway’s Game of Life, and even a horizontal space-shooter.

Continue reading “Smooth(er) Text Scrolling On HD44780 LCDs”

Ham Radio Mobile Operations Circa 1919

You used to be able to tell a die-hard ham radio operator on the road by the number and length of antennas protruding porcupine-like from their vehicle. There are still some mobile high frequency operators that have respectable car-mounted antenna farms, but they have nothing on Alfred H. Grebe. In 1919, he fitted a medium wave transmitter in his car that operated around 2 MHz. Since it needed a very large antenna, Grebe rigged a wire antenna that looked like a clothesline between the two bumpers. Obviously, you had to stop, set up your antenna, and then operate — you couldn’t talk and drive. But this may have been the world’s first automotive radio setup for voice communication.

The car had a separate battery for the radio and a dynamotor to generate high voltage for the tubes. Although many radio enthusiasts found ways to add receivers to their cars in the 1920s, it would be 1930 before Motorola made radios especially for cars in production quantities.

Continue reading “Ham Radio Mobile Operations Circa 1919”

Ljusmaskinen Takes The Rave To The Streets (Eventually)

When humanity comes out the other side of this pandemic there will be a mountain of awesome projects to show off in person. For instance, this backpack mounted DMX lighting was built to be worn as a mobile rave rig by Swedish hacker [Tim Gremalm]. In-person raves aren’t happening right now but that just means there’s time to add waaaaay to many features to this thing until lockdowns become a thing of the past.

The frame holding the lighting integrates into this backpack and we assume that’s where the battery is stored. The Y-shaped masts hold four PAR lights. Incidentally, that mean parabolic aluminized reflectors, which are commonly used for stage lighting, but in this case the halogen bulbs have been torn out for a trio of 4 W RGBW LEDs. The yellow rectangles are 10 W Chip-on-Board LED panels that serve as strobe lights.

But merely having the lights does not make it a Rave — this party needs both music and a way to synchronize the lighting effects with it. The music part was already built and used at the West Pride Gothenburg festival (the second largest in Sweden after Stockholm) five years ago. That project, called Festmaskinen, works in conjunction with Ljusmaskinen (the Light Machine). So two people carry the rave on their backs, one with music, the other with the lighting, now that’s a party!

The light controller board uses a set of four Arduino Nano boards along with four voltage regulators to provide control to each of the PAR lights. All of it is stitched together by control from a DMX input board which also controls the COBs. (In this image the DMX board is hidden below the light control board.) Of course you need something that can process the audio and turn it into DMX512 to bring those lighting animations to life and for that he reached for a Raspberry Pi.

[Tim] has a quick demo of the rig at work which we’ve embedded below. What we’re missing is seeing how the top-heavy structure handles when worn as a backpack. Hopefully he’ll be able to get out of his low-ceilinged home and let the stage lights fly before too long!

Touch Screen Reflow Oven Pulls Out All The Stops

We’ve seen plenty of simple reflow ovens, and there’s an excellent chance that some of the people reading these words have even thrown their own together. A minimal example isn’t much more than a old toaster oven, a Solid State Relay (SSR), a thermocouple, and a microcontroller to get them all talking. But if you’re like [Mangy_Dog] and willing to put in a bit more effort, the final result can be a capable piece of equipment that will be the envy of the hackerspace.

This build started as most do, with a search for a used toaster oven. But in the end he actually found a German model cheap enough that he could buy it new without going over budget for the project. Though he soon found out why: when it arrived, the so-called “pizza oven” was far smaller than he’d imagined. Luckily, it ended up being the perfect size for PCBs.

Unfortunately, the heating elements weren’t quite where he wanted them. Even after wrapping the heating chamber with ceramic insulation, a feature that was likely left off the original oven to cut costs, he says the temperature would only rise about 1 degree per second. So he added an additional halogen heating element at the top of the oven which pushed that rate up to 6 degrees per second.

Control is provided by an Arduino Pro Mini and a touch screen display with some very slick graphics. There’s the expected thermocouple to detect the current temperature, but while the earlier versions of the electronics used the aforementioned SSR to control the heating elements, [Mangy_Dog] eventually replaced it with a dimmer module rated for 4000 watts. After coming up with a circuit that allowed him to control the dimmer with the Arduino, this module gave for much finer control over the chamber temperature. Plus it apparently kept all the lights in his house from flickering when the elements kicked in at 100%, which was a nice bonus.

This isn’t the first time we’ve seen somebody shoehorn an LCD into an off-the-shelf toaster oven, but it’s certainly one of the most polished examples to ever come our way. When even commercially available units need some hacking to reach feature parity with DIY versions, building your own reflow oven still seems like the way to go in 2020.

Continue reading “Touch Screen Reflow Oven Pulls Out All The Stops”

A Lowly 8-Bit Micro Busts Copy Protection From The 16-Bit Era

When floppy disks were the data storage medium of choice, software companies and in particular game developers came up with ever more inventive ways to make them difficult to copy. Tinkering at the edges of the disc format standards didn’t come cheap though, and for example the Dungeon Master game for the Atari ST was reported as using $40,000 worth of custom hardware to achieve its so-called “fuzzy bit” technique. [Chris Evans] set out to recreate it, not by building a modern version of the custom hardware, but by doing it the hard way, with an early-1980s 8-bit BBC Micro home computer.

One could be forgiven for thinking that a computer sporting a 2 MHz 6502 would be unable to manage this task without extra hardware, and were it simply the 6502 itself you would of course be right. So to get anywhere he had to get creative with the Beeb’s built-in peripherals. Eschewing the floppy controller it was hooked up directly to the parallel port, and after a voltage problem courtesy of the drive’s termination resistors we’re taken through some of the 6522 VIA’s different modes in order to achieve a higher speed data burst than would normally be possible. All of these approaches hit the buffers though, until he looks at the 6845 video chip and uses its video output as a very fast shift register. With a custom cable and some work on special video modes, a home computer that would have cost several hundred dollars in the early 1980s can do the work of $40,000 custom hardware from later in the decade. Colour us impressed!

If you’d like to know more about the Dungeon Master copy protection, we’ve been there in the past.

BBC Micro header image: StuartBrady / Public domain.

Hyundai Makes Push Towards Fuel Cell Trucking

Hyundai has begun shipping fuel-cell based heavy duty trucks to face off against battery-electric trucks in the commercial hauling market.

Battery electric vehicles, more commonly known as electric cars, have finally begun to take on the world in real numbers. However, they’re not the only game in town when it comes to green transportation. Fuel cells that use tanks of hydrogen to generate electricity with H2O as the main byproduct have long promised to take the pollution out of getting around, without the frustrating charge times. Thus far though, they’ve failed to make a major impact. Hyundai still think there’s value in the idea, however, and have developed their XCIENT Fuel Cell truck to further the cause. Continue reading “Hyundai Makes Push Towards Fuel Cell Trucking”

FreeCAD Vs SolveSpace

When you are ready to design real things, you’ll find simple CAD programs can be pretty limiting. Serious modern designs tend to use parametric modeling where you don’t necessarily set dimensions and positions of everything but instead constrain the design by describing the relationship between different elements. For example, you can create a vertical line and constrain other lines to be parallel, perpendicular, or form a given angle with that line. There are many tools that can do that, including FreeCAD and SolveSpace, two programs that [Joko Engineeringhelp] uses to create a complex compressor blade and it really shows the differences and similarities between the two tools.

You probably don’t need this particular design, but watching over someone’s shoulder while they do a complex design can be very valuable. Being able to see the differences between the two tools might convince you to learn one or the other or maybe even switch.

Continue reading “FreeCAD Vs SolveSpace”