A set of helping hands is a nice tool to have around the shop, especially if soldering or gluing small components is a common task. What we all really want, though, is a robotic arm. Sure, it could help us set up glue or solder but it can do virtually any other task it is assigned as well. A general-purpose tool like this might be out of reach of most of us, unless we have a 3D printer to make this open-source robotic arm at home.
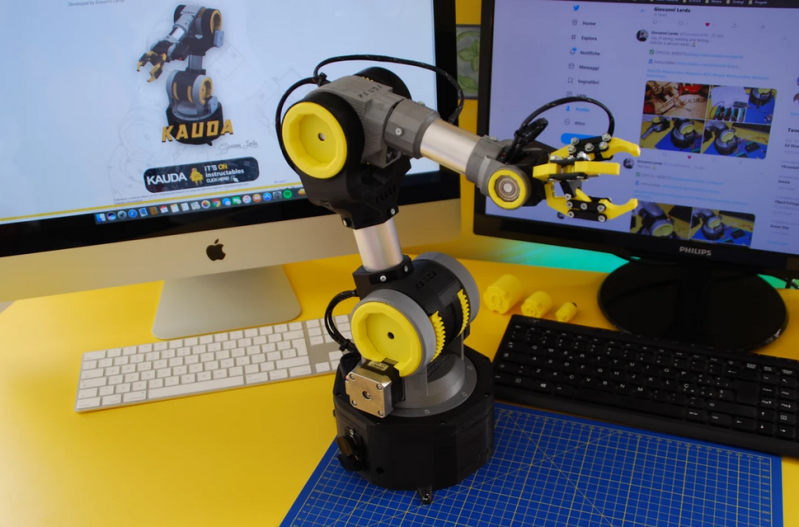
The KAUDA Robotic Arm from [Giovanni Lerda] is a five-axis arm with a gripping tool and has a completely open-source set of schematics so it can be printed on any 3D printer. The robot arm uses three stepper motors and two servo motors, and is based on the Arduino MEGA 2560 for control. The electrical schematics are also open-source, so getting this one up and running is just an issue of printing, wiring, and implementing some software. To that end there are software examples available, and they can easily be modified to fit one’s robotic needs.
A project like this could be helpful for any number of other projects, or also just as a lesson in robotics for yourself or even in a classroom, since many schools now have their own 3D printers. With everything being open-source, this is a much simpler endeavor now than other projects we’ve seen that attempted to get robotic arms running again.


This video is a bit more worthwhile than the one in the article
https://www.youtube.com/watch?v=Lrvtf4m6fgc&feature=youtu.be
The first video (the one embedded above) is mostly pointless, since it doesn’t show the arm moving. The second one from the website actually shows the arm itself moving.
I’m a bit concerned with how the “fore-arm” is just attached to the servo motor output shaft. Seems like you’d want some kind of open joint to physically attach the fore-arm, leaving the servo shaft to just control the rotation. You could arrange 3-4 bearings/rollers, attached via the inner race to the “upper-arm” and arranged around a U-profile band around the fore-arm (or vice-versa).
Oh, and also the gripper needs some kind of sensing mechanism or endstops, at least.
Thinking about the fore-arm mounting some more: You could also just use a single large-diameter bearing, each race mounted appropriately to the opposing arm parts. With either kind of arrangement, it becomes important to adjust the servo mounting to make sure its output shaft is coaxial to the bearing axis.
It’s “completely open source” so why don’t you just make your contribution instea …
Oh wait, its a just bunch of STL files.
Well, scad files or whatever project file it was originally saved in would certainly be better, but STLs are easy enough to modify.
I wish consumer goods all came with STLs. Hell, I wish my raspberry pi and arduino came with STLs. That would be a big step up from nothing.
I wish your comments came as STLs.
Done and done.
https://pastebin.pl/view/c5ed2448
Aww, I can’t paste a pastebin here? I went through all the trouble of making an STL of my comment!
Dougs STL post was glorious… I downloaded and opened it, even considered printing it.
Doug, that was awesome! But next time, add some line feeds so it fits on my print bed.
@Doug
https://www.youtube.com/watch?v=gXBJRz_33Y8
and if they’d provided .sldprt all the fusion360 people would be upset, and if they’d provided .f3d files all the freecad people would be upset…
STL is the lingua franca of the hacker movement.
This has been discussed to the bits here before. There are some formats that can be opened or converted by many CAD applications, like Step and IGES. Grabcad is a wonderful online source for finding decent 3d models.
^ +9001
fusion loads sldprts;)
i wish stl wasn’t as popular, since its just a soup and no scale, no colour, texture or any other cad info, no breps, surfaces, assemblies .
So? Still better than the current situation of only STLs. I can download a new CAD program, I can’t make STL files parametric.
Ah, the glorious days when a robot arm was the pinnacle of geek on a kid’s desktop, a QuickShot SVI-2000 next to the CPC464 that could barely cough up Elite’s wireframe 3D. It didn’t matter, I was in space, and my robot friend was with me.
What you can actually, practically *do* with a desktop-size robot arm beyond the novelty of moving it around and pick up and drop pencil erasers, to this day I still have no idea.
Really depends on the end effectors and what you want to do. I would really like one with the little vacuum pump to run around on rails over my electronic bits box and then place the right part on the board.. Could even do the solder paste dispensing though a little needle. And if you have one that has proper PCB clamp hand it can hold the PCB at the best angle for you to do that part with the iron etc..
Really depends on the capacity of the arm as to what you can do with it, at the very least set it up with an openCV camera and it can sort your LEGO in a stylish fashion! Most of the arms I’ve seen are rather limited one way or another and in many ways its impractical to use a robot arm – at least compared to dedicated tools.. But that is also the neat bit about them greater versatility.
Though if you are taking it with you in the wonderful world of Elite its obvious what it does! Pokes the joystick around! Its your ‘auto’ pilot! Or more likely reaches to the coffee/tea machine that inevitably is behind your back and brings you that essential sustenance. Though I think again it wants to be on a rail to traverse greater space than its arm span..
It’s pretty, sure, but the software is where I usually lose the thread on these things. The designer puts up some Arduino sketches showing the arm wave back at you in a video, but rarely is there any model for a motion control system like ROS. I’ve got a box of arm parts printed but I keep losing steam when I get into the software portion, so I totally get why they stop there.
I remember a class in college that taught the math involved for a robot arms movements. It wasn’t pretty. A lot of matrix multiplications. Don’t remember a thing now
This has given me an idea. I am currently playing with ideas for adding additional axes to my ShopBot, to let me carve any side and orientation of something. The usual solution beyond XYZ is some combination of rotary axes, or mounting the cutter on a robotic arm (which has issues with stiffness, since it must move freely through all axes). But what if you had a really strong robotic arm that could withstand the cutting forces against something it held without moving, and had fingers that would allow it to reorient what it was holding into any position? Then, use ordinary XYZ movement of the cutter. The programming effort would probably be stunning, but just imagine the flexibility!
nott o advocate for the devil but a project/ diy machine following the usual “constraints” like not allowing feature creep to anchor you in beta (non functional), onlyt having so much time to program such an incredibly strong arm to eliiminate any Undefined behaviour not to mention the insurmountable task of ensuring such an arm exhibited fail safe failure modes only. The addition of a rotary axis or two just works and isnt anywhere near the gargantuan task of motion flow control programming and everything that comes along with any type of articulating machinery