
Performing over-the-air updates of devices in the field can be a tricky business. Reliability and recovery is of course key, but even getting the right bits to the right storage sectors can be a challenge. Recently I’ve been working on a project which called for the design of a new pathway to update some small microcontrollers which were decidedly inconvenient.
There are many pieces to a project like this; a bootloader to perform the actual updating, a robust communication protocol, recovery pathways, a file transfer mechanism, and more. What made these micros particularly inconvenient was that they weren’t network-connected themselves, but required a hop through another intermediate controller, which itself was also not connected to the network. Predictably, the otherwise simple “file transfer” step quickly ballooned out into a complex onion of tasks to complete before the rest of the project could continue. As they say, it’s micros all the way down.
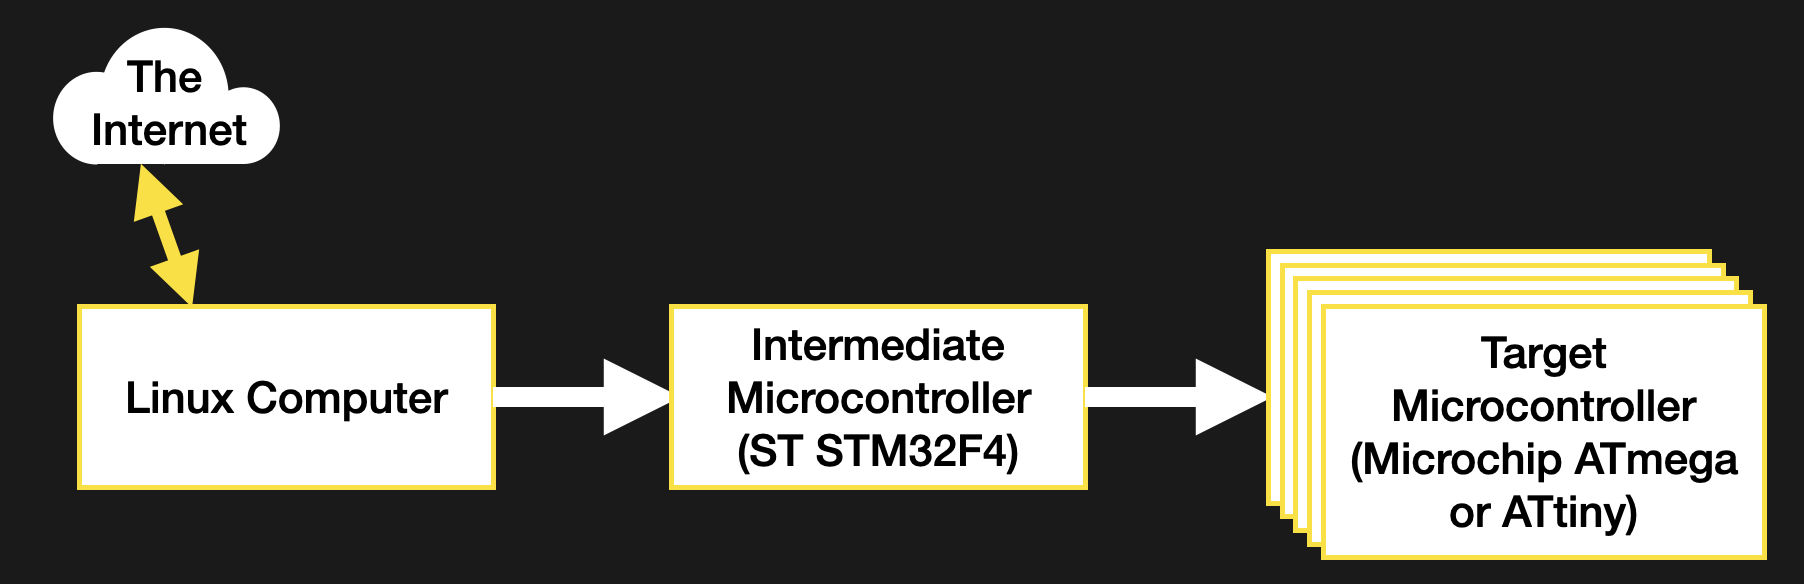
The system in question isn’t particularly exotic. The relevant portion is composed of a network connected Linux computer wired to a large microcontroller, wired to a variety of smaller controllers to manage various tasks. I needed to be able to update this fan-out of smaller controllers. To save complexity I decided I would have the intermediate microcontroller responsible for the update process of its children. But this presented a new problem; how do we get the firmware images into the intermediate controller?
The micro in questions is fairly powerful, with a hefty dollop of external flash (formatted with littleFS, naturally) but getting the files into that flash would force me to develop a filesystem interface for the Linux computer. Not an issue, but a large piece of work and a significant diversion from the task at hand: bootloading those darn controllers! Then someone suggested an excellent way to simplify the process down to nearly nothing; what if I bundled the target firmware images with the firmware for the intermediate controller itself? Then flashing the intermediate would also transfer the payload firmwares for free! Definitely an expeditious strategy, but how to do it? This turned out to be a more interesting problem what I had anticipated. Let’s see how to get the images into the firmware.
Options for Images
I explored four methods for performing the firmware image bundling: compiling the payload firmware as a header, linking it in as an object file or modifying the compiled output to inject it, and directly editing the final binary. Among other differences, each of these strategies lends itself to usage at different points in the development process. Linking makes sense only when compiling the firmware, linker tricks work just after compilation, and binary editing can happen at any point after the binary is completed.
As this was a component of a larger stability-focused project, tracking the exact version of each separate firmware image was extremely important for bug-hunting and traceability. Ideally, each image would be somewhat decoupled, so they can be individually changed without recompiling everything. Adding further complexity to the problem was a need for three images — each controller runs a separate application — and two toolchains, as the intermediate and target microcontrollers were of different architectures. Though one of the four options was the best fit for my needs, all four are worth discussing.
The Classic: A Header File
There’s no trick to this method, it’s exactly as simple as it seems. You use a tool to effectively “print” the payload binary as a series of individual byte constants, then dump them into a source file as an array and compile away. Access is a snap, it’s just an array of fixed size! You can even use a sizeof() to figure out how much data is available.
There are a bunch of tools which facilitate this workflow, the most surprising being that paragon of utilities GIMP, which can export to C source directly. A more CLI friendly option (and one which will come up again) is xxd. xxd is nominally used for converting between raw binary and a variety of hex file formats, but can also be configured to export a C source file directly with the -i flag. The output should look pretty familiar if you’ve seen a constant C array before:
borgel$ xxd -i somefile.bin
unsigned char somefile_bin[] = {
0x22, 0x22, 0x22, 0x47, 0x75, 0x69, 0x64, 0x65, 0x20, 0x74, 0x68, 0x65,
...
0x69, 0x6f, 0x6e, 0x22, 0x5d, 0x0a, 0x29, 0x0a
};
unsigned int somefile_bin_len = 10568;
Pretty handy, right? Direct that output to a source file and compile away. Unfortunately this wasn’t a good fit my my application. I couldn’t guarantee that the payload firmware would always be available at compile time, and even if it was it would be somewhat more difficult to trace the exact version it had been built from without reading it from the final binary itself or creating a separate version file. So a C header was out.
Slick Linker Magic
For a compiled programming language like C, the compiler probably produces intermediate object files. You’ve seen them as the .o‘s hanging around in your directory tree. These contain compiled segments of the program in question, as well as metadata about where that code will eventually land in the final executable along with other information used by a linker or debugger. Well, it turns out that anything can be turned into an object file by wrapping it in the right bytes, including another binary.
With gcc and gcc-compatible tools this object file wrapping can be done with ld (the linker) itself with the -r and -b flags. -r asks ld to produce an object file as its output, and -b lets us tell it the input format (in this case binary). Note on some platforms -b seems to be deprecated and may not be necessary. The full command looks something like this:
borgel$ ld -r -b binary somefile.bin -o somefile.o
That’s essentially it. This somefile.o can be linked in with the rest of the object files to comprise a complete program.
Using the embedded binary with the running executable is more complex than reading a constant array, but only just. The linker automatically adds some magic symbols to the object file describing the start address, end address, and size of the payload (in this case a binary). On the development machine these can be verified in a few ways, the most ergonomic being nm (for listing symbols in an object file) and objdump (the object file dumper) – both part of a normal GNU binutils install. Each is very powerful but let’s use objdump as our sample:
borgel$ objdump -x somefile.o

somefile.o: file format ELF32-arm-little

Sections:
Idx Name Size Address Type
0 00000000 0000000000000000
1 .data 00002948 0000000000000000 DATA
2 .symtab 00000050 0000000000000000
3 .strtab 0000004f 0000000000000000
4 .shstrtab 00000021 0000000000000000

SYMBOL TABLE:
00000000 *UND* 00000000
00000000 l d .data 00000000 .data
00000000 .data 00000000 _binary_somefile_bin_start
00002948 .data 00000000 _binary_somefile_bin_end
00002948 *ABS* 00000000 _binary_somefile_bin_size
We’re not really interested in most of this, though it’s interesting to poke around at compiled binaries to see what they contain (for that, also try the strings tool). For our purposes we want the three __binary_somefile_bin_* symbols. Note their absence in the ld one-liner above, they are automatically named and placed by the linker. The column of numbers on the left of the SYMBOL TABLE section are the offsets in the object file where each symbol is located, in hex. We can get the size of our binary (in this case with a simple ls)
borgel$ ls -l somefile.bin somefile.bin
-rw-r--r--@ 1 borgel staff 10568 Aug 15 14:22 somefile.bin
to see that the symbols _binary_somefile_bin_size and _binary_somefile_bin_end are correctly placed after a block the same size as our input file (10568 = 0x2948). To access these symbols in C, we add them as extern to any file that needs them, like so:
extern const char _binary_somefile_bin_start;
extern const char _binary_somefile_bin_end;
extern const int _binary_somefile_bin_size;
Then they can be referenced in code like any variable. Remember they’re intended as pointers to the data on disk. That is, their address is meaningful, and the data stored at that location is the data on disk at that address.
This method works great, and feels better encapsulated than directly converting everything to a source file. But it suffers from similar problems to the previous approach; that tracking the provenance of the resulting binary can be complex without embedding additional symbols.
In my case, the bigger problem was that in order to work with the object files you must have tooling that supports that particular processor architecture. Not a problem when bundling software for a desktop, but in my case it meant I needed a copy of the arm-none-eabi-gcc tooling on hand at a point in the build process where it wasn’t already present. This was possible to fix, but there were better options.
But Wait, There’s More?
Did we just cover all of the possible ways to build a binary? Hardly! But these two options are both best suited for compile time and cover the most common needs for embedding binaries. Where are you most likely to encounter them in these pages? Probably when embedding images in microcontroller firmware. Compiling a bitmap down to a header is perhaps the easiest way to go from an image on a desktop to a display attached to a micro.
If all this talk of object files is getting you thinking of more ways to explore the compiler’s leavings, check out [Sven Gregori]’s excellent post on creating plugin systems with shared libraries; a closely related topic. And if the thought of working with binaries is filling your mind with possibilities, [Al Williams] has your number as he works through the process of creating binary files using xxd and other common Linux tools.


Had a similar problem in the late 80s. The need was to update software in remote units that weren’t always physically accessible, e.g. on a mountain in the winter or middle of a swamp. Communications was over a satellite channel.
The system as an STD bus x86 processor. The running code was in RAM. The EPROM based firmware would verify a checksum in the RAM. If invalid it would go into a mode where the watchdog periodically restarted the system. On restart the system would send a message requesting a software download. The firmware wrote it into RAM. Of course if power failed a new download was required. Downloads were fast enough that it wasn’t an issue. The monitored equipment would also go down with the power and took a bit to restart, also.
Yuck. Presumably there is a command/data path between Linux and the STM. So have a ‘create image’ command, a ‘here are some bytes to add to the image’ command and a ‘erase image’ command. Easy to implement, and no messing about updating firmware on multiple processors.
If you have a system that has a number of processors communicating to each other and the protocol is still in flux, it’s not a bad idea to have all the versions welded together into one release blob. Really cuts down on the possible permutations when debugging….
Since the Linux box and the STM32 microcontroller are in communication with each other — presumably by either a USB “COMport”-style (emulated RS-232) connection, or an *actual* RS-232 connection, if the Linux box is old enough or its hardware hails from certain segments of the computing market where such ports are still common on systems (industrial control systems for stuff too sophisticated/etc to be run from a PLC, as well as thin clients — which BTW are cheaply available secondhand from everyone’s favorite eternal flea market — don’t buy brand new ones, they’re waaay too expensive)…
There’s a *much* easier way to do this, presuming the STM32 has the ability to initiate a firmware upgrade, on command, of the flotilla of ATwhatever chips downstream (I bet they’re Arduinos!)… since the article specifies a relatively large storage-memory space (what on a tablet or thin client would typically be called ROM, serving the equivalent function of a PC’s hard drive or SSD)… you’d need to modify the code on the STM32, but only once, so that’s worth it to flash a MicroSD card or use a programmer or whatever (depending on the resident board’s capabilities) to do that. All you need to do is give it the ability to respond from an external connection — again, actual RS-232 cable and connection or a USB cable with an FTDI or CH34x type chip at the STM32 end emulating an RS-232 connection — to a command to update the downstream device firmware. This is fairly simple, here’s some pseudocode… each > indicates a tab ;) and this assumes a mix of different chip types.
On external command input
> ack to the user that it’s gone into ‘downstream firmware update mode’ and provide a command option to cancel
> begin upload loop
>> prompt for a filecopy operation, the user should indicate a binary file containing the proper firmware image
>> on file-select confirmation, host PC streams out file over the “TTY” type connection
>> perform CRC check on received file
>>> if check passes, continue loop
>>> if check fails, auto-retry file transfer op 5x (can change this number easily, of course) before halting upgrade program with ‘fatal error, process aborted’ type user notification
>> prompt user to confirm whether or not there are additional firmware uploads (Y/N)
>>> if yes, repeat loop from start
>>> if no, exit loop
>>> if unintelligible input, auto-retry prompt 5x (or whatever) with ‘sorry, please try again’ type error message before halting upgrade program with ‘fatal error, process aborted’ type user notification
>> end loop
> begin firmware-update loop
>> for each connected downstream microcontroller, query unit for primary processor chip-type, waking unit from sleep if necessary
>> find file with designated matching uC chip type indicated within (header, filename, etc — there are a number of ways to do this), load into a buffer somewhere
>> if no firmware-update file is locally resident for the chip type in question, skip it and repeat loop from start, beginning with the next microcontroller that has not receive an update
>> reset relevant microcontroller board into DFU mode or equivalent
>> stream buffered upgrade file to downstream microcontroller
>> confirm file received correctly
>>> if file was received correctly, trigger firmware upgrade process
>>> if file was received incorrectly, reset in DFU/equiv mode aga in and retry firmware stream automatically 5x (or as set otherwise) before powering down uC and going to the next board (repeat loop from start)
>>> if confirmation request times out, auto-retry request 5x before powering down uC
>> confirm with microcontroller unit that the firmware update was successful
>>> if successful, continue loop
>>> if unsuccessful, or confirmation request times out, power down uC for manual intervention, notify user that such action is necessary, and halt upgrade program
>> determine if there are additional un-updaded microcontrollers
>>> if additional microcontrollers exist in un-updated form, repeat loop from start
>>> if all microcontrollers connected to the STM32 have received firmware updates, exit loop
>> end loop
> report to user the total number of microcontrollers, the types of chips onboard, and indicate for each one its status (upgrade successful, upgrade failed and how (firmware stream failed excessively, conf request timed out, etc), or skipped because matching file not found.
Doesn’t sound hard to me…
…but, then, I’m not a programmer!
You’re right, passing the image through the intermediate micro would have been much easier! In this case I wanted to make sure that if the Linux computer wasn’t operational the rest of the system would be able to maintain itself.
As long as you have some sort of way to access the intermediate micro, that criterion is fulfilled by what I described… you just need, in those cases, to modify the design I laid out such that, instead of providing new firmware from an upstream device, there’s (eg) a button somewhere that can read in the code/etc from eg an SD card.
Apologies for the (very) late reply, I never tick the “Notify” boxes any more because they don’t understand comment threads. I desperately wish I was able to have a “Notify me of new comments exclusively to this comment thread via email” independent of other comments or posts, but I’ve not been provided that.
SRecord (srecord.sourceforge.net) is another great toolkit for this sort of manipulation of binary files.
It talks a huge number of file formats and the documentation is great.
A few of the many things we use it for:
– Generating and inserting data about the data (CRCs, image sizes etc)
– Building production line firmware images (combining a bootloader, application and other binary data)
– Inserting serial numbers and manufacturing dates at time of programming
I would be more inclined to use a laptop or tablet for the “intermediate microcontroller”.
For working at the bench I despise boot loaders. First, they’re generally less reliable then direct connection to a programmer, and often you have to do some kind of trick to get the thing into boot loader mode, such as holding an extra button during reset.
For normal development I usually have an IDE or makefile set upto talk to a programmer directly, so you just hit [F9] on your keyboard, the stuff gets compiled and flashed into the chip. No need to even take your hands of the keyboard.
For field updates, Mike from Mike’s Electric Stuff has the right answer:
Add extra storage to your target device. uSD, serial flash chip, lot’s of RAM or whatever, and then download the new firmare image into that, verirfy it’s OK, or reject it, and if OK, let the thing proceed with re-programming itself.
Arduino has it all figured out well enough that I prefer it over any other embedded dev environment, with the one exception that the actual code editor still seriously sucks, and not having debugging also sucks.
I’m surprised noone talks about encryption or signing to prevent adversaries from manipulating with firmware. This will be a big issue when products are sold to end users and incorporate some kind of ‘safety’ feature. This is not limited to Tesla cars and medial equipment but could also apply to equipment that can break when peripherals are incorrectly driven or safeties overridden. (e.g. a fridge or microwave). This of course goes against the spirit of hacking but its nonetheless a necessity for most companies, especially if they can be held liable.
@Kerry Scharfglass –
Wow! Whiplash! “There are four methods to do this… method 1, 2.” :: screech :: :: crash :: End of article?!?! Really?!?! What happened to the text for the two most interesting methods (3 & 4)?
Nice to know about xxd. I didn’t know it existed. I wrote a similar tool simply because writing it was quicker than fumbling through g00gle hash. But it looks like xxd does more so I’ll have to give it a whirl. That certainly is an interesting use of “ld” I didn’t know about. I really need to delve into the details of most of the GNU compiler and bintools suites. But their docs are really bad!
Is there a part 2 coming?
Haha, good catch. There miiiight be.
xxd is pretty cool! Turns out to be a very convenient little tool.