Comprehensive Power Management For The Raspberry Pi

The Raspberry Pi has been a revolutionary computer in the maker space, providing a full Linux environment, GUI, and tons of GPIO and other interfacing protocols at a considerably low price. This wasn’t its original intended goal, though. Back in the early 2010s it was supposed to be an educational tool for students first, not necessarily a go-to for every electronics project imaginable. As such there are a few issues with the platform when being used this way, and [Vin] addresses his problems with its power management in his latest project.

[Vin]’s main issue is that, unlike a microcontroller, the Raspberry Pi doesn’t have a deep sleep function. That means that even when the operating system is shut down the computer is still drawing an appreciable amount of current, which will quickly drain some batteries. We’ve covered [Vin]’s farm and his use case for the Raspberry Pi in the past, but a quick summary is that these boards are being used in a very rugged environment where utility power isn’t as reliable as he would like.

In [Vin]’s post he not only outlines his design for the board but goes through his design process, starting by using discrete logic components and then trying out various microcontrollers until settling on an ATmega88. The microcontroller communicates with the Raspberry Pi over I2C where the Pi can request a power-down as well as a time for future power-on. A latching relay controlled by the microcontroller ensures the Pi doesn’t drain any battery while the ATmega can put itself into actual sleep in the meantime.

The build for this project goes into an impressive amount of detail, and not only are the designs and code available on the project’s GitHub page but [Vin] also wrote another blog post which uses this project to go over his design philosophy more broadly.

Arduino Measures Remaining Battery Power With Zero Components, No I/O Pin

[Trent M. Wyatt]’s CPUVolt library provides a fast way to measure voltage using no external components, and no I/O pin. It only applies to certain microcontrollers, but he provides example Arduino code showing how handy this can be for battery-powered projects.

The usual way to measure VCC is simple, but has shortcomings.

The classical way to measure a system’s voltage is to connect one of your MCU’s ADC pins to a voltage divider made from a couple resistors. A simple calculation yields a reading of the system’s voltage, but this approach has two disadvantages: one is that it constantly consumes power, and the other is that it ties up a pin that you might want to use for something else.

There are ways to mitigate these issues, but it would be best to avoid them entirely. Microchip application note 2447 describes a method of doing exactly that, and that’s precisely what [Trent]’s Arduino library implements.

What happens in this method is one selects Vbg (a fixed internal voltage reference that is temperature-independent) as Vin, and selects Vcc as the ADC’s voltage reference. This is essentially backwards from how the ADC is normally used, but it requires no external hookup and is only a bit of calculation away from determining Vcc in millivolts. There is some non-linearity in the results, but for the purposes of measuring battery power in a system or deciding when to send a “low battery” signal, it’s an attractive solution.

Being an Arduino library, CPUVolt makes this idea very easy to use, but the concept and method is actually something we have seen before. If you’re interested in the low-level details, then check out our earlier coverage which goes into some detail on exactly what is going on, using an ATtiny84.

A Mega-Tiny Arduino

Integrated circuits, chipsets, memory modules, and all kinds of other transistor-based technology continues to get smaller, cheaper, and more energy efficient as time moves on. Not only are the components themselves smaller, but their supporting infrastructure is as well. Computers like the Raspberry Pi are about the size of a credit card and have computing power on the order of full-sized PCs from a few decades ago. The Arduino is no exception to this trend, either, and this new dev board called the Epi 32U4 might be the smallest ATmega platform we’ve seen so far.

As the name suggests, the board is based around the ATmega32U4 which is somewhat unique among Atmel chips in that it includes support for USB within the chip itself rather than relying on external translating circuitry. This makes it an excellent choice for any project which involves sending keyboard, mouse, or other peripheral information to a computer. This goes a few steps further with eliminating “bloat” compared to other boards, too — there’s no on-board voltage regulator, and just a single LEDs on pin 13.

One of the other features this board boasts over other small form factor boards is on-board USB-C, which is definitely a perk as more and more devices switch away from the various forms of older USB-type plugs. The project’s specifications are also available on this GitHub page for anyone that wants to produce their own. And, if you don’t have a 32U4 on hand and still want to build a keyboard project, it’s possible to get some other Arduinos to support these features but it’ll take a little more work.

Thanks to [Rasmus L] for the tip!

Fail Of The Week: Epic 312 Weeks Of Fixing A Broken Project

If a hacker guardian angel exists, then we’re sure he or she was definitely AWOL for six long years from [Aaron Eiche]’s life as he worked on perfecting and making his Christmas Countdown clock. [Aaron] started this binary clock project in 2016, and only managed to make it work as expected in 2022 after a string of failures.

In case you’d like to check out his completed project first, then cut the chase and head over to his Github repository for his final, working version. The hardware is pretty straightforward, and not different from many similar projects that we’ve seen before. A microcontroller drives a set of LED’s to show the time remaining until Christmas Day in binary format. The LEDs show the number of days, hours, minutes and seconds until Christmas and it uses two buttons for adjustments and modes. An RTC section wasn’t included in the first version, but it appeared and disappeared along the six year journey, before finding a spot in the final version.

The value of this project doesn’t lie in the final version, but rather in the lessons other hackers, specially those still in the shallow end of the pool, can learn from [Aaron]’s mistakes. Thankfully, the clock ornament is not very expensive to build, so [Aaron] could persevere in improving it despite his annual facepalm moments.

Continue reading “Fail Of The Week: Epic 312 Weeks Of Fixing A Broken Project”

A handheld game console made from bare PCBs

Minimalist Homebrew Hardware Recreates Arcade Classics

Classic video games might look primitive by today’s standards, but the addictive gameplay of Breakout or Pac-Man remains fun no matter what decade you were born in. Keeping the relevant hardware running becomes harder as the years pile up however, so when [Michal Zalewski] decided to introduce his kids to classic video games, he didn’t dig up his old game consoles. Instead, he decided to recreate several games from scratch using the bare minimum amount of hardware needed.

The first project is a copy of Snake, the arcade classic that millennials will recognize from their Nokia phones. [Michal] made an initial version using an ATmega328P with an 8×8 LED matrix as a display, but quickly upgraded the hardware to a 16×16 display powered by an ATmega644, and added an LED seven-segment display to show the score. All parts are simply soldered onto a piece of prototyping board, with no need for any custom PCBs or enclosures.

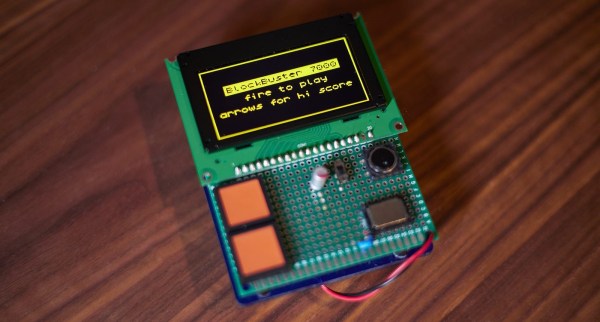
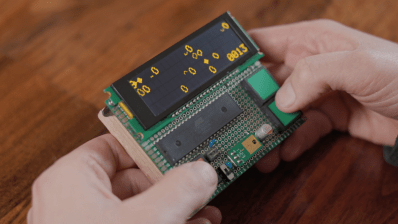
Game #2 is a side-scrolling space shooter called Dino in Space. This game runs on an ATmega1284 and uses a 4×20 character text display, allowing simple graphics as well as an on-screen score counter. Similar hardware, although with a 128×64 graphic OLED screen, powered game #3, a Breakout/Arkanoid clone called Blockbuster 7000.

[Michal]’s blog post is filled with interesting tips for real-life game programming. For example, a true random number generator creates a rather odd-looking bunch of asteroids in space – tweaking the distribution to make it a bit more uniform greatly enhances the game’s playability. Source files for all games are available on [Michal]’s website, and include a description of the exact hardware setup needed for each game.

Recreating Snake on custom hardware is sort of a rite of passage for microcontroller hackers, as you can see inĀ  many impressive projects. Breakout-style games can also be implemented on various hardware platforms, including analog oscilloscopes.

The Inner Machinations Of The Arduino Are An Enigma

Arduinos have been the microcontroller platform of choice for nearly two decades now, essentially abstracting away a lot of the setup and lower-level functions of small microcontrollers in favor of sensible IDEs and ease-of-use. This has opened up affordable microcontrollers to people who might not be willing to spend hours or days buried in datasheets, but it has also obscured some of those useful lower-level functions. But if you want to dig into them, they’re still working underneath everything as [Jim] shows us in this last of a series of posts about interrupts.

For this how-to, [Jim] is decoding linear timecodes (LTCs) at various speeds. This data is usually transmitted as audio, so the response from the microcontroller needs to be quick. To make sure the data is decoded properly, the first thing to set up is edge detection on the incoming signal. Since this is about using interrupts specifically, a single pin on the Arduino is dedicated to triggering an interrupt on these edges. The rest of the project involves setting up an interrupt service routine, detecting the clock signal, and then doing all of the processing necessary to display the received LTC on a small screen.

The project page goes into great detail about all of this, including all of the math that needs to be done to get it set up correctly. As far as general use of interrupts goes, it’s an excellent primer for using the lower-level functionality of these microcontrollers. And, if you’d like to see the other two projects preceding this one they can be found on the first feature about precision and accuracy, and the second feature about bitbanging the protocol itself.

Diagram of the LTC protocol, showing the difference between 1 bits and 0 bits - both transmitted using one up and one down pulse, but with '1' bit pulses being half as short.

Animate Arcane Protocols With Interrupt-Backed Bitbanging

We often take our “SoftwareSerial” libraries for granted, and don’t investigate what goes on under the hood — until they fail us, at least. Would you like to learn how to harness the power of interrupt-driven bitbanging? [Jim Mack] teaches us how to make our protocol implementations fly using the LTC protocol as a springboard.

LTC (Linear/[Longitudinal] TimeCode) is a widely-used and beautifully-crafted protocol that tends to fly under our radar, and is one that hackers could learn plenty from. It’s used for synchronization of audio/video devices during media production and playback. LTC’s signal is almost digital but not quite: it doesn’t need a clock, and it has no polarity. Additionally, it mimics an audio signal really well, you can decode it at any playback speed, and many other benefits and quirks that [Jim] outlines. You do need to maintain the timings, though, and [Jim]’s article shows us how to keep them right while not inconveniencing your primary tasks.

Continue reading “Animate Arcane Protocols With Interrupt-Backed Bitbanging”