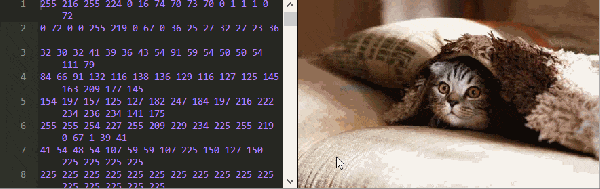
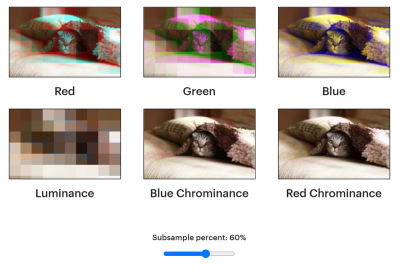
Forgotten Chemical Photography

Much to the chagrin of Eastman Kodak, the world has moved on from chemical photography into the realm of digital, thanks to the ease of use and high quality of modern digital cameras. There are a few photographers here and there still using darkrooms and various chemical processes to develop film, and the most common of these use some type of chemistry based on silver to transfer images to paper. There are plenty of alternatives to silver, though, each with their unique style and benefits, like this rarely-used process that develops film using platinum.

This process, notable for its wide tonal range, delicate highlights, and rich blacks, produces only black and white photographs. But unlike its silver analog, it actually embeds the image into the paper itself rather than holding the image above the paper. This means that photographs developed in this manner are much more resilient and can last for much longer. There are some downsides to this method though, namely that it requires a large format camera and the negatives can’t be modified to produce various sized images in the same ways that other methods allow for. Still, the results of the method are striking for anyone who has seen one of these images in person.

As to why this method isn’t more common, [Matt Locke] describes a somewhat complicated history involving the use of platinum to create commercial fertilizers, which is an identical process to that of the creation of explosives, which were needed in great numbers at the same time this photographic method was gaining in popularity. While the amount of research and development that goes into creating weapons arguably generates some ancillary benefit for society, the effects of war can also serve to divert resources away from things like this.

New Drivers For Ancient Webcam

For those of us who are a little older, the 90s seem like they were just a few years ago. The younger folks might think that the 90s were ancient history though, and they might be right as we’ve been hearing more bands like Pearl Jam and The Offspring playing on the classic rock stations lately. Another example of how long ago the 90s were is taking a look at the technological progress that has happened since then through the lens of things like this webcam from 1999, presuming you load up this custom user space driver from [benjojo].

Thankfully the driver for this infamous webcam didn’t need to be built completely from scratch. There’s a legacy driver available for Windows XP which showed that the camera still physically worked, and there’s also a driver for Linux which was used as a foundation to start working from. From there a USB interface was set up which allowed communication to the device. Not a simple task, but apparently much easier than the next steps which involve actually interpreting the information coming from the webcam. This is where a background in digital signal processing is handy to have. First, the resolution and packet size were sorted out which led to a somewhat recognizable image. From there a single monochrome image was pieced together, and then after deconstructing a Bayer filter and adding color, the webcam is back to its former 90s glory.

[benjojo] has hosted all of the code for this project on a GitHub page for anyone who still has one of these webcams sitting around in the junk drawer. The resolution and color fidelity are about what we’d expect for a 25-year-old device that predates Skype, Facebook, Wikipedia, and Firefox. And, while there are still some things that need to be tweaked such as the colors, white balance, and exposure, once that is sorted out the 90s and early 00s nostalgia is free to flood in.

Parametric Press Unravels The JPEG Format

This is the first we’ve heard of Parametric Press — a digital magazine with some deep dives into a variety of subjects (such as particle physics, “big data” and such) that have interactive elements or simulations of various types embedded within each story.

The first one that sprung up in our news feed is a piece by [Omar Shehata] on the humble JPEG image format. In it, he explains the how and why of the JPEG encoding process, allowing the reader to play with the various concepts along the way, in real time, within the browser.

RGB colour-space subsampling doesn’t affect each component to the same degree due to the human eye cone cell response. Also, the chroma components are much less affected than the luminance.

For those not familiar with the format, the first step (which is actually optional) to JPEG encoding is to transform the image from the RGB color space, into a YCbCr (luminance, chrominance) color space. Since the human eye is far more sensitive to luminance (brightness) differences than it is to Cb (chroma relative blueness) and Cr (chroma relative redness) differences, these latter two components can be subsampled by only storing a single value for each, in every 2×2 pixel matrix. JPEG allows other matrix sizes, but 2×2 is the most common.

This sets the scene for the clever bit, that comes next and allows more of that harder-to-perceive chroma information to be discarded. It’s fun to play with the chroma sub-sampling slider and see how the different colours are not equally affected, due to the relative sensitivities of the human eye cone cells.

Next, the three YCbCr components are treated independently to a discrete cosine transform and quantization. This transforms each 8×8 pixel block into 64 discrete spatial frequencies. The JPEG compression level (which you can change) affects how many of the upper-frequency components get discarded, and thus how much of the fine spatial detail gets discarded. This is the main source of JPEG image quality loss. Finally, the compressed blocks are delta encoded, where each subsequent block is coded as the difference from the previous one. Like chroma subsampling, this doesn’t offer any compression on its own but allows the subsequent run-length encoding to be more effective, giving more (lossless) compression. Finally, the whole lot is then Huffman compressed with a unique table stored in the JPEG header. So want to play with JPEGs some more? here’s the GitHub source.

If all of this theoretical stuff is a bit useless to you, perhaps you just want to decode some JPEGs, then here is a speedy library for just that.

Photography, The Stereo Way

Most consumer-grade audio equipment has been in stereo since at least the 1960s, allowing the listener to experience sounds with a three-dimensional perspective as if they were present when the sound was originally made. Stereo photography has lagged a little behind the stereo audio trend, though, with most of the technology existing as passing fads or requiring clumsy hardware to experience fully. Not so with the DIY stereoscopic cameras like this one produced by this group of 3D photography enthusiasts, who have also some methods to view the photos in 3D without any extra hardware.

The camera uses two imaging sensors to produce a stereo image. One sensor is fixed, and the other is on a slider which allows the user to adjust the “amount” of 3D effect needed for any particular photo. [Jim] is using this camera mostly for macro photography, which means that he only needs a few millimeters of separation between the two sensors to achieve the desired effect, but for more distant objects more separation can be used. The camera uses dual Raspberry Pi processors, a lithium battery, and a touch screen interface. It includes a ton of features as well including things like focus stacking, but to get a more full experience of this build we’d highly recommend checking out the video after the break.

As for viewing the photographs, these stereoscopic 3D images require nothing more than a little practice to view them. This guide is available with some simple examples to get started, and while it does at first feel like a Magic Eye puzzle from the late 90s, it quickly becomes intuitive. Another guide has some more intricate 3D maps at the end to practice on as well. This is quite the step up from needing to use special glasses or a wearable 3D viewer of some sort. There are also some methods available to create 3D images from those taken with a regular 2D camera as well.

Thanks to [Bill] for the tip and the additional links to the guides for viewing these images!

Continue reading “Photography, The Stereo Way”

On the left side, there's a smartphone. On the right side, there's a hairdryer turned on. On the smartphone screen, you can see the working end of the hairdryer shown, as well as a jet of air coming out of that end. In the background, there's an LCD screen showing a noise pattern.

Observe Airflow Using Smartphone And Background-Oriented Schlieren

Multiple people have recently shared this exciting demonstration (nitter) with us – visualizing airflow using a smartphone, called ‘background-oriented schlieren’. On a hot summer day, you might see waves in the air – caused by air changing density as it warms up, and therefore refracting the light differently. Schlieren photography is an general set of techniques for visualizing fluid flow, but of course, it can also be applied to airflow. In this case, using some clever optical recognition tricks, this schlieren method lets you visualize flow of air using only your Android smartphone’s high resolution camera and a known-pattern printed background! Continue reading “Observe Airflow Using Smartphone And Background-Oriented Schlieren”

Building A Serial Bus To Save An Old Hard Drive

Universal Serial Bus has been the de facto standard for sending information to and from computer peripherals for almost two decades, but despite the word “universal” in the name this wasn’t always the case. Plenty of competing standards, including USB, existed in the computing world in the decades before it came to dominance, and if you’re trying to recover data from a computer without USB you might have to get creative with how it’s done.

[Ben] recently came across a 80486 with this problem, so he had to get creative to recover the contents of the drive. He calls it the “lunchbox” computer due to its form factor, and while it doesn’t have USB it does have a tried-and-trusted serial port to communicate with other computers. [Ben] wrote up a piece of software for both the receiving computer and the sending computer in order to copy the drive sectors one by one across a serial link to a standalone computer running Windows XP, and was able to recover the contents of the drive that way instead.

All of the code [Ben] wrote is available on his GitHub page for anyone looking to boot up a 30-year-old computer again. While it might sound uncommon, computers of this vintage are still around running things like CNC machines or old mainframes.

Gaming Mouse Becomes Digital Camera

Ever since the world decided to transition from mechanical ball mice to optical mice, we have been blessed with computer pointing devices that don’t need regular cleaning and have much better performance than their ancestors. They do this by using what is essentially a tiny digital camera to monitor changes in motion. As we’ve seen before, it is possible to convert this mechanism into an actual camera, but until now we haven’t seen something like this on a high-performance mouse designed for FPS gaming.

For this project [Ankit] is disassembling the Logitech G402, a popular gaming mouse with up to 4000 dpi. Normally this is processed internally in the mouse to translate movement into cursor motion, but this mouse conveniently has a familiar STM32 processor with an SPI interface already broken out on the PCB that could be quickly connected to in order to gather image data. [Ankit] created a custom USB vendor-specific endpoint and wrote a Linux kernel module to parse the data into a custom GUI program that can display the image captured by the mouse sensor on-screen.

It’s probably best to not attempt this project if you plan to re-use the mouse, as the custom firmware appears to render the mouse useless as an actual mouse. But as a proof-of-concept project this high-performance mouse does work fairly well as a camera, albeit with a very low resolution by modern digital camera standards. It is much improved on older mouse-camera builds we’ve seen, though, thanks to the high performance sensors in gaming mice.