Since the Raspberry Pi arrived back in 2012, we’ve seen no end of interesting and creative designs for portable versions of the little computer. They often have problems in interfacing with their screens, either on the very cheap models using the expansion port or on more expensive ones using an HDMI screen with associated controller and cabling. The official Raspberry Pi touchscreen has made life easier with its DSI convector, but as [jrberendt] shows us with this neat little tablet, there are other DSI-based options. This one uses a 5″ DSI touchscreen available through Amazon as well as a Pi UPS board to make a tablet that is both diminutive and self-contained.
Having fooled around ourselves in the world of Pi tablets we like this one for its clean look and a bezel that is little bigger than the screen itself. As is the case with so many Pi tablets though it has to contend with the bulk of a full-sized Model B board on its behind, making it more of a chunky brick than a svelte tablet. The screen has potential though, and we can’t help wondering whether there’s any mileage in pairing it with a much thinner Pi Zero board and a LiPo board for a slimmer alternative.
Probably the nicest Pi tablet we’ve brought you was this one, which managed to remain impressively slim despite its HDMI screen.


Has no one managed to use a cm4 in tablet form factor yet?
If someone designed a breakout board for the cm4 with connections on the edges and battery management built in, I’d buy it. Bonus points if they utilise pogo pins for power and usb connections.
Exactly what i am working on,
Built the exact same with with the cm3, now updating for cm4, thankfully the cm4 is much slimmer to integrate.
An yes, we use some form of pogo pins for Connections 😁
Maybe someday i have the time to writeup my journey and post it somewhere..
Is on my todo list as well
Don’t leave out the M.2 interface if you want some serious sales. I’d buy at least 2.
There is a raspebrry pi cm4 tablet, this one: https://cutiepi.io/
This is a pre-order. The tablet is expected to ship in July, 2021.
Yes, the CutiePi was a Kickstarter tablet originally designed for the cm3 (predating the cm4 announcement), but they upgraded to cm4 after it was released. It’s supposed to ship soon.
That’s the https://cutiepi.io/ which just announced it was switching to the CM4 socket.
I’m going to add my voice to all the others below. A CM4 breakout that I could put in a mini laptop would be amazing. Cue the comments if “shut up and do it yourself,” but it would just need to be the reference desogn from the RPi foundation, ideally made a bit smaller, and maybe with some nice battery and power management on board. Oh, for more hours in the day to design such a thing! Until then, there’s always the GPD Micro, or the waiting list for the Dragonbox Pyra…
Hi Bob!!
Dieter speaking i am currently designing a tablet based around the CM4 with the HQ camera and a few other features like High power usb-c Charging HDMi out and USB3.0 and high speed wifi, a dash of NVME and a splash of battery capacity. There will be an Nvidia Jetson version as well!!’
Is anyone interested??
how about using a Pi 3A instead of the full size 3B+?
yes you’d compromise on memory but most everything else is there
Very few people create new Pi3 projects anymore.
Project is actually using a Raspberry Pi 4 B.
I used to move my Pi3 from project to project, but since the Pi4 came out (4 and 8GB) the Pi3 is a permanent photo display. If you’re running a GUI, the difference in performance is amazing.
I had done this with a 2.8″ LCD (not sure if it counts as a tablet at this point.). I had desoldered the header from the LCD in order to get the thing as thin as possible. I soldered the LCD directly onto the pi. The goal was a PDA. Actually the part I’m currently stuck on is powering the thing. The pi does not seem happy with 5V, seems to need 5.2V for long term stability. It works great with the power supply from canakit, but has instablity on several li-po cell phone chargers (a couple rated for 2.4A, which should be sufficient)… anyway a boost converter is on its way, which should easily handle the current draw of the pi+LCD.
> The screen has potential though, and we can’t help wondering whether there’s any mileage in pairing it with a much thinner Pi Zero board and a LiPo board for a slimmer alternative.
Pairing a DSI screen with a Zero that famously has no DSI broken out? Suuure.
Dremel + pi4 = chonky pi zero, we can work with that.
Funny you say that because I’ve literally had a dream tonight of sawing a Pi in half for a project (sanding the sides to prevent inter-layer shorts and everything) and then connecting to its CSI traces. Shame there’s no gerbers, I’d love to know just how much one can saw off before some critical trace is cut.
I think you could relatively easily remove the DSI (or CSI as you said) connector and solder to its pins/pads left behind. It’s just a piece of plastic, after all. After doing away with some of the more bulky ports, this would be a step in the right direction for miniaturization.
(Warning to all who attempt this: When I did it a couple months ago, I had thought that that gig ethernet port was a little bulky for what it was. Turns out, THEY FREAKING LIED TO US, IT’S NOT A SINGLE BOARD COMPUTER, and there’s another small PCB in there, with some pretty sensitive parts on it – magnetics, methinks. I accidentally destroyed mine, but with some research you can avoid doing the same.)
CSI is camera port, DSI is display port. Similar in many ways but incompatible. Desoldering connectors is not a bad idea for a start! Even if it does, sadly, make the project less repeatable.
Such Ethernet ports are called Magjacks and they’re pretty commonplace.
I know about the CSI/DSI thing – I was just differentiating because the article was about DSI and you mentioned DSI instead. But the connectors and methods of removing them will mostly be ‘compatible’. :)
Problem with those ports, tho, is that they can actually be shockingly expensive for a single-unit order (or so I’ve heard.) I’m putting this particular Pi in an Macbook 2006 chassis, so I’ll get a USB hub that has Ethernet and use the port on the side.
It’s an ethernet jack with internal magnetics. You can just buy another one for 15cts. There are different types, but almost all gigabit PHYs use the 1:1 version. Even if it needs a 1:1.5 and you use a 1:1 it will work, but not meet the spec and not at full distance.
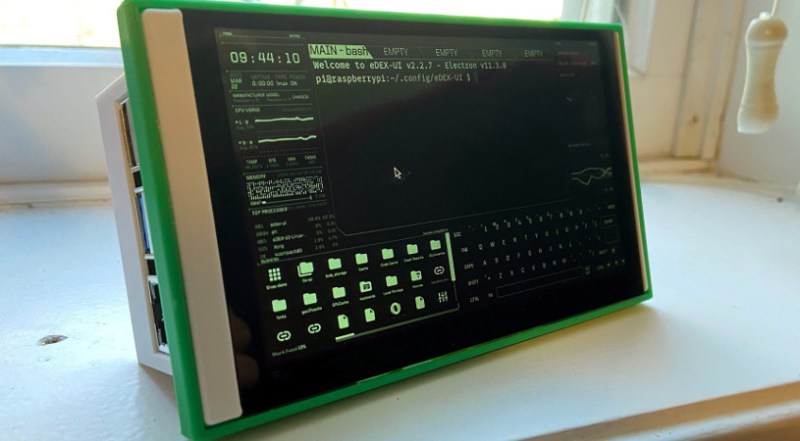
What is the is on the screen?
Hope this isn’t a silly question, but what OS is being displayed here? What’s on the screen? Looks lovely.
It is a silly question – look at the screen… :-)
I have been looking at it. I can’t figure out what it’s running, I can’t find something similar after searching for a few hours on google.
Would it be terrible for you to enlighten me?
It appears to be this: https://github.com/GitSquared/edex-ui
but I had to blow up the image a bit to read it well enough to Google it.
Wow! THANK YOU :)
I’ve been looking for something like this too, I use i3 gaps and some other stuff on desktops but this looks absolutely amazing for smaller screens.
Main window, at the top: “Welcome to eDEX UI”
This screen has the same resolution, 800 x 480, as the Official Raspberry Pi Touchscreen and that’s awfully small. I keep hoping someone will produce a DSI screen for the Pi that has better resolution.
+1 me too! One of the great features of the Pi is/was it’s support of full HD (and now 4k!) It’s sad to see so mamy displays that don’t take advantage of this.
I don’t think they can make higher resolutions with the DSI connector as it only has limited lanes. I wish they had dropped it when the Pi4 came with 2hdmi ports, could have kept the full sized port and then relocated the second to a header (like the DSI is).
What raspberry pi terminal theme is this!? It looks amazing! How do I make my screen look like this?
Where do you purchase one
all i want is basically this for the rpi400: https://external-content.duckduckgo.com/iu/?u=https%3A%2F%2Fwww.gamegrin.com%2Fassets%2Fplatform%2Fplaystation%2Fpsone-lcd-screen%2F_resampled%2FSetWidth1920-playstation-psone-lcd-screen-1.jpg&f=1&nofb=1 with 10″ but i havent found any 10″ dsi displays, and rolling my own adapter i would need a dsi to edp chip and probably a edp to lvds chip and a 3d printer and im too lazy
what for is a DSI convector
We’ve got a 5″ 800×480 DSI display for pi. https://www.crystalfontz.com/product/cfam800480b0050tc-800×480-raspberry-pi-dsi-tft-lcd
Someone looked for a non-800×480 DSI screen?
https://hackaday.io/project/177027-7-lcd-for-raspberry-pi-cm4-cmio
No idea how it works, though.