I’ve been playing with a few MicroPython projects recently on several different embedded platforms, including a couple of ESP32 WiFi modules. There are various ways to program these modules:
- Use a serial terminal and ampy (maintained by [devxpy] since being dropped by Adafruit in 2018).
- If you use Pycom boards or WiFy firmware, there are the
pymakrplugins for Atom and Visual Studio. - If you prefer the command-line like me, there is rshell by one of the top MicroPython contributors [Dave Hylands].
For over a year, I have been quite happy with rshell until I started working on these wireless nodes. Being lazy, I want to tinker with my ESP32 modules from the sofa, not drag my laptop into the kitchen or balcony to plug up a USB cable. Can’t I work with them wirelessly?
Well, you can use WebREPL. While its functional, it just didn’t strike my fancy for some reason. [Elliot] mentioned in a recent podcast that he’s using telnet to access his wireless nodes, but he’s using esp-link on an ESP8266, which means throwing another chip into the mix.
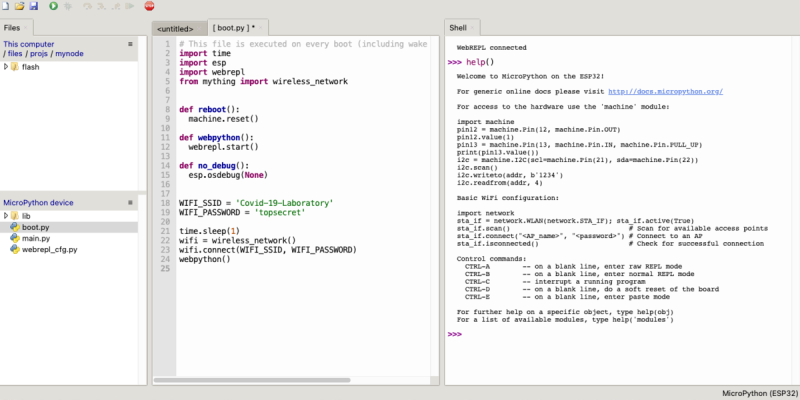
The Thonny IDE
I had all but given up when by chance I saw this video on the Dronebot Workshop channel about running MicroPython on the new Raspberry Pi Pico boards. Bill was using Thonny, a Python IDE that is popular in the education community. Thonny was introduced in 2015 by Aivar Annamaa of the University of Tartu in Estonia. Thonny was designed to address common issues observed during six years of teaching Python programming classes to beginners. If you read about the project and its development, you’ll see that he’s put a lot of effort into making Thonny, and it shows.
Leaning about Thonny got me curious, and after a little digging I discovered that it has WebREPL support for MicroPython right out-of-the-box. Although this is a new feature and classified as experimental, I found it reasonably stable to use and more than adequate for home lab use.
Installation and Connection
Instructions are clearly given on the project’s website. There is a downloader link at the top of the page for Windows. For Linux and Mac simply doing sudo apt install thonny or brew install thonny was all I needed. If you have a Raspberry Pi, you will find Thonny is pre-installed — version 3.3.3 was found on a recent Pi 4 in my lab. On an older Pi 3 however, Thonny was too old and simply reinstalling it didn’t work for me. Doing a sudo apt update, sudo apt upgrade, and then reinstalling Thonny resulted in the latest version 3.3.6.
For some reason, the Thonny found in the Ubuntu 20.04 and Debian Buster package repositories also weren’t recent enough. Rather than building from source, I used the provided Linux installation script that downloads and installs the latest release.
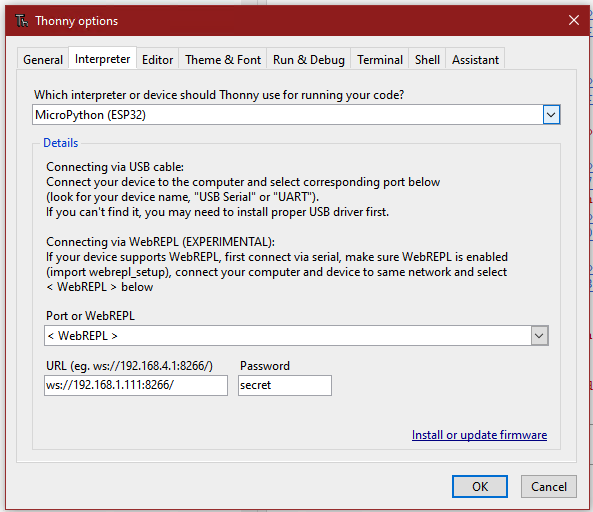
In order to connect to a module, you will use the Run -> Select interpreter... menu. Here you pick which type of module to use, and which interface (USB or WebREPL). Note that you have to connect to your module over USB first and make sure that WebREPL is enabled in boot.py. This is the normal method of enabling WebREPL in general — if your module already has WebREPL setup, you don’t need to change anything. Fill in the WebREPL URL and password — you should connect and be good to go.
Tweaks
By default, Thonny’s windows are stacked vertically. If you’re using a modern wide-screen monitor, you will probably want to rearrange the windows in Thonny so the editor and shell are side-by-side (see the feature image). This is done by adding ShellView.location = e to the [view] section of the configuration.ini file (see here). The e means East, and other compass points like se can be specified as well. For the systems I tested, the configuration file can be found in the following places:
- Raspi, Ubuntu, Debian
~/.config/Thonny/configuration.ini - Mac
~/Library/Thonny/configuration.ini - Windows
C:\Users\\AppData\Roaming\Thonny\configuration.ini
I had no problems using the REPL manually, but I discovered an issue once you start testing self-starting applications with forever loops. If you are not careful, your application’s main loop can prevent you from regaining REPL control. The solution is to make sure your application sleeps for several milliseconds in the main loop. I tested with 100 ms (see here) and was always able to regain control. This shouldn’t be an issue in most home sensor applications, where the module may sleep for tens of minutes between readings.
By default, a Thonny installation doesn’t make itself visible for command line execution. On the computers I tested, you will find the Thonny executable in the following locations:
- Raspi
/usr/bin/thonny - Ubuntu, Debian (installed via installer script)
~/apps/thonny/bin/thonny - Mac
/Applications/Thonny.app/Contents/MacOS/thonny - Windows
C:\Users\\AppData\Local\Programs\Thonny\thonny.exe
Multiple Modules and Instances
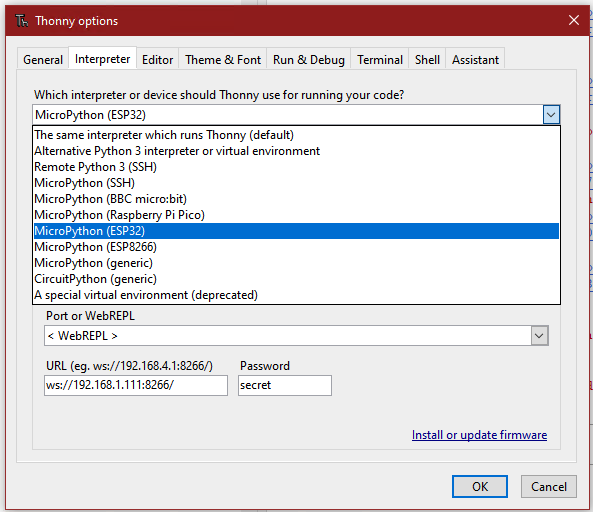
Thonny can support a variety of different modules. But if you want to connect to multiple modules at the same time, you need to run several instances of Thonny simultaneously. By default, only one instance is allowed. In the Tools -> Options -> General menu, untick the Allow only single Thonny instance checkbox.
I noticed one quirk on MacOS, however. For some reason, unchecking that option doesn’t work when launching the app from the GUI. There is a workaround — you can get multiple instances running if you start them from the command line.
One more annoyance — by default, Thonny will use the previous interpreter / connection when starting up. This is reasonable behavior, but causes a hiccup when talking to multiple boards simultaneously. Just ignore the plethora of error messages when Thonny instance #2 tries to connect to an already connected module, and use the menus to connect to the second device. There apparently isn’t any command line argument for a specific connection, but I have an inquiry pending on the GitHub project page.
Tip of the Iceberg
I have only focused on the WebREPL connectivity aspect of Thonny here, a functionality which seems to be uncommon in other MicroPython programming workflows. But this only scratches the surface of Thonny. Under the hood, it has a lot to offer that is hidden when you first open it.
And while I have been using its MicroPython mode of operation, Thonny was designed to aid students who are learning to write and debug “normal” Python programs running on desktop computers. If you frequently work in Python, I would encourage you to have a look at these aspects of the program — an object inspector, debugger, single-stepping, and a whole slew of other useful tools.
Thonny is also a multi-platform tool. While preparing this article, I tested it on MacOS, Windows 10, Debian, Ubuntu, and Raspberry Pi computers with no problems. The project is open-sourced under the MIT License.
At the very least, Thonny is a great solution for remote MicroPython programming of WiFi embedded modules. Check it out and give it a test run, especially if you’re lazy like me.


I would like to know “Why NO”, I would like to know your opinion, in advance thank you very much for your time.
Hey, i go through a lot of work to make things easy for myself.
And it’s worth it.
Nice tip indeed.
For programs that don’t allow multiple instances, would you be able to just run one with sudo and one without? Or even throw other non-superusers into the mix?
Thonny is awesome for teaching coding. Debugger and variable explorer in a simple uncluttered interface.
WebRepl integration rocks too. So straightforward.
Worth mentioning that thonny will upload the micropython firmware for you too. I like the simplicity of only needing one tool.
I have been learning python and I really like Thonny.My goal was to move into rasping programming so this article was really helpful
What’s wrong with hooking up the device to a wireless router/hotspot with USB port. Install USBIP server on the router/hotspot and client on your laptop. Now you can access the remote USB port wirelessly from your laptop.
Portable wireless hotspot with USB port is available from China for $4-$6 and you can flash OpenWRT and install usbip. Hook that up to a USB power bank for portability.
can you provide a link to one which can be reflashed?
I recommend https://www.gl-inet.com/ devices, they come with OpenWRT installed. And can be updated (a.k.a. reflashed ).
There is a Micropython FTP implementation, alas, it’s not a CLI REPL but allows for updating the .py files without a browser. I recommend to make a boot.py which either boots to main.py, or while a button is pressed: starts the FTP.
I have a couple of exp32’s hooked up to a Raspberry Pi 3, that allows me to access and program them remotely (and use the pi to power them). I access them with rshell via the pi, program them with vim…. but this is interesting I will give it a try.
Hey, one thing there is no good tutorial for online is how, on an esp32 or esp8266 to use micro python to accept input from both a web server or gpio pin (or mqqt).
A basic tutorial on how to do that would be great. Turn the onboard led on with a button on a web page, and/or with a physical push button.
That would lay the groundwork for threading, and having a device that could react to real world inputs or inputs coming from the network.