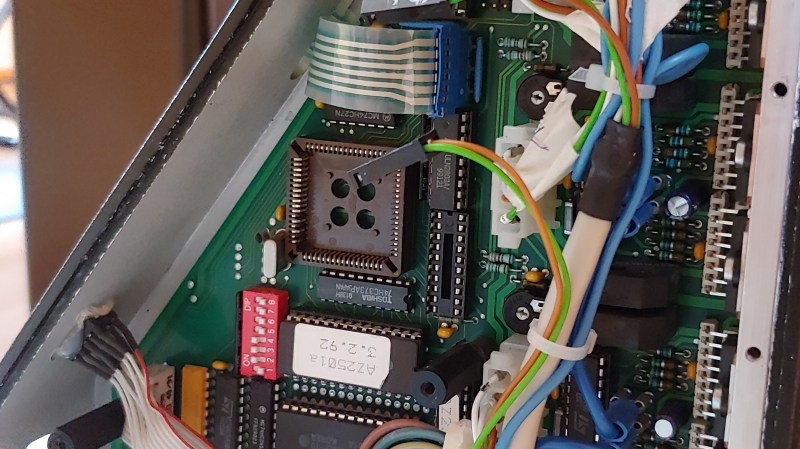
[Sebastian] and [Stefan Shütz] had a ISEL EP1090 CNC machine at home, sitting unused, and they decided to bring it to life. With pretty good mechanical specs, this CNC looked promising – alas, it was severely constrained by its controller. The built-in CPU’s software was severely outdated, had subpar algorithms for motor driving programmed in, and communication with the CNC was limited because the proprietary ISEL communications protocol that isn’t spoken by other devices.The two brothers removed the CPU from its PLCC socket, and went on to wiring a grbl-fueled Arduino into the controller box.
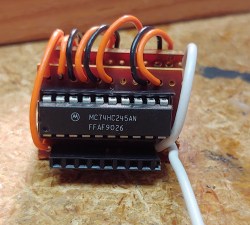 They reverse-engineered the motor driver connections – those go through a 74HC245 buffer between the original CPU and the drivers. Initially, they put an Arduino inside the control box of the CNC and it fit nicely, but it turned out the Arduino’s CPU would restart every time the spindle spun up – apparently, EMC would rear its head. So, they placed the Arduino out of the box, and used two CAT7 cables to wire up the motor and endstop signals to it.
For tapping into these signals, they took the 74HC245 out of its socket, and made an interposer from two small protoboards and some pin headers – letting them connect to the STEP and DIR lines without soldering wires into the original PCB. There’s extensive documentation, GRBL settings, and more pictures in their GitHub repo, too – in case you have a similar CNC and would like to learn about upgrading its controller board!
After this remake, the CNC starts up without hassles. Now, the brothers shall CNC on! Often, making an old CNC machine work is indeed that easy, and old controller retrofits have been a staple of ours. You can indeed use an Arduino, one of the various pre-made controller boards like Gerbil or TinyG, or even a Raspberry Pi – whatever helps you bridge the divide between you and a piece of desktop machinery you ought to start tinkering with.


Always fun to see a dead CNC machine brought back to life. Old iron is good iron.
A better way to handle EMI is to use standard isolation techniques: isolated power supply, opto isolators for I/O, ethernet for comm. Common Arduino based Grbl breakout boards and bare Arduinos seldom have this but there are some, especially 32-bit Grbl boards that do. See my website for an example of one that uses such techniques. I’ve retrofitted several Grbl based systems that suffered EMI problems like your. That fixed the problem. The advantage of 32-bit Grbl is you can get much higher step rates.
guess HAD doesn’t show the web site. look here – https://www.grbl.org/grblhal-breakout-board
It’s linked via your name. (And now mine.)
Yes. For example, it would be interesting to see how the return paths for the logic was run, relative to the return path for the motors. The actual distances and conductor gauges. Stuff like that matters a lot.
This is pretty cool, but be careful with grbl. It has software bug on G2/G3 commands with large (20 meters) radius – it just starts jogging forever which might damage CNC hardware. Do not assume that switching to 32 bits controller would fix it – 32 bits grbl has same bug. You might think that nobody would ever need radius like that, but some CNCs today are already have 1.5 and even 2 meter bed and they do. But also, some gcode generators produce G2/G3 commands with huge radius even for a very short lines (which could be replaced with a straight line).
Then just make your G-code generator produce line segments instead of arcs.
The hardware shouldn’t be damaged if the endstop switches are present and/or software range limits have been set.
Writing your own g-code generator is a very tedious process. I wrote some simple ones, but writing one that keeps track of tool path curves in 3D is full-time job
Maybe it’s a problem for a big CNC router but for a lableler????
Depends on CAD and G-code generator and has very little to do with CNC size. The g-code move command that damaged my CNC was only a few millimeters long (but g-code generator wrote it as a curve with a huge radius – because CAD design software smoothed it into a curve).
Never assume.
Instead of running the cables through the old serial-port hole, they could have wired them to a HD15 15-pin (VGA) plug/socket (assuming they needed at most 15 of the 16 wires). If 16 or more wires were needed, there’s probably an available connector of some type that would fit the existing hole.
done this on an Isel machine.. working great.
ine thing to change is to use the mks dlc board and drivers instead.