Water Drips Up In Kid-Friendly Engineering Experiment

Did you know that water can drip UP instead of down? It’s true! Okay, okay- it’s a bit of an optical illusion, but one that’s mesmerizing no less, and it’s one that is especially awe-inspiring for kids. As [Science Buddies] explains in the video below the break, it’s also achievable for anyone with some basic supplies.

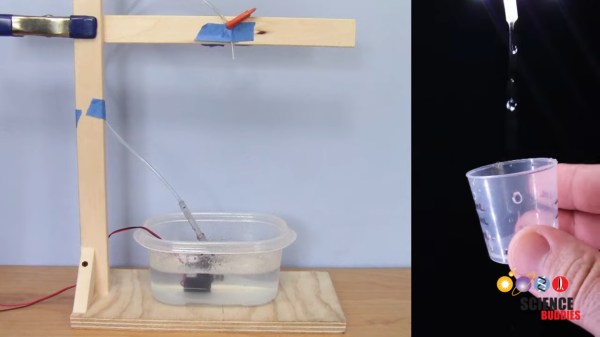
On first glance, the “water dripping upward” illusion looks like it must be extremely complicated with precisely timed drops, and perfectly triggered strobing lights and the like- right? Well, not so much. [Science Buddies] demonstrates a highly simplified experiment using only an aquarium pump, a basic frame, a smart phone with a strobing app, and naturally, water. The experiment is presented in a simple manner that would allow a young person to replicate it without too much adult intervention.

The video goes into such concepts as frequency, duty cycle (pulse width modulation), and other basic engineering principles. The experiment can be completed for just a few dollars for the pump and tubing, and the rest can be improvised. What a great way to get a young one started on their way to engineering!

If you’d like to see a more fleshed out version of a similar machine, check out this gravity defying dripper we featured a few years ago.
Continue reading “Water Drips Up In Kid-Friendly Engineering Experiment”

Why You Should Totally Roll Your Own AES Cryptography

Software developers are usually told to ‘never write your own cryptography’, and there definitely are sufficient examples to be found in the past decades of cases where DIY crypto routines caused real damage. This is also the introduction to [Francis Stokes]’s article on rolling your own crypto system. Even if you understand the mathematics behind a cryptographic system like AES (symmetric encryption), assumptions made by your code, along with side-channel and many other types of attacks, can nullify your efforts.

So then why write an article on doing exactly what you’re told not to do? This is contained in the often forgotten addendum to ‘don’t roll your own crypto’, which is ‘for anything important’. [Francis]’s tutorial on how to implement AES is incredibly informative as an introduction to symmetric key cryptography for software developers, and demonstrates a number of obvious weaknesses users of an AES library may not be aware of.

This then shows the reason why any developer who uses cryptography in some fashion for anything should absolutely roll their own crypto: to take a peek inside what is usually a library’s black box, and to better understand how the mathematical principles behind AES are translated into a real-world system. Additionally it may be very instructive if your goal is to become a security researcher whose day job is to find the flaws in these systems.

Essentially: definitely do try this at home, just keep your DIY crypto away from production servers :)

ICEBlaster: A Drag’n’Drop Bitstream Loader For ICE40

The iCE40 series of FPGAs gets a fair bit of coverage on these pages, largely due to its accessibility (thanks to huge efforts in reverse engineering and open tool chains) and likely also due to Lattice Semiconductors’ attitude to open source in general. Whilst these devices are small and rather limited, you can’t really beat them for a first foray into the subject. They’re plenty beefy enough for many of the simpler FPGA applications. [TinLethax] over on Hackaday.IO has plenty of experience with the devices, and has added another tool to our collective iCE40 arsenal, namely iCEBlaster, a USB mass storage device (MSC) style bootloader for drag-n-drop bitstream loading. The days of needing dedicated special programmers are starting to be numbered, with many chips now presenting a USB mass storage device to the host in order to upload the firmware image.

FPGAs don’t tend to operate this way, needing a device-specific bitstream loading upon start-up, which (unless they have OTP memory) is usually the job of an external configuration memory. iCEBlaster (a play on the Xilinx ByteBlaster programmer, maybe?) runs on the STM32F4xx series devices at least, but should be easily portable to others. The idea is pretty straightforward — dragging a new bitstream file onto the storage device initiates an FPGA target reset, which in turn allows the STM32 to send the bitstream over to the iCE40 via the SPI interface. Nothing more than that.

If you’ve been looking to get into the iCE40, this guide might be a good starting point, and every learning experience needs a good project to drive it, how about running Doom on a softcore RISC-V?

photo of the CNC controller, with the PLCC socket for the CPU, surrounded by driver ICs

Old CNC Brain Swapped With An Arduino

[Sebastian] and [Stefan Shütz] had a ISEL EP1090 CNC machine at home, sitting unused, and they decided to bring it to life. With pretty good mechanical specs, this CNC looked promising – alas, it was severely constrained by its controller. The built-in CPU’s software was severely outdated, had subpar algorithms for motor driving programmed in, and communication with the CNC was limited because the proprietary ISEL communications protocol that isn’t spoken by other devices.The two brothers removed the CPU from its PLCC socket, and went on to wiring a grbl-fueled Arduino into the controller box.

The interposer PCB, with an extra 74HC245 buffer on it
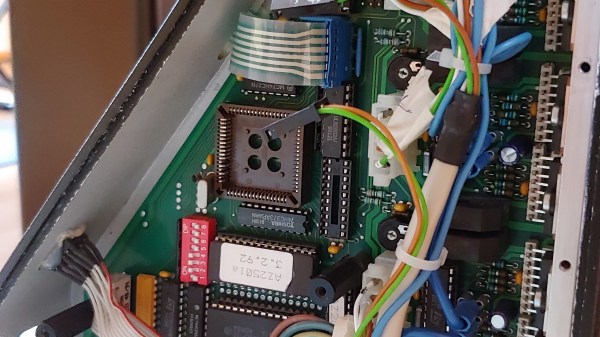
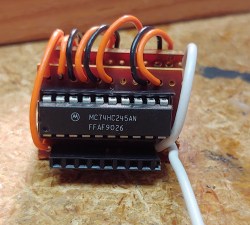
They reverse-engineered the motor driver connections – those go through a 74HC245 buffer between the original CPU and the drivers. Initially, they put an Arduino inside the control box of the CNC and it fit nicely, but it turned out the Arduino’s CPU would restart every time the spindle spun up – apparently, EMC would rear its head. So, they placed the Arduino out of the box, and used two CAT7 cables to wire up the motor and endstop signals to it.

For tapping into these signals, they took the 74HC245 out of its socket, and made an interposer from two small protoboards and some pin headers – letting them connect to the STEP and DIR lines without soldering wires into the original PCB. There’s extensive documentation, GRBL settings, and more pictures in their GitHub repo, too – in case you have a similar CNC and would like to learn about upgrading its controller board!

After this remake, the CNC starts up without hassles. Now, the brothers shall CNC on! Often, making an old CNC machine work is indeed that easy, and old controller retrofits have been a staple of ours. You can indeed use an Arduino, one of the various pre-made controller boards like Gerbil or TinyG, or even a Raspberry Pi – whatever helps you bridge the divide between you and a piece of desktop machinery you ought to start tinkering with.

Burn Pictures On A CD-R, No Special Drive Needed

When we routinely carry devices holding tens or hundreds of gigabytes of data, it’s sometimes a shock to remember that there was once a time when 650 MB on a CD was a very big deal indeed. These now archaic storage media came first as silver pre-recorded CD-ROMs, then later as recordable CD-Rs. Most people eventually owned CD writer drives, and some fancy ones came with the feature of etching pictures in the unused portions of the disc.

Haven’t got a fancy drive and desire an etched CD-R? No worries, [arduinocelentano] has a solution, in software which writes a disk image for a standard CD writer whose data makes the visible image on the disc.

CD-Rs have a thin layer of phthalate dye sandwiched between the polycarbonate disc and a silvered layer of lacquer. They’re often gold coloured, but the silvering is in fact just aluminium. The data is encoded as a series of pits and lands crested by the laser vapourising small portions of the dye to make holes.

The code creates a data structure of a standard CD-ROM session which doesn’t contain any usable data, instead whose pits and lands are arranged to form the image. You can find it all in a GitHub repository, and have a go at creating your own offerings. We would have made a Wrencher disc for our pictures, but sadly for some of us who were once in the thick of it we don’t have any CD-Rs any more.

Where Are Our Video Phones?

Videoconferencing has been around in one form or another for quite a while, but it took the pandemic to thrust into prominence with just about everyone. In a way, it has been the delivery of something long-promised by phone companies, futurists, and science fiction writers: the picture phone. But very few people imagined how the picture phone would actually manifest itself. We thought it might be interesting to look at some of the historical predictions and attempts to bring this technology to the mass market.

The reality is, we don’t have true picture phones. We have computers with sufficient bandwidth to carry live video and audio. Your FaceTime call is going over the data network. Contrast that with, say, sending a fax which really is a document literally over the phone lines.

Continue reading “Where Are Our Video Phones?”

The Digital Ham Hack Chat

Join us on Wednesday, July 13 at noon Pacific for The Digital Ham Hack Chat with Rosy Schechter and John Hays!

For most of its existence, amateur radio has been the quintessence of the analog arts. From the very earliest days of radio, hobbyists have been piecing together circuits to ply the radio spectrum, using whatever bits of RF wizardry they managed to pick up — or invent — along the way. From the architecture of the radios to the nature of the conversations they had over the airwaves, ham radio was very much an analog experience.

But if hams are anything, they’re resourceful, and they’ve got a long history of leveraging whatever the current state of the art happens to be. And so when electrical engineering began to dive into the digital world, so too did the hams. Radioteletype, facsimile, and other text-and-data modes lead to things like packet radio, which in turn gave us powerful tools like APRS, FT8, and PACTOR, upon which the current rich infrastructure of location reporting, weak signal digital contacts and beacons, and email service independent of an Internet connection have been built. There’s even a complete TCP/IP network using amateur radio as the physical layer, which even predates the widespread public Internet by many years.

Amateur radio always has been at the forefront of digital communications, but it takes work to keep hams in their leadership position in the field. To help with that, Amateur Radio Digital Communications (ARDC) was established. ARDC is a non-profit dedicated to supporting amateur radio and digital communication science and technology, chiefly through their programs of grants that are available to fund the development of technically innovative open and non-profit projects in amateur radio.

join-hack-chatFor this Hack Chat, ARDC Executive Director Rosy Schechter (KJ7RYV) and Staff Lead John Hays (K7VE) will be joining us to discuss the world of digital communications on the ham bands. Here’s your chance to share your experiences with digital modes, find out about what’s new in digital comms, and find out how to participate in the ARDC grant program and possibly fund the next big thing for the digital ham.

Our Hack Chats are live community events in the Hackaday.io Hack Chat group messaging. This week we’ll be sitting down on Wednesday, July 13 at 12:00 PM Pacific time. If time zones have you tied up, we have a handy time zone converter.

Continue reading “The Digital Ham Hack Chat”