[Koraks tinkers] was gifted a gargantuan photographic enlarger, a Durst Laborator 138 s, which is a unit designed specifically for black and white usage only. This was not good enough for [Koraks] so down the rabbit hole of conversion to colour we go! The moral of the story is this: if you can’t find it, build it. The hacker mentality. After wasting time and effort trying to source a period colour head for the thing, [Koraks] did the decent thing and converted what was already in front of them.
Now, if you’re thinking this process is simply a matter of ripping out the tungsten bulb and sticking a high-power RGB array in there, then you’re going to be disappointed! You see, colour photography of the era — specifically the RA4 process in this case — requires careful colour calibration and is heavily biased towards the red end of the visible spectrum, due to the colour curve of those tungsten bulbs we touched upon earlier.
The first attempt at using an off-the-shelf COB array was a bust — it simply wasn’t bright enough once the light had passed through the diffuser plate, and the light path losses were too high to expose the RA4 paper sufficiently, especially at the red end of the spectrum. Quite simply this is due to the reduced energy of red photons (compared to blue) making the desired chemical reaction rate too low. The solution is more power.
Another issue that quickly raised itself was that 8-bits of PWM control of the RGB components was inadequate since the ratio of blue to red required was so skewed, that only a few effective bits of blue channel control were usable, and that was far too granular to get the necessary accuracy.
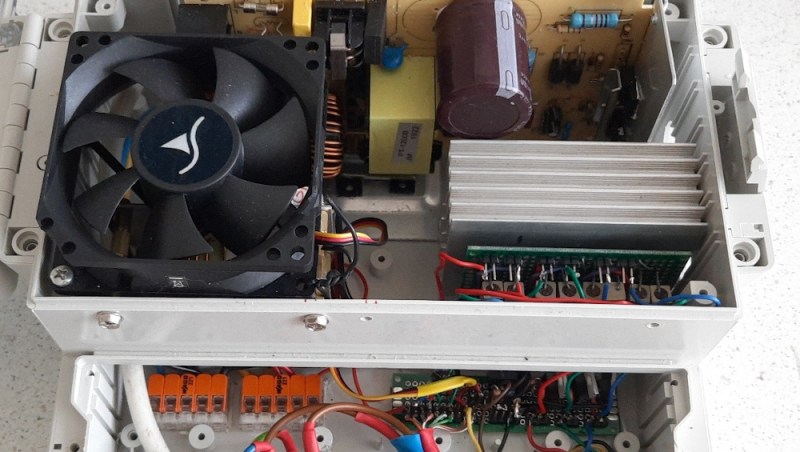
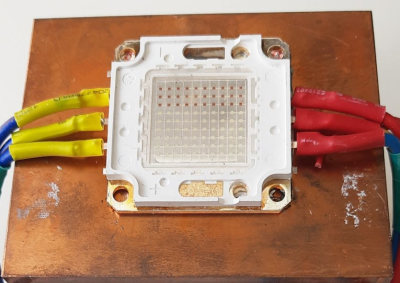
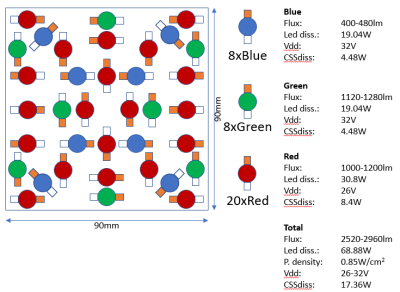
[Koraks’] approach was to custom build an LED array with twenty red 3W LEDs and eight each of the green and blue devices. 12-bits of PWM resolution was delivered via a PCA9685 PWM controller, that also handily controlled the cooling fans. The whole thing was hooked up to an Arduino Nano, with an MCP23016 expander board performing the duty of interfacing the rotary encoders and trigger footswitch. In fact, several iterations of the LED array have been constructed and this four-part blog series (Part1, Part2, Part3, Part4) lays out the whole story in all its gory detail for your entertainment. Enjoy!
COB LED arrays are pretty nifty, checkout turning them into 7-segment displays, just because. If all you want is raw power, we reckon that 100W “should be enough for anyone…”
Thanks [macsimski] for the tip!
Update: Corrected the article header from ‘exposer head’ to ‘enlarger’ for clarity at the request of the project author.


Similar setup is used by football hooligans for those impressive cardboard displays.
The Laborator 138s was built as a condenser enlarger. The LED source effectively turns it into a diffusion source enlarger, which results in lower contrast in the prints. Not the end of the world, but you have to shoot your images accordingly to get what you want.
I was going to say something similar: If you have a light path designed for a point light source, you can’t just replace the bulb with an area light source and expect good results.
Though, looking closer, the enlarger appears to expect a frosted bulb, so not entirely point light.
If you really wanted something closer to a point source with this enlarger, you could always get the Xenon flash lamp head. But even a frosted bulb is a better approximation of a point source than an array of LEDs. In fact, unless the LED array has a good diffuser in front of it, the condensers (if left in place) will probably result in uneven color balance across the print. When users wanted a softer illumination, they would replace the condensers with a cold-light head (usually fluorescent lamps).
I know it’s apostasy to suggest this on Hackaday, but if this person’s goal is to actually make color prints rather than build a light source, they should sell this enlarger and buy something like a Chromega D5 that’s ready to run. Of course, there’s a reason this was a gift – they’re almost impossible to sell. In fact, they can be difficult to even give away.
The person I got this from had four of these – and indeed, back then, they were difficult to sell. He gifted it to me because he knew I would be actually using it. I still visit him from time to time, look at prints, discuss photography, etc.
As to the comment on my goal with this: it sure is to make prints, and I’ve made hundreds upon hundreds with this enlarger so far, both in color and B&W. It works magnificently, and much more conveniently than the dichroic enlargers I’ve also used.
It’s perhaps relevant to remark that before I built this light source, I had been printing for a few years on Durst M305 and M605 color enlargers, so I’m aware of how a regular dichroic head works and what it’s capable of. Part of the development work of this color head of course was side by side testing on both systems.
When I reached the point where print quality was the same between the dichroic and the LED systems, I ditched the dichroic enlargers because the digital system is more convenient, and the 138 allows me to print from 35mm to 4×5″ on the same device, saving space.
I believe Koraks didn’t remove condensing lenses so it is not difusion enlarger even after the conversion.
This is correct; I did not remove any condensors. In fact, the current version of the system (the Hackaday article discusses an earlier incarnation) still uses the condensors. It’s effectively a diffusor-condensor system, much like many original Durst enlargers.
Alternatively, a set of color printing gel filters will quickly and easily turn any B&W enlarger into a color printing one, for a fraction of the price and all without irreversibly destroying the original enlarger. I get that lacks a bit of the gee-whiz-bang appeal and won’t make the Hackaday front page, but gutting a piece of fully functional vintage hardware to make it objectively worse when a simple and nonintrusive method to obtain the same goal is readily available, I can’t get behind this effort.
This enlarger almost certainly lacks a filter drawer above the negative, which means you would end up putting the filters below the lens, compromising image quality. Or at least that’s what an obsessive would say.
The first thing I did trying to print color with this enlarger was to use color filters the old way. Anyone who has ever done this, knows that it’s a b*tch to do filter corrections this way – it’s just an awkward way of working. Another possibility would have been to just install one of the Durst color heads that were made for this enlarger type, but I couldn’t find one, and thus, I resorted to DIY-ing something. In response to the ‘gutting’ comment – I would have hated to modify the enlarger in a permanent way. Everything is done in such a way that I can revert the enlarger to the original state I got it in. Not a single hole was drilled anywhere, and not a single component permanently removed, destroyed etc. It’s still the exact same machine – just with some additional hardware added to it.
This is also not about any ‘gee which bang’ appeal. It’s a functional machine made to actually work. That’s also why it looks like it escaped from a cheap 1970s sci-fi movie set. It was never made to look ‘vintage’ etc. It just needed to work! And that, it does.
Or better: a pre-publish plugin that flags commonly mis-spelled words. It’s WordPress, meaning someone has to have made this already…
I remember parting out something like this and finding that some of the LEDs like the red needed to be unusually intense wavelengths to get the most out of it. I may have been using the response curves of variable contrast black and white paper though.
Cool, thanks for featuring my project :) In fact, the implementation as described here is an earlier version of the system that I built. I actually used it that way for a year or two, but some time ago I made an improved version as described in the Part 4 link also included in the article (https://tinker.koraks.nl/photography/the-big-ugly-part-4-imperfect-present/). This version uses an ESP32 as the main brains, which also handles the PWM generation, eliminating the need for a PCA9685. It’s in fact vastly more complex than the initial system with the COB LED or the one with the LED beads that the illustrations in this Hackaday article were taken from. Most of it is unnecessary complexity that arose due to the ‘make it up as I go along’ style of building this. I’m considering building an improved version based on the same concept, but simplified and more robust. However, since I’m focused on photography and printing more so than on electronics, and the present version works quite well indeed, it’s kind of low on my priority list.
Nice job. It works for you and you kept an item off the trash heap. Naysayers need to read.
I still need to get to RA4 colour printing (still doing B&W enlargement of negatives) but hope to soon now that I have a colour print processor available to me. Anything that keeps these colour enlargers in service is a welcome project 😊👌