ARCTOS is a 6-DOF robot arm based upon 3D printed mechanics running a modified version of GRBL firmware. Let’s get this straight now, the firmware is open source, but the hardware plans are a paid download, but for less than forty euros, we reckon the investment would be well worth it, judging from the quality of the build instructions and the software support already in place. Continue reading “Arctos Robotics: Build A Robot Arm Out Of 3D Printer Spares?”→
We’re still in the early days of generatively-designed objects, but when combined with the capabilities of 3D printing, we’re already seeing some interesting results. One example is this new copper aerospike engine. [via Fabbaloo]
A collaboration between startups Hyperganic (generative AI CAD) and AMCM (additive manufacturing), this 800 mm long aerospike engine may be the most complicated 3D print yet. It continues the exciting work being done with 3D printing for aerospace applications. The complicated geometries of rocket nozzles of any type let additive manufacturing really shine, so the combination of generative algorithms and 3D printed nozzles could result in some big leaps in coming years.
Aerospikes are interesting as their geometry isn’t pressure dependent like more typical bell-shaped rocket nozzles meaning you only need one engine for your entire flight profile instead of the traditional switching mid-flight. A linear aerospike engine was one of the main selling points for the cancelled VentureStar Space Shuttle replacement.
This isn’t the only generative design headed to space, and we’ve covered a few projects if you’re interested in building your own 3D printed rocket nozzles or aerospike engines. Just make sure you get clearance from your local aviation regulator before your project goes to space!
In the realm of test equipment, there are a number of items that you don’t know you need until you need one. That’s probably the case with the HP11720A pulse modulator. [Tom] acquired two of these even though, by his own admission, he had “no need for these things.” We’d like to say we don’t get that, but — alas — we do.
The good news, though, is he used one of them to measure the quality of some coax cable and shared the exercise with us in the post and a video, which you can watch below. The device can generate pulses with extremely fast rise and fall times (under 10 nanoseconds) at frequencies from 2 to 18 GHz. These were often used in pulsed radar applications and probably cost quite a bit more new than [Tom] shelled out for them.
[Koraks tinkers] was gifted a gargantuan photographic enlarger, a Durst Laborator 138 s, which is a unit designed specifically for black and white usage only. This was not good enough for [Koraks] so down the rabbit hole of conversion to colour we go! The moral of the story is this: if you can’t find it, build it. The hacker mentality. After wasting time and effort trying to source a period colour head for the thing, [Koraks] did the decent thing and converted what was already in front of them.
A hacked Chinese-sourced COB array. This is no use.
Now, if you’re thinking this process is simply a matter of ripping out the tungsten bulb and sticking a high-power RGB array in there, then you’re going to be disappointed! You see, colour photography of the era — specifically the RA4 process in this case — requires careful colour calibration and is heavily biased towards the red end of the visible spectrum, due to the colour curve of those tungsten bulbs we touched upon earlier.
Attempt 2: With a heavy bias towards the red end of the spectrum
The first attempt at using an off-the-shelf COB array was a bust — it simply wasn’t bright enough once the light had passed through the diffuser plate, and the light path losses were too high to expose the RA4 paper sufficiently, especially at the red end of the spectrum. Quite simply this is due to the reduced energy of red photons (compared to blue) making the desired chemical reaction rate too low. The solution is more power.
Another issue that quickly raised itself was that 8-bits of PWM control of the RGB components was inadequate since the ratio of blue to red required was so skewed, that only a few effective bits of blue channel control were usable, and that was far too granular to get the necessary accuracy.
[Koraks’] approach was to custom build an LED array with twenty red 3W LEDs and eight each of the green and blue devices. 12-bits of PWM resolution was delivered via a PCA9685 PWM controller, that also handily controlled the cooling fans. The whole thing was hooked up to an Arduino Nano, with an MCP23016 expander board performing the duty of interfacing the rotary encoders and trigger footswitch. In fact, several iterations of the LED array have been constructed and this four-part blog series (Part1, Part2, Part3, Part4) lays out the whole story in all its gory detail for your entertainment. Enjoy!
If you’re one of the more than 180,000 subscribers to [Alan Wolke]’s YouTube channel W2AEW, you’ll know he’s a lover of old test gear and ham radio hardware. You may have followed one of his tutorials, or referenced his work while repairing or upgrading your own equipment. But when we got a chance to talk to him one-on-one during Vintage Computer Festival East 2023, we were treated to a more personal look at the man himself.
Like many of us, [Alan] says he got his start with electronics at a young age simply by taking things apart and trying to put them back together again. From there he got a job in a TV repair shop during high school, where he was able to hone his natural curiosity into a marketable skill. His career took him through several of tech companies, but he ultimately ended up in an engineering role at Tektronix, a position he’s held for nearly 20 years.
Despite continuing to stay on the cutting edge, it’s no surprise that he still has a certain attraction to the technology from his youth. But it’s more than simple nostalgia — he points out that vintage hardware is generally easier to service than modern gear. As many of his own videos show, there was something of a technological “sweet spot” around the mid-20th century to the 1980s or so; where you could expect to not only have schematics available, but the design and construction of hardware was such that you could still reason your way through it using basic troubleshooting principles.
As for being a ham, [Alan] thinks it’s a great way for get an even deeper understanding of technology. He says that if you’re interested in learning how electronics work, repairing and upgrading old radio hardware is a great way to flex your mental muscles. But at the same time, being a ham isn’t limited to dusting off war-surplus radios that were built before you were born. There’s plenty of ways to mix in modern technology, from digital modes to receiving signals from satellites using a software-defined radio.
A recent edition of [Babbage’s] The Chip Letter discusses the obscurity of assembly language. He points out, and I think correctly, that assembly language is more often read than written, yet nearly all of them are hampered by obscurity left over from the days when punched cards had 80 columns and a six-letter symbol was all you could manage in the limited memory space of the computer. For example, without looking it up, what does the ARM instruction FJCVTZS do? The instruction’s full name is Floating-point Javascript Convert to Signed Fixed-point Rounding Towards Zero. Not super helpful.
But it did occur to me that nothing is stopping you from writing a literate assembler that is made to be easier to read. First, most C compilers will accept some sort of asm statement, and you could probably manage that with compile-time string construction and macros. However, I think there is a better possibility.
Reuse, Recycle
Since I sometimes develop new CPU architectures, I have a universal cross assembler that is, honestly, an ugly hack, but it works quite well. I’ve talked about it before, but if you don’t want to read the whole post about it, it uses some simple tricks to convert standard-looking assembly language formats into C code that is then compiled. Executing the resulting program outputs the desired machine language into a desired file format. It is very easy to set up, and in the middle, there’s a nice C program that emits machine code. It is not much more readable than the raw assembly, but you shouldn’t have to see it. But what if we started the process there and made the format readable?
At the heart of the system is a C program that lives in soloasm.c. It handles command line options and output file generation. It calls an external function, genasm with a single integer argument. When that argument is set to 1, it indicates the assembler is in its first pass, and you only need to fill in label values with real numbers. If the pass is a 2, it means actually fill in the array that holds the code.
That array is defined in the __solo_info instruction (soloasm.h). It includes the size of the memory, a pointer to the code, the processor’s word size, the beginning and end addresses, and an error flag. Normally, the system converts your assembly language input into a bunch of function calls it writes inside the genasm function. But in this case, I want to reuse soloasm.c to create a literate assembly language. Continue reading “A Literate Assembly Language”→
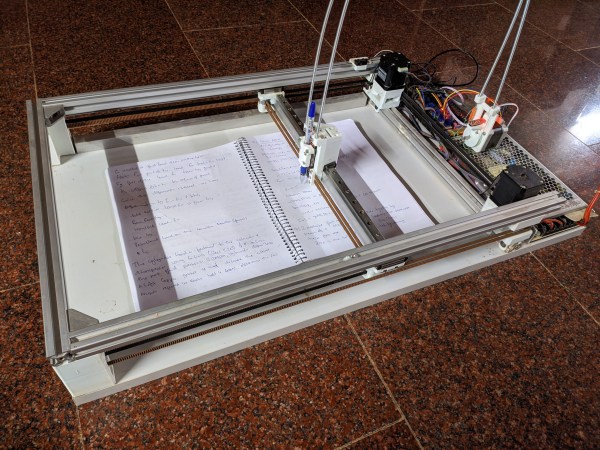
For those outside the world of education, it can be hard to judge the impact that ChatGPT has had on homework assignments. If you didn’t know, the first challenge of the 2023 Hackaday Prize is focused on improving education. [Devadath P R] decided that the best way to help teachers and teaching culture was to confront them head-on with our new reality by building the homework machine.
The goal of the machine is to be able to stick in any worksheet or assignment and have it write out the answers in your own handwriting, and so far, the results are pretty impressive. There are already pen holder tools for 3D printers, but they often have a few drawbacks. Existing tools often take quite a while to generate G-Code for long pages of text. Hobby servos to lift the pen up and down take more wear than you’d expect as a single page has thousands of actuations. Vibrations are also a problem as they are a dead giveaway that the text was not human-written. [Devadath] created a small Python GUI to record their particular handwriting style on a graphics tablet and used ChatGPT to generate answers. Continue reading “Hackaday Prize 2023: The Realities Of The Homework Machine”→