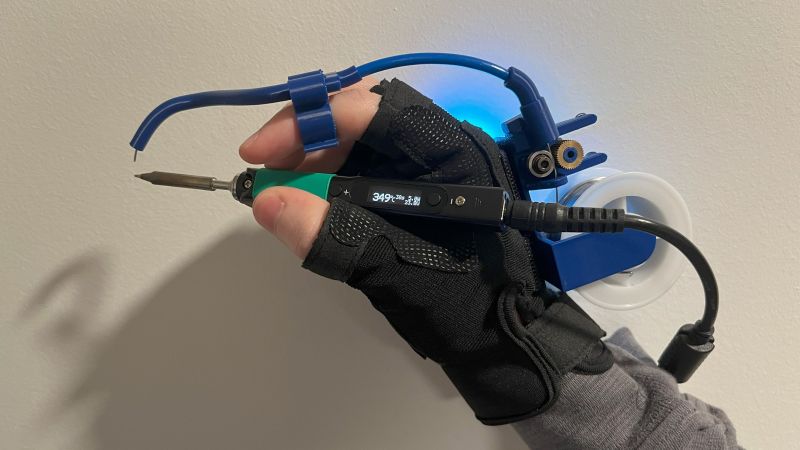
Soldering is easy, as long as you have one hand to hold the iron, one to hold the solder, and another to hold the workpiece. For those of us not so equipped, there’s the new and improved Solder Sustainer v2, which aims to free up one of however many hands you happen to have.
Eagle-eyed readers will probably recall an earlier version of Solder Sustainer, which made an appearance in last year’s Hackaday Prize in the “Gearing Up” round. At the time we wrote that it looked a bit like “the love child of a MIG welder and a tattoo machine.” This time around, [RoboticWorx] has rethought that concept and mounted the solder feeder on the back of a fingerless glove. The solder guide is a tube that clips to the user’s forefinger, which makes much finer control of where the solder meets the iron possible than with the previous version. The soldering iron itself is also no longer built into the tool, giving better control of the tip and letting you use your favorite iron, which itself is no small benefit.
Hats off to [RoboticWorx] for going back to the drawing board on this one. It isn’t easy to throw out most of your design and start over, but sometimes it just makes sense.


That looks pretty neat and somehow even practical, bonus points for the futuristic and use of velcro.
But… the PCB is dangling on the side and without proper strain relief on the wires, it’s a matter of very short time before the wires break, Sure I get it, it’s a prototype, but come on, the rest looks pretty polished, yet the PCB seems to be completely ignored in the design stage. Looking forward to the followup video.
Looks useful. Hoping V3 uses smaller solder roll and smaller microcontroller.
Why not make it stationary, always refilling, and we can just push the board up against, since it’s already in the air.
This is my go to technique when running out of hands; unwind a piece of solder and hold the board against it. An automatic dispenser, slightly elevated stationary on the table with maybe a foot pedal control (or distance sensor?) would work wonders
Not really useful except for very coarse jobs. You actually do the solder with the wire, which provides the flux, the iron is only there to heat up the recipient.
I don’t understand your criticism, you need both the solder and the iron, and they are both present in this creation. Slightly modifying how the solder is unspooled isn’t going to change that.
That is so cool! I would never have thought of it myself, but now I want one.
I’d make a few changes to suit my own needs. I’d skip the lights because they seem impractical. I’d use a bigger battery, strapped farther up my arm, and eliminate the voltage and status monitoring circuitry. And I’d experiment with moving the solder onto my forearm as well – I think having that weight and bulk below my wrist would get old pretty fast.
All in all, it’s a brilliant idea that’s been well executed. Kudos!
Moving the solder seems like a good idea.
I think I would move those lights to a right light on the armature holding the solder.
Why would you eliminate the voltage and status monitor?
I can see the voltage monitor’s usefulness with the small battery shown in the video. But for me it’s an unnecessary complication, given that I’d be using a bigger battery and would have spares on a charger ready to swap in. I’m also a minimalist when it comes to indicators – for me there should be no more than absolutely necessary and they should be dim enough not to distract me. That said, a normally-off LED that simply starts blinking when the charge is getting low would be OK.
It’s not clear to me what other status indicators are designed in. It’s possible that I’d find them useful, but for now I think that seeing whether or not the solder is feeding when expected would tell me everything I’d need to know.
This:
Hats off to [RoboticWorx] for going back to the drawing board on this one. It isn’t easy to throw out most of your design and start over, but sometimes it just makes sense.
Restarting a completed design is actually a deep questioning of one’s self, of one’s ability to even accomplish a project, or of why even do the project in the first place.
kudos to RoboticWorx and everyone else who makes it through the introspection.
I bet Big Clive has one of these up his sleeve. I always wondered how he does it.
I don’t understand why people think it’s difficult to do how Big Clive does it. (Maybe some people are not as dexterous as others.)
Try it out. It’s not difficult once you get the hang of it. Might help if you are too lazy to set up the third arm for soldering ;-)
I started doing it long before I began watching Big Clive.
It’s like a mig welder spool feed for solder. Excellent idea!
I have no need to hold the PCB in one of my hands when I’m soldering. This thing looks well made, but I’m not sure for how many people it will be useful.
When soldering SMT, my workflow is as follows:
1. Apply solder to the left pads of a bunch of footprints. (heat very short to keep as much flux as plausible)
2. Use tweezers to position an SMT part.
3. Re-heat the solder to solder the left pad.
4. Repeat from step 2 for the next footprint.
5. When all the left pads are soldered, either turn the soldering iron to your other hand, or turn the PCB around and solder all the right pads. And because you now have both solder and an iron in your hands, you can revisit the occasional left pad that has not been soldered properly.
For bigger parts such as QFP, you start the same way. I usually create a short between 3 or so pads during the initial positioning. Creating shorts at this point is not important. The only important focus during the initial fixation is the location of the IC on the footprint.
And as Bryan noticed. Big Clive’s soldering skills are quite impressive
Ha! That’s pretty clever.
Nitpicking
– the spool of solder is way larger that it needs to be
– the motorized solder feed seems over-complicated. Some sort of mechanical feed lever that could be “pumped” with the thumb or baby finger would be more elegant, I think
– foot-pedals? that’s requiring more appendages, not less
Still, I’m looking forward to seeing v3 of this. The core idea of tipping the solder into the iron & work with the index finger of the “iron” hand is novel and useful.
For PCB work, the workbench. If required, I use some sort of vise, clamp or fixture to hold the board in the desired position. For connectors or small assemblies that can’t be positioned or supported otherwise, I’ve learned to hold the connector/assembly between the middle and ring finger of one hand, and the solder between thumb and index finger. (and iron in the other hand, obviously). Clamping the victim in small vice-grips sometimes makes it easier to hold onto.
Something to consider in V3 : drill a hole in the blue pie ,put a small piece of sponge just enough to not block the movement of the solder, add one or two drops of flux and you get fluxed solder!, mmmh.. ok now for V4.0… put a small tube in the hole to deliver controlled amount of flux too…
Ok now for version 5.0 ….
Honestly, looks like a solution in search of a problem. Is it neat, yes, look cool, yes. But I can knock out more solder joints than it takes to put on/off
Good Job ! A well made project made much better than anything I could ever do
Really interesting gadget, but I feel like I’d be endlessly annoyed by no longer having fine (and coarse) control of the angle and direction of the solder approach. As well as little things like bending the end of the solder wire to get just the right approach angle in really tight spots.
With enough practice, though, I bet someone could build proficiency with this thing.
I use something like this with a finger tip attachment: https://www.thingiverse.com/thing:2813478
I manually pull out some solder every ~5 joints, then use my finger attachment to direct it. Better, but not ideal.
The finger directs solder, but it’s always directed to the solder iron tip. So why not attach a stainless tube to the solder iron itself? Could also be 100% mechanical, powered with a lever or knob.