The Aimbot V3 Aims To Track & Terminate You

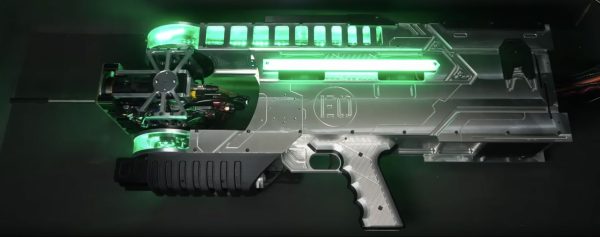
Some projects we cover are simple, while some descend into the sort of obsessive, rabbit-hole-digging-into-wonderland madness that hackers everywhere will recognize. That’s precisely where [Excessive Overload] has gone with the AimBot V3, a target-tracking BB-gun that uses three cameras, two industrial servos, and an indeterminate amount of computing power to track objects and fire up to 40 BB gun pellets a second at them.

The whole project is overkill, made of CNC-machined metal, epoxy-cast gears, and a chain-driven pan-tilt system that looks like it would take off a finger or two before you even get to the shooty bit. That’s driven by input from the three cameras: a wide-angle one that finds the target and a stereo pair that zooms in on the target and determines the distance from the gun, using several hundred frames per second of video. This is then used to aim the BB gun stock, a Polarstar mechanism that fires up to 40 pellets a second. That’s fed by a customized feeder that uses spring wire.

The whole thing comes together to form a huge gun that will automatically track the target. It even uses motion tracking to discern between a static object like a person and a dart fired by a toy gun, picking the dart out of the air at least some of the time.

The downside is that it only works on targets with a retroreflective patch: it includes a 15 watt IR LED on the front of the gun. The camera detects the bright reflection and uses it to track the target, so all you have to do to avoid this particular Terminator is make sure you aren’t wearing anything too shiny.

Continue reading “The Aimbot V3 Aims To Track & Terminate You”

A finger points at a stack of yellow plastic plates sandwiched together like on a bookshelf. A grey metal rectangle holds the top together and black plastic sticks off to the left. The top of the pack has copper and nickel (or some other silver-colored metal) tabs pointing up out of the assembly.

Tearing Into A Sparky Sandwich

We’re still in the early days of modern EV infrastructure, so minor issues can lead to a full high voltage pack replacement given the lack of high voltage-trained mechanics. [Ed’s Garage] was able to source a Spark EV battery pack that had succumbed to a single bad cell and takes us along for the disassembly of the faulty module.

The Spark EV was the predecessor to the more well-known Chevy Bolt, so its nearly ten year old systems might not reflect the state-of-the-art in EV batteries, but they are certainly more modern than the battery in your great-grandmother’s Baker Electric. The Li-ion polymer pouch cells are sandwiched together with cooling and shock absorbing panels to keep the cells healthy and happy, at least in theory.

In a previous video, [Ed’s Garage] takes apart the full pack and shows how the last 2P16S module has assumed a darker color on its yellow plastic, seeming to indicate that it wasn’t receiving sufficient cooling during its life in the car. It would seem that the cooling plates inside the module weren’t quite up to the task. These cells are destined for other projects, but it doesn’t seem like this particular type of battery module would be too difficult to reassemble and put back in a car as long as you could get the right torque settings for the compression bolts.

If you’re looking for other EV teardowns, might we suggest this Tesla Model S pack or one from a passively-cooled Nissan Leaf?

Continue reading “Tearing Into A Sparky Sandwich”

Small, Quiet Air Compressor Puts 3D-Printed Parts To Best Use

When the only tool you’ve got is a hammer, every problem starts to look like a nail. Similarly, while a 3D printer is a fantastic tool to have, it can make you think it’s possible to build all the things with printed parts. Knowing when to print ’em and when to machine ’em is important, a lesson that [Diffraction Limited] has taken to heart with this semi-printed silent air compressor.

The key to this compressor’s quiet operation is a combination of its small overall size. its relatively low output, and its strategic use of plastic components, which tend to dampen vibrations. The body of the compressor and the piston arms are the largest 3D-printed parts; the design calls for keeping printed parts in compression for longer life, while the parts of the load path in tension travel through fasteners and other non-printed parts. The piston design is interesting — rather than being attached to connecting rods via wrist pins, the machined Delrin pistons are solidly attached to the piston arms. This means they have to swivel within the cylinders, which are made from short pieces of metal tubing, with piston seals designed to move up and down in grooves on the pistons to allow air to move past them. The valve bodies atop each cylinder are salvaged from another compressor.

When powered by a NEMA23-frame BLDC motor via a belt drive, the compressor is remarkably quiet; not quite silent perhaps, but still impressively smooth, and capable of 150 PSI at low speeds. And as a bonus, the split crankcase makes it easy to open up and service, or just show off how it works. We’ve seen a variety of 3D-printed compressors, from screw-type to Wankel, but this one really takes the prize for fit and finish. Continue reading “Small, Quiet Air Compressor Puts 3D-Printed Parts To Best Use”

Garage Door Automation With No Extra Hardware

Home automation projects have been popular as long as microcontrollers have been available to the general public. Building computers to handle minutiae so we don’t have to is one of life’s great joys. Among the more popular is adding some sort of system to a garage door. Besides adding Internet-connected remote control to the action of opening and closing, it’s also helpful to have an indicator of the garage door state for peace-of-mind. Most add some sensors and other hardware to accomplish this task but this project doesn’t use any extra sensors or wiring at all.

In fact, the only thing added to the garage door for this build besides some wiring is the microcontroller itself. After getting the cover of the opener off, which took some effort, a Shelly Uni was added and powered by the 12V supply from the opener itself. The garage door opener, perhaps unsurprisingly, has its own way of detecting when the door is fully open or closed, so some additional wire was added to these sensors to let the microcontroller know the current state. Shelly Uni platforms have a WiFi module included as well, so nothing else was needed for this to function as a complete garage door automation platform.

[Stephen] uses Home Assistant as the basis for his home automation, and he includes all of the code for getting this platform up and running there. It wouldn’t be too hard to get it running on other openers or even on other microcontroller platforms; the real key to this build is to recognize that sometimes it’s not necessary to reinvent the wheel with extra sensors, limit switches, or even power supplies when it’s possible to find those already in the hardware you’re modifying. This isn’t always possible, though, especially with more modern devices that might already be Internet-connected but probably don’t have great security.

Cryo-EM: Freezing Time To Take Snapshots Of Myosin And Other Molecular Systems

Using technologies like electron microscopy (EM) it is possible to capture molecular mechanisms in great detail, but not when these mechanisms are currently moving. The field of cryomicroscopy circumvents this limitation by freezing said mechanism in place using cryogenic fluids. Although initially X-ray crystallography was commonly used, the much more versatile EM is now the standard approach in the form of cryo-EM, with recent advances giving us unprecedented looks at the mechanisms that quite literally make our bodies move.

Myosin-5 working stroke and walking on F-actin. (Credit: Klebl et al., 2024)

The past years has seen many refinements in cryo-EM, with previously quite manual approaches shifting to microfluidics to increase the time resolution at which a molecular process could be frozen, enabling researchers to for example see the myosin motor proteins go through their motions one step at a time. Research articles on this were published previously, such as by [Ahmet Mentes] and colleagues in 2018 on myosin force sensing to adjust to dynamic loads. More recently, [David P. Klebl] and colleagues published a research article this year on the myosin-5 powerstroke through ATP hydrolysis, using a modified (slower) version of myosin-5. Even so, the freezing has to be done with millisecond accuracy to capture the myosin in the act of priming (pre-powerstroke).

The most amazing thing about cryo-EM is that it allows us to examine processes that used to be the subject of theory and speculation as we had no means to observe the motion and components involved directly. The more we can increase the time resolution on cryo-EM, the more details we can glimpse, whether it’s the functioning of myosins in muscle tissue or inside cells, the folding of proteins, or determining the proteins involved in a range of diseases, such as the role of TDP-43 in amytrophic lateral sclerosis (ALS) in a 2021 study by [Diana Arseni] and colleagues.

As our methods of freezing these biomolecular moments in time improve, so too will our ability to validate theory with observations. Some of these methods combine cryogenic freezing with laser pulses to alternately freeze and resume processes, allowing processes to be recorded in minute detail in sub-millisecond resolution. One big issue that remains yet is that although some of these researchers have even open sourced their cryo-EM methods, commercial vendors have not yet picked up this technology, limiting its reach as researchers have to cobble something together themselves.

Hopefully before long (time-resolved) cryo-EM will be as common as EM is today, to the point where even a hobby laboratory may have one lounging around.

Do You Trust Your Cheap Fuses?

When a fuse is fitted in a power rail, it gives the peace of mind that the circuit is protected. But in the case of some cheap unbranded fuses of the type that come in kits from the usual online suppliers that trust can be illusory, as they fail to meet the required specification.

[Andreas Spiess] has used just these fuses for protection for years as no doubt have many of you, so it was something of a shock for him to discover that sometimes they don’t make the grade. He’s taken a look at the issue for himself, and come up with an accessible way to test your fuses if you have any of those cheap ones.

It’s an interesting journey into the way fuses work, as we’re reminded that the value written on the fuse isn’t the current at which it blows but the maximum it’s intended to take. The specification for fuses should have a graph showing how quickly one should blow at what currents above that level, and the worry was that this time would be simply too long for the cheap ones.

In the video below the break, he looks at the various set-ups required to test a fuse, and instead of a bank of large power supplies, he came up with a circuit involving an 18650 cell and three one ohm resistors in parallel. The resulting 1/3 ohm resistor should pass in the region of 10 A when connected across the 18650, so with a 5 A fuse in that circuit and a storage ‘scope he’s able to quickly test a few candidates. He found that the cheap fuses he had were slower to blow than a Bosch part but weren’t as worrisome as he’d at first thought. If you have any of these parts, maybe you should take a look at them too?

Continue reading “Do You Trust Your Cheap Fuses?”

Linux Fu: Getting Started With Systemd

I will confess. I started writing this post about some stupid systemd tricks. However, I wanted to explain a little about systemd first, and that wound up being longer than the tricks. So this Linux Fu will be some very fundamental systemd information. The next one will have some examples, including how to automount a Raspberry Pi Pico. Of course, by the end of this post, you’ll have only scratched the surface of systemd, but I did want to give you some context for reading through the rest of it.

Like many long-time Unix users, I’m not a big fan of systemd. Then again, I’m also waiting for the whole “windows, icon, mouse, pointer” fad to die down. Like it or not, systemd is here and probably here to stay for the foreseeable future. I don’t want to get into a flame war over systemd. Love it or hate it, it is a fact of life. I will say that it does have some interesting features. I will also say that the documentation has gotten better over time. But I will also say that it made many changes that perhaps didn’t need to be made and made some simple things more complicated than they needed to be.

In the old days, we used “init scripts,” and you can still do so if you are really motivated. They weren’t well documented either, but it was pretty easy to puzzle out the shell scripts that would run, and we all know how to write shell scripts. The systemd way is to use services that are not defined by shell scripts. However, systemd tries to do lots of other things, too. It can replace cron and run things periodically. It can replace inetd, syslog, and many other traditional services. This is a benefit or a drawback, depending on your point of view.

(Editor’s note: And this logging functionality was exactly what was abused in last week’s insane liblzma / ssh backdoor.)

Configuring systemd requires you to create files in one of several locations. In systemd lingo, they are “units.” For the purpose of this Linux Fu, we’ll look at only a few kinds of units: services, mounts, and timers. Services let you run programs in response to something like system start-up. You can require that certain other services are already running or are not running and many other options. If the service dies, you can ask systemd to automatically restart it, or not. Timers can trigger a service at a particular time, much like cron does. Another unit you’ll run into are sockets that represent — you guessed it — a network socket.

Continue reading “Linux Fu: Getting Started With Systemd”