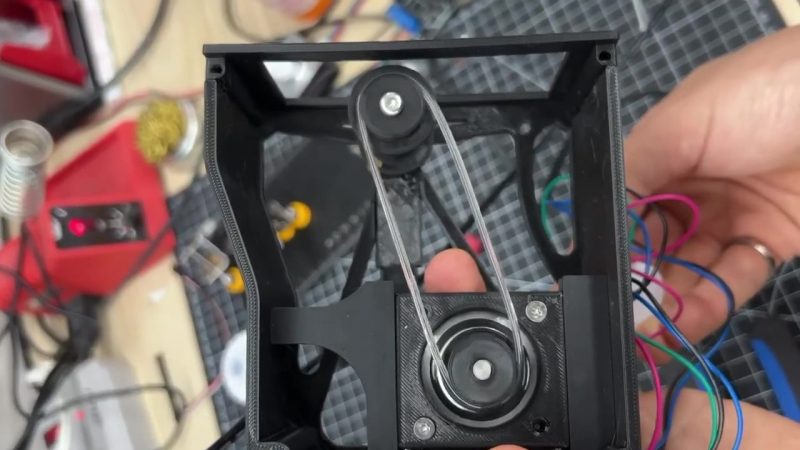
If you need to make polyurethane belts in custom lengths, it’s not too hard. You just need to take lengths of flexible polyurethane filament, heat the ends, and join them together. In practice, it’s difficult to get it right by hand. That’s why [JBVCreative] built a 3D printed jig to make it easy.
The jig consists of two printed sliders that mount on a pair of steel rods. Each slider has a screw-down clamp on top. The clamps are used to hold down each end of the polyurethane filament to be joined. Once installed in the jig, the ends of the filament can be heated with a soldering iron or other element. and then gently pushed together. The steel rods simply enable the filament to be constrained linearly so the ends don’t shift during the joining process.
The jig doesn’t produce perfect belts. There’s still a small seam at the join that is larger than the filament’s base diameter. A second jig for trimming the belt to size could be helpful in this regard. Still, it’s a super useful technique for making custom belts. This could be super useful to anyone needing to restore old cassette decks or similar mechanical hardware.
[Thanks to Keith Olson for the tip!]


Thats a good ideea for 3d printer filament welding.
One can use a corner extrusion as well, by pushing the two extremities against each other, while blocking them in the corner. Works well last time I add to weld a belt.
PU cord can be used as a convenient stock for pressing small square belts.
You need an relatively thin aluminium block with a round slot milled a couple millimeters deep, place the cord into the slot, and then put the block on a stove. When the plastic melts, it flows to fill the bottom of the slot and you get a square belt. If you want exact results, overfill the slot with a second piece of cord and press another piece of aluminum on top, then slice off the bit that squeezes over.
The melting point is around 200 C if I remember it correctly.
I guess we are down to tiktok hacks.
Nobody called it a “hack” and not everything posted here has to be useful or interesting to you
If all the factors are not even in the belt you may hear the results as pitch changes especially the main drive belt but even the takeup belt will cause fluctuations as the tape plays. Thickness, elasticity, uniform as possible.
This is where the 3 motor decks shine because rubber can last decades or days. The most needed to replace parts would be brake pads.
I fought the same alignment fight that was shown in the video when I needed a belt for a yard sale acquired mini drill press.
I eventually won the fight using replaceable pin type snap ring pliers with the pins removed, and the belt ends somewhat sketchily held under the pin clamps.
A soldering gun (with a “Weller 6130 Cutting Tip” that I happened to have laying around) provided a thin, flat heat source to put between the belt ends. I used the pliers to bring the ends into contact with the heat source, then pull the ends away from the heat, then bring the ends into contact with each other in good-enough alignment yielding a solid if slightly squooshed out joint.
The “flash” (or whatever the squooshed out bit is called when the melty ends are pressed together) is easily trimmed with ordinary nail clippers to bring the joint down to the belt’s target cross sectional diameter.
For a one-off process it worked pretty well. I wouldn’t do it that way for a living though.
(Is it fair to ignore the 2 or 3 failures and still call it a “one-off”?)
My takeaway from welding a belt was that you have to stick the ends together RIGHT NOW, necessitating a jig of some sort. I used a steel V-block, but I sure like the snap-ring plier idea.
I assume many projects would be better off using the next standard size up and adding a tensioner to the design, though.
For our High School Robotics team (FRC), I made fixtures out of 1/4″ aluminum bar stock. I clamped two pieces and crossed drilled it in a drill press. The hinge was two layers of duct tape.
Lay the fixture open on a table, heat the polycord with a heat gun. Push the ends together in the groove, flip over the top half, of the fixture, and apply a pinch clamp. After it cools give it a tug test.
We’ve made over 100 feet, of belts in seven years.
I like the idea, hate the youtube short. but overall it is a nice and simple method of making belts so good on him.
Maybe just print the belt instead?
Printing belts is too much time if you need anything longer than a few inches. The whole idea is not new. I have spools of pu belting material, from round 1/4 inch to 2 in wide flat belt at work. They used a lot in the food industry. We have a clamping pliers with a v block fixture on the end to clamp the ends and bring together straight and old cheapo Weller soldering iron with a flat blade attachment to melt the ends. The trick is to get temperature just right. Too hot like in the video, and belt will fail within a week, too cold and it will last 5 min. Do it just right and it will work for a decade.