[mitxela] has a tiny problem, literally: some of his projects are so small as to defy easy programming. While most of us would probably solve the problem of having no physical space on a board to mount a connector with WiFi or Bluetooth, he took a different path and gave this clever light-based programming interface a go.
Part of the impetus for this approach comes from some of the LED-centric projects [mitxela] has tackled lately, particularly wearables such as his LED matrix earrings or these blinky industrial piercings. Since LEDs can serve as light sensors, albeit imperfect ones, he explored exactly how to make the scheme work.
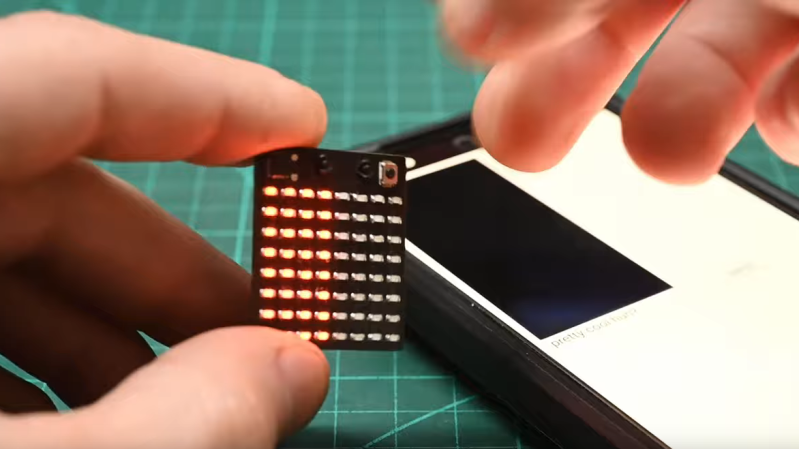
For initial experiments he wisely chose his larger but still diminutive LED matrix badge, which sports a CH32V003 microcontroller, an 8×8 array of SMD LEDs, and not much else. The video below is a brief summary of the effort, while the link above provides a much more detailed account of the proceedings, which involved a couple of false starts and a lot of prototyping that eventually led to dividing the matrix in two and ganging all the LEDs in each half into separate sensors. This allows [mitxela] to connect each side of the array to the two inputs of an op-amp built into the CH32V003, making a differential sensor that’s less prone to interference from room light. A smartphone app alternately flashes two rectangles on and off with the matrix lying directly on the screen to send data to the badge — at a low bitrate, to be sure, but it’s more than enough to program the badge in a reasonable amount of time.
We find this to be an extremely clever way to leverage what’s already available and make a project even better than it was. Here’s hoping it spurs new and even smaller LED projects in the future.


Nice job [mitxela]. Now implement that to give a sync ability to your blinky Fibonacci earrings, and to reflash / configure them
I’m confused. It flashes about 50 times in the video, so not re-programming the whole MCU, just the LED config?
Yes, the author only needed to change the LED config so they didn’t write a custom bootloader
“about 50” is suspiciously close to 64, the number of bits it would take to set the state of each LED in this 8×8 array.
Reminds me of a early smartwatch that used a blinking square on the CRT
Had the same thought. Took me a few minutes of web searching to find it. It was called Timex Datalink. The watch had an sensor to read the flashing computer screen for data download. https://en.wikipedia.org/wiki/Timex_Datalink
I think those also modulated the width of a light band on the screen itself thanks to the predictable precise timing CRTs allow. If I remember they stopped working with LCDs like light guns did.
ah, the remee lucid dreaming mask method
What’s old is new: https://hackaday.com/2013/02/25/using-a-flashing-lcd-monitor-to-transfer-data/
Also see
https://en.wikipedia.org/wiki/Timex_Datalink
and some similarity to https://en.wikipedia.org/wiki/NES_Zapper
The fun part is that it doesn’t require a dedicated sensor to receive the data. And it’s even better because the hardware he designed a half year ago with the single purpose to display things worked out of the box for this kind of reception, just by using different software.
Well now I feel old. I remembered that immediately too, but I never would have guessed it was more than ten years ago.
esp camera and small led and we have system for sending information for km!
meybe if You add ocular or teleskop 10 km?
alphaber morsea or normal PPP
A record was set in 1997 by WB7VVD and KC7AED: 192.6 km at 474 THz (632 nm).
It’s been a while, I’ll bet that record has been broken.
Actually, of course it has, by a cat video even: https://hackaday.com/2023/12/19/nasas-tech-demo-streams-first-video-from-deep-space-via-laser/
So you could put two of those badges together and have one flash the other. So theoretically, you could create a virus that way!
From the video, one of the best quotes, I’ve heard in a while:
When I set out to do this I was expecting to make a new version of the badge with a different circuit originally I had to add a bunch of components just to make the amplifier work. But, I just kept optimizing and whittling it down and eventually ended up back with the original circuit. This badge is the same one I showed off six months ago. It’s unmodified there are no hardware changes at all. So in a sense, the ability to do wireless updates was there all along – we just had to unlock it, by thinking really hard about the problem.
Art.
Reminds me of this quote from Michelangelo,
“The sculpture is already complete within the marble block, before I start my work. It is already there, I just have to chisel away the superfluous material.”
The explanations and the description of the test and development is awesome! Its useful for anyone interested in similar transmission techniques.