There are a ton of fun Raspberry Pi and Linux projects that require audio output – music players, talking robots, game consoles and arcades, intelligent assistants, mesh network walkie-talkies, and much more! There’s no shortage of Pi-based iPods out there, and my humble opinion is that we still could use more of them.
To help you in figuring out your projects, let’s talk about all the ways you can use to get audio out of a Pi or a similar SBC. Not all of them are immediately obvious and you ought to know the ropes before you implement one of them and get unpleasantly surprised by a problem you didn’t foresee. I can count at least five ways, and they don’t even include a GPIO-connected buzzer!
Let’s rank the different audio output methods, zoning in on things like their power consumption, and sort them by ease of implementation, and we’ll talk a bit about audio input options while we’re at it.
USB: Accessible, Cheap, Growing
In the first category of audio interfaces, you have USB, Bluetooth, HDMI and network audio. All of these are high-power-consumption interfaces, with HDMI likely taking the inefficiency cake. Let’s talk about USB and BT first, since they are the interfaces you can use most realistically.
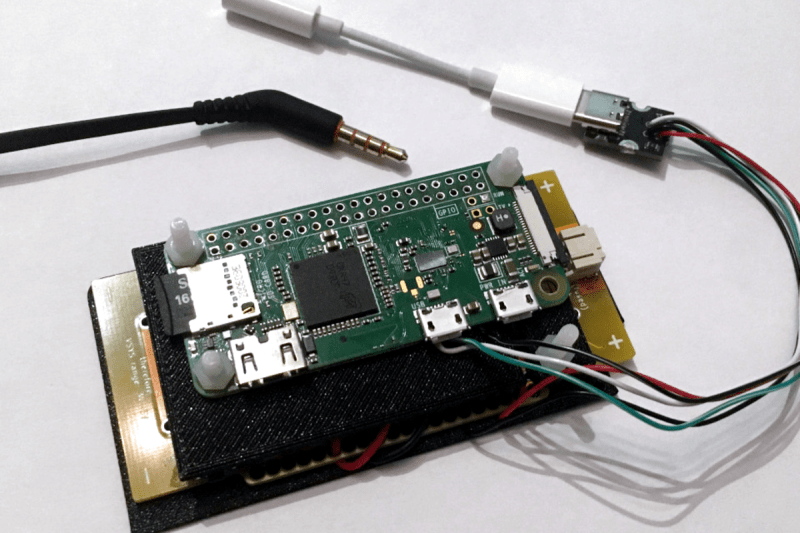
USB soundcards are definitely the simplest possible solution. You can get a very cheap one for $2 in the usual places, and while it might be noisy and cheaply built, you’re going to be fine with it for many usecases. It will likely have a 3.5 mm mic input, but you won’t always be able to use it as line-in.
 There’s some surprising options when it comes to USB audio – especially with disappearance of 3.5 mm headphone jacks on, which are now replaced by USB-C dongles that are essentially USB soundcards. My personal favourite is the Apple USB 3.5 mm adapter – it’s only $10, it’s well-built mechanically, there’s no audible noise even in standby, it’s 100% Linux-friendly, and the audio quality overall is seriously good! Plus, if you’re using a 3.5 mm 4-pin TRRS headset, it supports the microphone, with very good audio quality, and it even exposes the headset buttons as HID events – something I’m using in a project right now. To use with the Pi, plug it into a cheap USB-A to USB-C adapter and you’re golden. One note – most of these USB-C adapters won’t expose an audio interface until you plug something into the 3.5 mm jack, which is likely a power saving feature. If you plug it into your port and your OS doesn’t see an audio output, plug in a headset, and it should enumerate properly.
Unironically, it’s perhaps the only Apple product with a reasonable price and a large featureset fully compatible with open-source OSes. There’s no shortage of other similar adapters, but I haven’t tested them as thoroughly as this one. If you get one with your phone, they should work just as well. Mind you – all of these will occupy a USB port and require a 5 V source, which makes them a bit of a power hog. Moreover, they’re wired, which is not always what you want.
Bluetooth: Tends To Work Well
What about Bluetooth? It is pretty great in situations where USB isn’t. The main advantage is of course wireless connectivity, and there’s lots of Bluetooth to go around. You can get speakers, headphones of all sorts, and 3.5 mm audio adapters. It’s a pretty good solution if you don’t want any tether between you and your device, or if you just have a spare Bluetooth headset/speaker that you want to put to good use.
There are plenty of obvious advantages to Bluetooth, so I’d like to focus on disadvantages here, and tell you how to work around them. On the Pi, the Bluetooth connection basically occupies the only stable UART port you can get, so if you want to have a UART connection for your GSM modem, GPS, or Linux debug console purposes, you will want either a USB Bluetooth adapter, a USB-UART adapter, use one of those obscure SPI to UART chips. Oh, if you have a Pi 4 or Pi 5, remember, it has extra UART ports waiting for you, so you might not need to use any extra USB!
The input situation on Bluetooth is kind of sad, too, so beware if you expect a headset and a microphone to work at the same time. The gist is, due to limited bandwidth, there have traditionally been two Bluetooth audio modes available – a bidirectional one optimized for low bandwidth voicecalls (HFP and HSP modes), and a unidirectional one optimized for music (A2DP). The bidirectional modes simply have lower audio output quality. The aptX codec increases audio quality even in bidirectional audio modes, but it’s as proprietary as any Qualcomm product, and devices that use aptX are both expensive and kind of rare.
Another disadvantage of Bluetooth is its many failure points. Your Bluetooth audio device is a whole separate entity, usually its own battery that needs to be kept charged and might die at some point. If your hardware isn’t good, you might have to re-pair devices every now and then, the connection range is limited, it drops even further if a badly built microwave oven is operating nearby, Bluetooth software stacks are a mess more often than not, and Bluetooth adapters are typically pretty proprietary. All of this can result in mysterious problems you often can’t solve unless you fully swap your hardware. If it works, it works; if it doesn’t, you may be out of luck.
Network And HDMI Audio: Unexpected Options
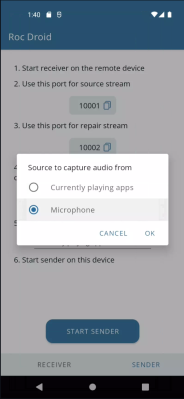 Ever thought about audio over WiFi or Ethernet? If your Pi is on the same network as an Android phone – or any Linux/Mac OS computer, – you are in luck, because there are easy ways to stream arbitrary audio over network, and many of them are open-source. I use network audio streaming a lot in my own projects – specifically, the roc project. Roc is a wonderful solution for streaming audio – it’s open-source, it has both CLI tools and Pulseaudio and Pipewire integration, and it has an audio buffer for wireless/wired connection dropouts. Thanks to this buffer, I’ve even had Roc links work over LTE really well, going on a long bike trip while listening to an audio stream from my laptop left at home, aided by Tailscale. The audio quality is as good as it goes since it’s lossless, it’s easy to setup, and it’s perhaps the only ready-to-use “arbitrary audio over network” solution that I’ve had work for me properly.
There are disadvantages to roc, certainly – one of them is about a second’s worth of delay caused by the buffer, which does make for good audio over WiFi transmission and is negligible for music listening, but it’s not good for gaming, and it might screw with your brain if you’re watching a movie; I’ve gotten used to it over time though. Apart from this, the roc-recv CLI process doesn’t exit if you unplug a USB audio adapter it’s using, starting to consume 100% of CPU until it’s killed and not reattaching when the USB device is replugged, so if you want to use and your USB soundcard might get unplugged, you might have to power-cycle your device or trigger a service restart – I have USB device presence monitoring scripts that do it.
If you do not require a speaker, and you have a nearby smart device with a speaker/headset handy, roc might just become your new friend – it’s not uncommon to have an Android phone or a Linux/MacOS connected to the same network as your Pi, after all. The Android application is on F-Droid, even!
What if you are using a HDMI display with your Pi? You might be in luck and get a 3.5 mm jack for free, or, if you’re using a TV, you get access to its entire audio output system. Many Pi-suited cheap HDMI displays throw a 3.5 mm output in, like the one I converted into a USB touchscreen display a couple months ago. Not using a HDMI display? You can get a small HDMI audio extractor box. This is one way you can cheaply get a digital audio out of a Pi, since it seems that some of these boxes have a S/PDIF output. On the other hand, if you’re doing a low-power device and you’re not already using a HDMI interface, HDMI audio output on the Pi consumes a fair bit of extra power, and so will a HDMI-processing audio chip.
I2S And PWM: Low-Power, Featureful, Some Hacking Required
The last two interfaces are I2S and PWM – if you’re building a low-power or small integrated device, you should know about them, because they’re quite easy to use. A Broadcom-based Pi has two PWM channels, and this interface takes up both of them – one for left channel audio and another for right channel. It’s unpopulated on the Pi Zero models and on Pi 5, but on any other model, if you want to get some PWM for other purposes, whether that’s a fan or a servo motor, you will need to either use software PWM, steal one of the channels from the audio output, or disable the audio output altogether. Also, there’s only two sets of pins you can output PWM audio through, so, arrange your pins accordingly.
How does it work? Through the power of a custom kernel driver, adjusting the duty cycle and the frequency to match the audio your system wants to output, and it gets the job done pretty well. Want to learn more about how it works at the low level? Our own Jenny List has described it in a way better detail than I ever could. This interface has gone through two revisions between the Pi B and B+, though I can’t tell if the resistor/capacitor changes made were a quality improvement or just BOM optimization. It’s a decent interface, but you still might get some audible noise on it, especially at idle. The interface also doesn’t have much power due to inline resistors, so expect it to be too quiet if your headphones are high-impedance.
What if a single headphone jack isn’t enough? Want to do it the pro way, get audio from a dedicated chip, add a mic, and maybe drive a speaker while at it? I2S is the way to go, and it’s a seriously promising audio interface. It’s a three-data-wire interface (plus an extra wire if you also want audio input), it’s low-power, and integrating it into your board will give you a fair bit of hacker cred. One caveat – just like with PWM, you have to use it on a specific set of pins, so make sure you got them freed up!
 The gist of working with I2S on a Raspberry Pi board is – get an I2S audio chip, maybe even on a breakout like the ones sold by Adafruit, or, if you want to expand your field of view, look into the list of Linux kernel drivers for I2S devices. There are both I2S output chips (DACs) input chips (ADCs), and there are a large number of I2S microphones with built-in ADCs out there too. With different I2S chips, you can give yourself a headphone jack, or a S/PDIF digital audio output, or a speaker amplifier output – maybe, all of these things at once. Look out for a nuance, sometimes your I2S chip will also want an I2C interface for sending it some configuration commands – especially if it’s a codec.
A codec is an entire audio system on a chip, usually used in phones and computers. Your phone’s CPU might only have a single I2S interface, yet it needs to drive headphones, a pair of speakers, grab data from onboard digital microphones and compensate for noise, your on-headset analog microphone, route all that audio to an LTE modem whenever needed, and maybe even apply some processing like wind cancellation. A CPU has neither the interfaces nor the CPU power to do all of this, which is why modern-day devices include a codec IC. Thanks to the market availability of these chips, there are a fair few Pi HATs carrying audio codec chips on their backs, and they bring you a whole bunch of audio capabilities at once.
If you want a featureful device when it comes to audio, get an I2S codec chip. If you can find a device schematic or a full datasheet that is using a certain codec, you’ve find a promising one, and all you have left is checking that your codec is supported by the Linux kernel; if not, you may make a bet on it nevertheless and hack it into submission. You will also need an I2C or SPI interface for configuration: the I2S interface is only usable for carrying audio data, it can’t carry sideband commands like “use a certain frequency for these digital microphones” or “adjust volume by X percent”. You’ll need some GPIO pins.
Your Turn
That’s as far as I’ve seen of Raspberry Pi and other Linux SBC audio, but if I have forgotten something, please do let me know! All in all, I hope this helps if you’re ever wondering just how much audio you can squeeze out of an ARM CPU, and you can go on to design that music player you always wanted to make!


What about FM radio? There was a hack using the early version Raspberry Pi that involved soldering a short piece of wire to one GPIO pin to act as a short range FM transmitter. A special kernel driver was needed to oscillate the pin at the require frequencies. You could play audio on appropriately tuned FM radios nearby.
But the article is about ways to get audio out of a Pi, not ways to get H-Fi audio out of a pi. I think it should have been included. Not sure if it still works with the Pi 5 though..
Nobody uses a pi for hi-fi
pi-fi
gudenoff
Hifiberry
Moode audio is fantastic for hifi using the pi.
moodeaudio.org
Exactly. It’s wonderful. I suggest using the DAC2 Pro from hifiberry. Sound is beautiful.
It’s called bit-banging.
The Apple USB C DAC measures absurdly well. It embarrasses some DACs which cost 10x more.
jain..
there are 2:
A2155 – EU-version, limited gain to comply with regulations
A2049 – everywhere else, the one you actually want
Lol that tracks
my raspi (4 model b) sits under the tv in the livingroom and has one job — it plays mp3s over the house speakers. the TV’s audio out goes to a little relay board controlled by the pi’s GPIO, which selects between the pi and the TV to drive the speaker. i just use the stock pi audio output. i can tell it’s not very good but it’s fine…it’s definite makes less hiss than the DAC in the TV!! it fulfills its duty admirably, though i’m frankly irate that it’s frozen in time because the proprietary closed private interface for HDMI CEC that i use was deprecated by raspi only a couple months after i implemented it. but no worry, the only thing i want to do to it is retire it.
but i have an anecdote…one of the jobs it had for a moment was driving the microphone i keep in the livingroom, because the table the pi lives under happens to be near the pile of musical instruments. the microphone is a nice job, a USB audio interface with mic in, line in, and headphone-out monitor functions. it can do the monitor entirely analog, or it can do full-duplex digital mode if you don’t mind a little latency.
i initially tried to use it with audacity, which has a DSP stack designed for low latency at all costs. so audacity attempts to open the device in a full duplex DMA mode. which seems to me like a dubious proposition over a USB interface. i really expected it to fail (silent in one direction or another), or to stutter / underflow / overflow, or to simply work but with no better latency than non-DMA. but what it did really astonished me: it hard locked the whole pi.
so i wrote my own multi-track recorder that prioritizes synchronization over latency. it doesn’t include the live input signal in the playback…so it just plays the pre-recorded tracks while it records the new track and just needs to know the offset between the playback and record, but it doesn’t care how big that offset is so long as it’s stable. so mine doesn’t use DMA, it just uses the ‘regular’ alsa mode. it works well. so i know the device is capable of full-duplex on the pi.
i also tested the microphone with a different host, and audacity was able to use it there too. so there’s something queer about the pi kernel that has this uncontained failure when this regular USB device is used in full duplex DMA mode. i don’t know the cause but given how much opaque bs i had to wade through to use HDMI CEC, i am not eager at all to track it down. obviously the ‘when in rome’ way to deal with this is to upgrade the pi stock OS blindly with your fingers crossed as if you were a supplicant to a closed-source software vendor like microsoft. heck, for all i know, that would work. for a decade now, pi evangelists have been saying that pi used to be rough around the edges but it’s all good now. maybe they’re finally right.
so just…the pi is not simply a USB host that you can use with anything. it has unique deficits as a USB host as well, and unique roadblocks to debugging it.
punchline of course is that after writing the DAW in spring 2022 i still haven’t found the time to actually play with it :cryingemoji:
oh and in other news my stupid recorder program…i went ahead and used the X library directly, because i’m not keen on the direction SDL has been going. i was just going to support 32bpp because that’s common everywhere and i’m not really trying to make something that works everywhere…but i found out, the pi only supports 16bpp. so my brand new software has legacy 16bpp support as a hack, which is infuriatingly stupid. i did a lengthy search through pi support forums where people reported their experiences blindly hacking on the closed-source pi ecosystem: an ‘open source’ kernel entirely dependent on the omnipotent omniscient omnipresent closed firmware it’s bundled with. i found about half a dozen approaches people had used to get 32bpp on the pi, and then also a “this used to work but doesn’t anymore” complaint for each of them. the firmware configuration keeps changing so what used to work doesn’t work, and it’s basically undocumented…it’s moving too fast to document it so what documentation you find is for the older one.
this kind of documentation / moving-target problem is endemic in open source world — try to find good reference documentation for ALSA even today in 2024! — but i’ve always relied on reading the source to clear up the details. pi gives you the problem but not the solution, because everything you really care about is closed. ugh.
Dude this sounds so freakin boss I bet you can use your program to record songs over a shifty line in! This is exactly what I’ve been looking for since my Alesis was stolen… open source? Github?
i’d be kind of surprised if you actually want it — it’s pretty weird. but it does have interactive help, press ‘h’. anyways, it’s at http://galexander.org/git/ggm.git
note you’ll need the “xcb” X C bindings library to build it
Could give Elk Audio OS a look over. It uses the EVL patch kernel to get latencies under what the RT Patched kernel gets.
Link: https://github.com/elk-audio/elk-pi
Nearly every microcontroller from China since the beginning of time has analog GPIO, something I wish the Pi was known for..
You could also use the Pi’s digital outputs to drive one or two resistor ladder DAC’s and output audio that way
pi gpio isn’t really powerful that way. we could do things like that in 1995 because modplay.com completely owned the computer. but pi is generally running linux, so bitbanging like that with a real-time constraint is really an uphill battle. that’s more a classic ‘microcontroller’ strength. iow, try it with the pico rp2040 :)
It was more a thought experiment, because the article was about listing all the options to produce sound. Anyway with the gpio’s driven from C it is possible to achieve very high frequency’s https://codeandlife.com/2012/07/03/benchmarking-raspberry-pi-gpio-speed/ and you could play with priorities to decrease the jitter on those outputs,
Als there is a possibility to go bare metal and skipping linux all together. This is an example where the synth can do 24 polyphonic voices that way: https://github.com/rsta2/minisynth
BTW i loved the sound comming from my modplayer on my 468dx50 processor, but you are right that a pico would be a much better choice to recreate such a player
One of my buddies built one of the old pport dac’s and liked it. He was creative and made an end plug out of a common plastic item for a db25 shell and somehow he got little cardboard boxes that were the a good size and made a fold up cardboard insert for the things to they sat in the box, and took the show on the road doing the computer shows and mail in. I think he was getting like $35 for them back in the day, and he had every file ever written that would play on them so he sold disks of tunes too. Quite the money maker in the late 80s to mid 90s.
Great article!
Or the Rube-Goldberg way: Use the PI to control a robot that plays regular, non-computerized musical instruments. Granted, there are limits to this approach.
there a fix for your movie sync issue
pulseaudio lets you set a latency for an interface. media players should be querying this and then play the audio from further along the stream to sync up
I use a HiFiberry DAC+ Pro (https://www.hifiberry.com/dacs) on a Raspberry Pi 5 to handle network audio from my main computer. PulseAudio with module-zeroconf-publish is installed on the Raspberry Pi 5 and PipeWire with libpipewire-module-zeroconf-discover is on my main computer. All audio sinks on the Raspberry Pi 5 are automatically detected by my main computer.
It might be possible to use the Pi 5’s PIO modules to generate a S/PDIF bitstream – there’s no shortage of amplifiers with inputs for that.
There’s always putting a filter on serial output… ☺
https://infosec.exchange/@RueNahcMohr/112389733393979313
I use an old PI running the VOLUMIO streaming software. Very easy to install and works well. I use the android phone VOLUMIO app to to control it. Its connected to my Denon amp using the HDMI i/f and I control the Denon using the Denon android app.
All works perfectly and its high quality audio.
please make a https://reticulum.network audio interface for baofeng or quansheng
nothing more
emergency sending package trought pmr
If it did 7.1 I could turn my PC off for fanless/hoiseless video watching.
Just disconnect the fan or the hoise.
So what about an audio HAT? Is it using the PWM? This would appear to e the superior and cheap route to good audio off a pi. e.g., https://www.waveshare.com/wm8960-audio-hat.htm
One link further from the above ( https://www.waveshare.com/wiki/WM8960_Audio_HAT ) says it uses I2S
Presumably if you are doing PWM you can just put a MOSFET on it for “Class D” style amplification?
If you don’t care about RFI that is.
I use a HiFiBerry DAC2ADC Pro specifically to interface my Elecraft KX3 HF transceiver’s IF to the Pi. The KX3 outputs its 192KHz wide IF band as analog I/Q signals. The DAC2ADC Pro digitizes stereo at 192KHz, so it’s perfect, allowing me to use my RPi4 as a panadapter display.
I leverage https://github.com/mill1000/raspdif to get SPDIF out of my Pi to my DAC. A resistor and an RCA cable was all the hardware required. Have tried on a 4 and 2b and works great. Also worth checking out is Mopidy music server.