Remember when dead batteries were something you’d just toss in the trash? Those days are long gone, thankfully, and rechargeable battery packs have put powerful cordless tools in the palms of our hands. But when those battery packs go bad, replacing them becomes an expensive proposition. And that’s a great excuse to pop a pack open and see what’s happening inside.
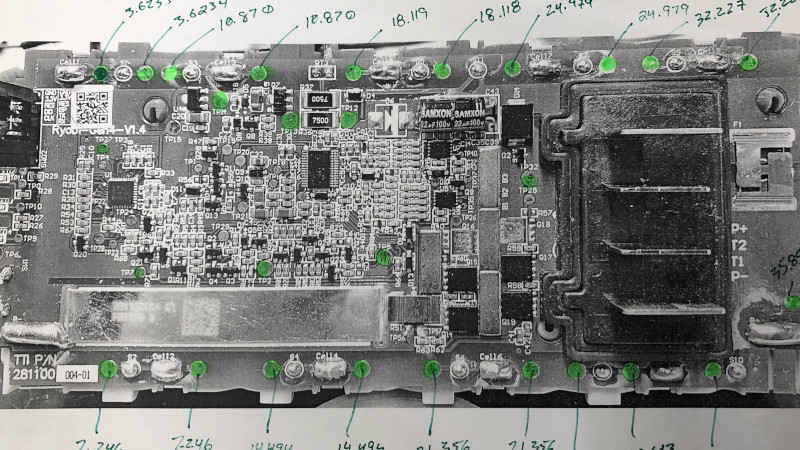
The battery pack in question found its way to [Don]’s bench by blinking some error codes and refusing to charge. Popping it open, he found a surprisingly packed PCB on top of the lithium cells, presumably the battery management system judging by the part numbers on some of the chips. There are a lot of test points along with some tempting headers, including one that gave up some serial data when the battery’s test button was pressed. The data isn’t encrypted, but it is somewhat cryptic, and didn’t give [Don] much help. Moving on to the test points, [Don] was able to measure the voltage of each battery in the series string. He also identified test pads that disable individual cells, at least judging by the serial output, which could be diagnostically interesting. [Don]’s reverse engineering work is now focused on the charge controller chip, which he’s looking at through its I2C port. He seems to have done quite a bit of work capturing output and trying to square it with the chip’s datasheet, but he’s having trouble decoding it.
This would be a great place for the Hackaday community to pitch in so he can perhaps get this battery unbricked. We have to admit feeling a wee bit responsible for this, since [Don] reports that it was our article on reverse engineering a cheap security camera that inspired him to dig into this, so we’d love to get him some help.


I did some work reverse engineering and then writing replacement firmware for the Dyson V10 series, which uses the same BMS IC family.
https://github.com/davidmpye/V10_Dyson_BMS/wiki/Hardware-info
The code on GitHub should be useful as pointers as to how to talk to the IC and understand it’s responses.
Regards
David
Wow great work, and noble too!
I’ve found that some of the ryobi battery packs stop charging when some of the cells lose too much charge. my low tech and probably a fire hazard method is tapping the batteries onto a couple of my 125ah garden solar batteries to give the pack a little bump and then it will sometimes work on the ryobi charger after the pack reaches a certain threshold of charge.
like abj says below. I have revived parkside “20V” packs by finding the 18650 cell that was discharged too far, then trickle-charge it back up with a constant current source.
I’ve always been somewhat wary of the lead-acid pulse charge method.
You need to use constant voltage on lithium cells. Keep the current low (trickle is good, like <1A), but the critical, fire preventing, cell preserving step is to limit voltage. 4.2V for typical 18650 Lithium Ion cells found in Ryobi’s tool batteries.
typically lithium cells are charged with constant current up to a threshold, then constant voltage. so he’s not entirely wrong, but yes a voltage limit is an important part of the picture. I have a homemade constant current source, i keep meaning to add a voltage regulation too… but charging lithium batteries would be SO much more boring
I charge them with a voltage limited constant current and have yet to have an issue, but I do make the current small. For a cell rated at say 2000mah discharge I will set up my lab supply to 4.1V, dial the current down to zero, short the power supply and dial the current up to 200ma and use that on the cell. I also keep the cells on something non flammable and away from anything that might catch easily. In my case I have the nice piece of granite that used to occupy the place a kitchen sink now sits.
I was always pretty sure, based on observations, that ryobi charged to temperature.
They charge much more slowly hot and when cold a 5Ah pack can charge in less than 20 minutes (haven’t exactly timed).
But there is definitely temp sensors come back into the charger through the “plug”, which you might expect as a safety thing anyway.
Ah right, I indeed use my programmable PSU, set the voltage to 4.0V and the current-limiter to 50mA or so, pretty careful I guess. When it’s charged enough, I’ll let the proper/official charger do the rest. At least that one cell is then revived.
This sounds like a method to have the firefighters and or paramedics rushing to your house. You should AT LEAST add a resistor and monitor voltage et current closely when doing this!
This does work. The best way would be to buy some TP4056 (might be the wrong number)liion single cell batteries and charge up the lower cells that are causing the problem. You can clip the charger onto the solder points for each of the series batteries. Remember you can only do one battery (1s 3.7v)at a time. I have saved some packs this way buy ultimately there is a reason that set of cells dropped below the 2.7v cut off.
The safe(r) way to do this is to use a current limited, voltage regulated lab power supply.
Set power supply to a low current, perhaps 0.05A-0.1A.
Set the power supply voltage to somewhere around 3.8V. Use the power supply to charge the affected cells above the low voltage cutoff threshhold, then use the original charger to actually charge and balance the pack.
It worked for me once. The next battery failed.
I’d love to see the results. I have 2 of the bricked ryobi batteries sitting here, unable to charge well before the cells were at their end of life.
Some packs fail to charge because they sre below a specific battery voltage. Using a constant current source charger you can jump start the battery then finish on the charger. Mabey he can identify that circuit and modify to start charging at s lower pack voltage.
How would you go about charging with such a charger, I’d like to try. I have 3 newish non charging batteries.
I ordered up some 18650 usb charge pcbs off Amazon. Charged individual cells as to not have a shared ground. Once they are over 3.5 volts the bms seems to be happy in most battery packs. I’ve had to do this on 40v greenworks batteries that died over the winter.
Done the same thing charging individual cells back up to the BMS threshold and then the entire pack is happy and charged again.. happens to many battery pack brands.
Works great and is pretty safe as long as properly charged using a charge controller for lithium battery individual cells. Keeping that initial current low is important on a heavily discharged cell.
Where to find the data sheet?
Sorry – I forgot to mention that after taking apart a Ryobi battery, I found the series string test points all measuring good when there is at least one cell discharging quickly. Hard to find when the other cells recharge it before I can test it
I have fixed many dead Ryobi batteries by plugging them into the charger about 20 times. Then the charger senses enough current from the batteries to switch into charge mode.
Just putting them in and taking them out repeatedly until it works?
I need to try this. Doubt is there however.
Love this article!
Commented on project – looks like cell6 is knackered.
As above – charge that cell “personally”.
There are test points that can be momentarily shorted that will allow the Battery in Question to possibly start charging ! Low voltage in some cells causes protection circuit to Activate safety mode ! 90% success rate!
Ive tested dozens of used Li batteries. Many will read out good on my multimeter will charge up even, but die quickly under load. You need a charger that not only charges, but also discharges them to do a real test. Ive rebuilt several battery packs, i always replace all the cells. Most of the circuitry is just to do a balance charge. Laptop batteries are programmed to fail after a preset # of charge cycles.
This reminds me of my “smart” car battery charger. Initially it will put some current into the battery and see if the voltage has risen by some amount and if not, it just declares it dead and stops. I have to go and get my dumb charger out and I put that on it for an hour or so, and than the smart charger likes it. It would be nice on the smart charger if it had an override button, like OK, this is probably not going to work but at least I can drive into town and get a new battery if I can get the car started this one time.
I recently delved into the P191, P192, P193, P194, P195 series of “Lithium+ HP” 18V battery packs. There is really limited info out there on the PCBs used on these particular packs, but I figured out how to reset the PCB, and some other things this crowd may find interesting. Not trying to hijack this post, but if that’s helpful to you, here’s a video I made comparing and repairing them: https://www.youtube.com/watch?v=j0QLwquWHz0
Great rundown! I subscribed on the off chance you ever do the same for their 40v batteries.
Really good video, thanks Colin. Your video is packed with good info, but the reset method you described is pretty relevant here.
Great video. Thank you for sharing.
Thank you! Playlist added!!
There’s an actual reset method on the board which alleviate the need to trickle charge to “revive” dead or underpreforming cells
All these comments talking about charging a cell that is below the cut-off voltage is making me nervous! The reason BMSes do not allow charging again after a cell has dipped below 2.5v is that the cell is a future fire hazard. Deep discharge often causes dendrites to form. In the future, the cell may randomly catch on fire and burn your house down. It won’t necessarily happen the first charge. It’s better to buy new properly matched cells, with proper discharge specs and spot weld them in, or dispose of the pack if you’re not capable of that.
Cab you provide more specific info where to get Marc’s batteries for the rgobi packs.
I have a Riobi battery operated lawnmower. When I put the battery on the charger it shows it needs charging so I charge it till it says done. Put it back in the lawnmower, start it, it goes about two feet and dies and doesn’t start again. But sometimes if I shake the lawnmower it willl start about two feet and die again. If I let it sit awhile after trying to start it it will start go about two feet and die again. The charger shows it is charged
The limit switches on the side of the handle are not fully engaged. Pull the handle out while turning the yellow switches to lock the handle into the operating position. Best of luck to you. It happened to me too.
Yup, it’s those limit switches on the side, you might need to tighten up the bolts at the base of the handle.
I had a 40v Kobalt li-on pack brand new, used it on their 40v weed eater through 2 charging cycles, and the third cycle it simply failed to charge and flashed all 4 LEDs on the battery’s status button and charger refused to charge indicating bad battery… Upon a close internal inspection of individual 18650 cells, I found that about half of them had the CID tripped and read zero voltage, whereas, the rest had been slightly overcharged to between 4.4v and 4.6v… Still working on it lol
I’ve recovered a 40-volt battery or two simply by cutting a short piece of Romex and connecting it terminal to terminal battery to battery from a good working one to the dead one and after a few minutes it will accept a charge on the dead battery. I know that’s not the correct way of doing it, but it is probably the fastest and works most often for me.
Seems like a lot of trouble for not much return. I found Ryobi batteries had a very short usage duration, so I bought a spare on Ebay for about half the price of the Ryobi branded job. I was slightly surprised when I received it to find that the price was actually for two batteries. They operate for about twice as long as the Ryobi batteries and are just as easy to recharge.
I can confirm the cheapo eBay generics where u get 2 or 3 of the 5Ah batterys for half the price of one oem ryobi 4Ah battery do last mich longer that the ryobi brand ones.
Problem being that ( ime ) power tool Batteries don’t have balance circuitry (latest Parkside being a notable exception). Certainly Ryobi do not balance. Nor do the Dyson – and they also do “lock out” after any detected problem. Presently I am struggling with a Karcher 18v which seems to have locked out. 🤬