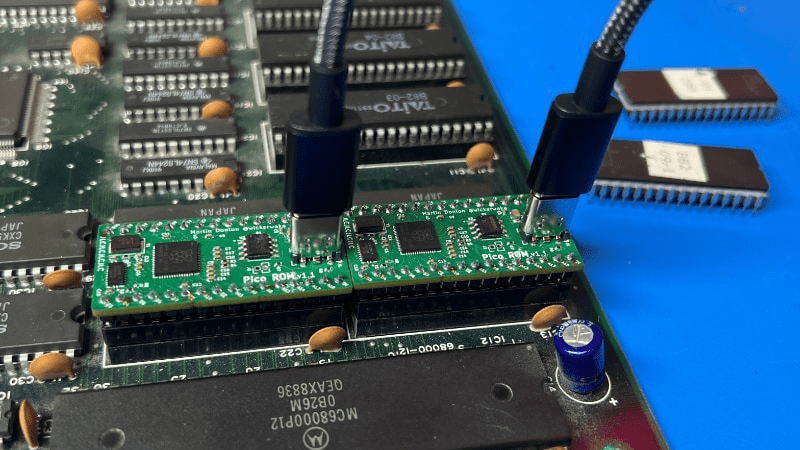
As we all know, when developing software for any platform or simply hacking a bit of code to probe how something works, the ability to deploy code rapidly is a huge help. [Martin Donlon], aka [wickerwaka], is well known in retro gaming and arcade hardware reverse engineering circles and had the usual issues figuring out how an arcade CPU board worked while developing a MiSTer core. Some interesting ASICs needed quite a bit of poking, and changing the contents of socketed ERPOMs is a labour-intensive process. The solution was PicoROM, a nicely designed ROM emulator in a handy DIP-32 form factor.
As the title suggests, PicoROM is based on the Raspberry Pi RP2040. It emulates an 8-bit ROM up to 2MBits in size with speeds up to 100ns. Since it uses the RP2040, USB connectivity is simple, enabling rapid uploading of new images to one (or more) PicoROMs in mere seconds. A vertically orientated USB-C connector allows multiple PicoROMs to be cabled to the host without interfering with neighbouring hardware. The firmware running on core 1 passes data from the internal 264K SRAM, using the PIO block as a bus interface to the target. A neat firmware feature is the addition of a mechanism to use a ROM region as a bidirectional control channel, which the software running on the target can use to communicate back to the host computer. This allows remote triggering of actions and the reporting of responses. Responses which may not be physically observable externally. [Martin] is using this feature extensively to help probe the functionality of some special function chips on the target boards, which is still a slow process but helped massively by reducing that critical software iteration time. The PCB was designed with KiCAD. The project files for which can be found here.
This isn’t the first time we’ve seen the RP2040 used for ROM emulation; here’s a pile of wires that does the same job. It just isn’t as pretty. Of course, if you really must use EPROMs, then you could give this sweet programmer a look over.


Anyone know where I can just buy this?
All the production files are there for getting JLCPCB to assemble them. Unfortunately there are parts on both sides which makes full assembly a lot more complicated/expensive :(
I suspect the author only got the top side assembled and soldered the bottom themselves, which kinda precludes “just buying this”.
Earlier revisions were single sided but once I added the level shifters I had to move to a double side design. I don’t assemble them myself, but double sided assembly is still pretty affordable. Last run I did was 20 pieces for about $15 each. I haven’t really considered selling them because the use case is pretty niche. They require external power so they can’t act as full ROM replacements, they are really only useful for iteration and development.
Hey Martin, I think you are wrong saying this is niche enough so that you could not sell these… there is a vast number of people doing reverse engineering, experimenting and various stuff around old computers and other kind of stuff who would buy these
I can think of plenty of use cases where it would be really handy, and I would love to own a couple myself just for designing single board computers around the vintage CPUs I have in a box, but never did because I do not have some eeprom programmer at hand…
Add a couple features like eeprom reading, a GUI, and you have a selling product
I would buy a couple right away, in fact…
+1, you’ve got plenty of synth people and retrocomputing enthusiast erady to buy them! A DIP-28 version would cover lots of ground also. And a version with just USB 2.0 on dupont headers would be a killer feature
If I land on a version I am confident I can support long term then I will find a way to sell some.
All that’s needed is a schottky diode to bind VBUS and VSYS together and your device would be able to run from either source (see section 3.1 in the hardware design guide.)
It takes time to copy the data from flash to SRAM at startup. I don’t know how long, I’ve never measured it, but I’ve been concerned that it might be too slow for some systems. It’s easy enough to add the capability though.
I’ve been waiting for such an application of the RP2040 since I learned about what its PIO are capable of. Brilliant.
I made something similar a year ago for Atari ST. And a ROM Emulator for 16 bit computers.
https://sidecartridge.com/products/sidecartridge-multidevice-atari-st/
https://sidecartridge.com/products/sidecartridge-tos-atari-st/
The code is open sourced here: https://github.com/sidecartridge/atarist-sidecart-raspberry-pico
How is the level translation to 5v levels solved?
In the latest version I use three 74LVC245’s for the address bus and a dual voltage 74LVCT8245 for the data bus.
There’s a Teensy version from a few years ago as well. https://microcorelabs.wordpress.com/2021/03/20/eprom-emulator/