Random Wire Antenna Uses No Wire

Ideally, if you are going to transmit, you want a properly-tuned resonant antenna. But, sometimes, it isn’t practical. [Ham Radio Rookie] knew about random wire antennas but didn’t want a wire antenna. So, he took carbon fiber extension poles and Faraday tape and made a “random stick” antenna. You can check it out in the video below.

We aren’t sure what normal people are doing with 7-meter-long telescoping poles, but — as you might expect — the carbon fiber is not particularly conductive. That’s where the tape comes in. Each section gets some tape, and when you stretch it out, the tape lines up.

Continue reading “Random Wire Antenna Uses No Wire”

Zinc Creep And Electroplasticity: Why Arecibo Collapsed

It’s been nearly four years since the Arecibo Telescope collapsed, an event the world got to witness in unprecedented detail thanks to strategically positioned drones. They captured breathtaking video of one of the support cables pulling from its socket as well as the spectacularly destructive results of 900 tons of scientific instruments crashing into the 300-meter primary reflector. But exactly why did those cable sockets fail?

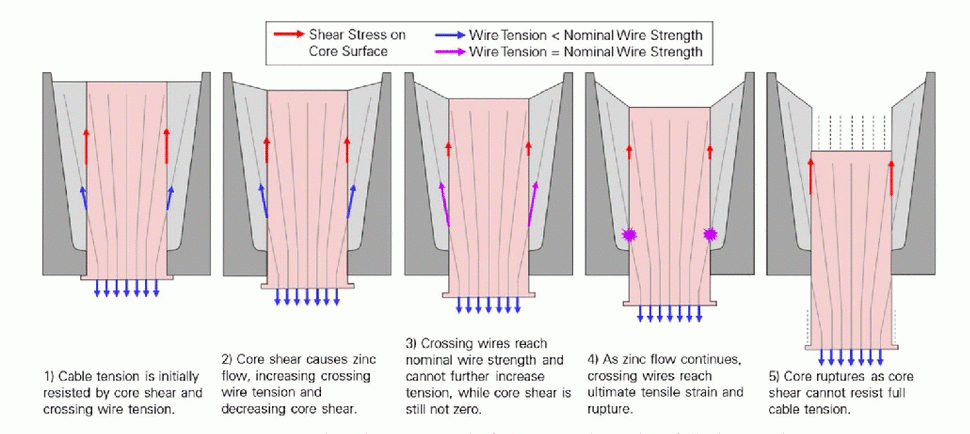
A new report aims to answer that question, and in the process raises some interesting questions of its own. The proximate causes of the collapse have been known for a while, including the most obvious and visible one, the failure of the zinc “spelter sockets” that were cast around the splayed ends of the wire ropes to hold them in place. The new report agrees with this conclusion, at least in part, implicating “zinc creep,” or the tendency for zinc to deform over time under load. Where it appears to differ, though, is with the quality of workmanship on the sockets, finding no issues with the way the individual wires in the failed support cable were manually splayed within the socket before the molten zinc was poured. The report also points out that the collapse probably started when Hurricane Maria swept over Puerto Rico 39 months before the collapse, after which zinc creep in the sockets seemed to accelerate.

But why did the sockets fail? As the report points out, spelter sockets are commonly used to anchor cables that support heavy loads under conditions similar to the tropical climate at Arecibo. After ruling out every other cause, the committee was left with the conclusion that Arecibo itself may have been to blame for the accelerated zinc creep, thanks to electrical currents induced in the cables and sockets when the telescope’s powerful transmitters were used. They call this “long-term, low-current electroplasticity.” Electroplastic effects have been observed since the 1950s, and while far from certain that’s what happened here, the thought is that skin-effect currents induced in the support cables flowed to ground through the zinc sockets, increasing the plasticity of the metal and accelerating the zinc creep that ultimately led to collapse.

Case closed? Hardly. The electroplasticity mechanism for the Arecibo collapse offered by this report is almost a “diagnosis of exclusion” situation. It makes sense, though; since no other spelter sockets have ever failed this way in a century of use, there’s a good chance that the root cause was specific to Arecibo, and since it was once the world’s most powerful radio transmitter, it seems like a red flag that bears further investigation.

PicoROM, A DIP-32 8-Bit ROM Emulator

As we all know, when developing software for any platform or simply hacking a bit of code to probe how something works, the ability to deploy code rapidly is a huge help. [Martin Donlon], aka [wickerwaka], is well known in retro gaming and arcade hardware reverse engineering circles and had the usual issues figuring out how an arcade CPU board worked while developing a MiSTer core. Some interesting ASICs needed quite a bit of poking, and changing the contents of socketed ERPOMs is a labour-intensive process. The solution was PicoROM, a nicely designed ROM emulator in a handy DIP-32 form factor.

As the title suggests, PicoROM is based on the Raspberry Pi RP2040. It emulates an 8-bit ROM up to 2MBits in size with speeds up to 100ns. Since it uses the RP2040, USB connectivity is simple, enabling rapid uploading of new images to one (or more) PicoROMs in mere seconds. A vertically orientated USB-C connector allows multiple PicoROMs to be cabled to the host without interfering with neighbouring hardware. The firmware running on core 1 passes data from the internal 264K SRAM, using the PIO block as a bus interface to the target. A neat firmware feature is the addition of a mechanism to use a ROM region as a bidirectional control channel, which the software running on the target can use to communicate back to the host computer. This allows remote triggering of actions and the reporting of responses. Responses which may not be physically observable externally. [Martin] is using this feature extensively to help probe the functionality of some special function chips on the target boards, which is still a slow process but helped massively by reducing that critical software iteration time. The PCB was designed with KiCAD. The project files for which can be found here.

This isn’t the first time we’ve seen the RP2040 used for ROM emulation; here’s a pile of wires that does the same job. It just isn’t as pretty. Of course, if you really must use EPROMs, then you could give this sweet programmer a look over.

Continue reading “PicoROM, A DIP-32 8-Bit ROM Emulator”

Split-Flap Clock Flutters Its Way To Displaying Time Without Numbers

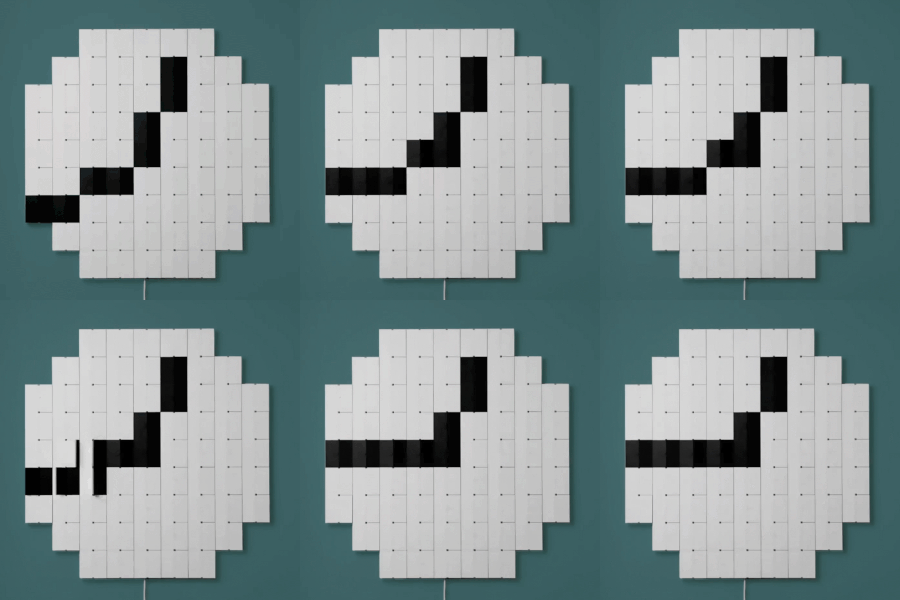
Here’s a design for a split-flap clock that doesn’t do it the usual way. Instead of the flaps showing numbers , Klapklok has a bit more in common with flip-dot displays.

Klapklok updates every 2.5 minutes.

It’s an art piece that uses custom-made split-flaps which flutter away to update the display as time passes. An array of vertically-mounted flaps creates a sort of low-res display, emulating an analog clock. These are no ordinary actuators, either. The visual contrast and cleanliness of the mechanism is fantastic, and the sound they make is less of a chatter and more of a whisper.

The sound the flaps create and the sight of the high-contrast flaps in motion are intended to be a relaxing and calming way to connect with the concept of time passing. There’s some interactivity built in as well, as the Klapklok also allows one to simply draw on it wirelessly with via a mobile phone.

Klapklok has a total of 69 elements which are all handmade. We imagine there was really no other way to get exactly what the designer had in mind; something many of us can relate to.

Split-flap mechanisms are wonderful for a number of reasons, and if you’re considering making your own be sure to check out this easy and modular DIY reference design before you go about re-inventing the wheel. On the other hand, if you do wish to get clever about actuators maybe check out this flexible PCB that is also its own actuator.

Continue reading “Split-Flap Clock Flutters Its Way To Displaying Time Without Numbers”

Open-Source Robot Transforms

Besides Pokémon, there might have been no greater media franchise for a child of the 90s than the Transformers, mysterious robots fighting an intergalactic war but which can inexplicably change into various Earth-based object, like trucks and airplanes. It led to a number of toys which can also change shapes from fighting robots into various ordinary objects as well. And, perhaps in a way of life imitating art, plenty of real-life robots have features one might think were inspired by this franchise like this transforming quadruped robot.

Called the CYOBot, the robot has four articulating arms with a wheel at the end of each. The arms can be placed in a wide array of positions for different operating characteristics, allowing the robot to move in an incredibly diverse way. It’s based on a previous version called the CYOCrawler, using similar articulating arms but with no wheels. The build centers around an ESP32-S3 microcontroller, giving it plenty of compute power for things like machine learning, as well as wireless capabilities for control or access to more computing power.

Both robots are open source and modular as well, allowing a range of people to use and add on to the platform. Another perk here is that most parts are common or 3d printed, making it a fairly low barrier to entry for a platform with so many different configurations and options for expansion and development. If you prefer robots without wheels, though, we’d always recommend looking at Strandbeests for inspiration.

Ubiquitous Successful Bus: Hacking USB 2 Hubs

We’ve been recently looking into USB 2.0 – the ubiquitous point-to-point communications standard. USB 2 is completely different from USB 3, the blue-connector next-generation USB standard. For instance, USB 2 is a full-duplex pseudo-differential bus, and it’s not AC-coupled. This makes USB2 notoriously difficult to galvanically isolate, as opposed to USB 3.  On the other hand, USB 2 is a lot easier to incorporate into your projects. And perhaps the best way to do so is to implement a USB hub.

USB 2 hubs are, by now, omnipresent. it doesn’t cost much to add to your board, and you truly have tons of options. The standard option is 4-port hubs – one uplink port to your host, four downlink ports to your devices. If you only have two or three devices, you might be tempted to look for a hub IC with a lower amount of ports, but it’s not worth bothering – just use a 4-port chip, and stock up on them.

What about 7-port chips? You will see those every now and then – but take a close look at the datasheet. Some of them will be two 4-port chips inside a single package, with four of the ports bottlenecked compared to the three other ports – watch out! Desktop 7-port hubs are basically guaranteed to use two 4-port ICs, too, so, again, watch out for bottlenecks. lsusb -t will help you determine the hub’s structure in case you don’t want to crack its case open, thankfully.

Recommendations? I use SL2.1 chips – they’re available in an SO16 package, very unproblematic, to-the-point pinout and easily hand-solderable. CH334 is a close contender, but watch out because there are different variants of this chip that differ by both package and pinout, so if you’re buying a chip with a certain letter, you will want to stick to it. Not just that, be careful – different variants run out at different rates, so if you lock yourself into a CH334 variant, consider stocking up on it. Continue reading “Ubiquitous Successful Bus: Hacking USB 2 Hubs”

The Hardware pipeline consists of three parts: antenna, signal conditioners, and computer. The solid lines indicate LMR-400 cable (low loss microwave coax), whereas the dotted line represents USB 3.0. (Credit: Jack Phelps)

Tracking Hydrogen In Space With A Home Radio Telescope For 21 Cm Emissions

What do you get when you put a one-meter parabolic dish, an SDR, a Raspberry Pi, and an H1-LNA for 21 cm emissions together? The answer is: a radio telescope that can track hydrogen in the Milky Way as well as the velocities of hydrogen clouds via their Doppler shifts, according to a paper by [Jack Phelps] titled “Galactic Neutral Hydrogen Structures Spectroscopy and Kinematics: Designing a Home Radio Telescope for 21 cm Emission“.

The hardware pipeline consists of three parts: antenna, signal conditioners, and computer, as per the above graphic by [Jack Phelps]. The solid lines are low-loss microwave coax LMR-400 cable, and the dotted line represents USB 3.0 between the RTL-SDR and Raspberry Pi 4 system. This Raspberry Pi 4 runs a pre-made OS image (NsfSdr) by [Dr. Glenn Langston] at the National Science Foundation, which contains scripts for hydrogen line observation, calibration and data processing.

After calibration, the findings were verified using publicly available data, and the setup could be used to detect hydrogen by pointing the antenna at the intended target in space. Although a one-meter parabolic dish isn’t going to give you the most sensitivity, it’s still pretty rad that using effectively all off-the-shelf components and freely available software, you too can have your own radio telescope.