Adding threads to your 3D prints is a life-changing feature, but obviously there are a lot of trade-offs and considerations when deciding on how to go about this exactly. Between self-tapping screws, printed threads, heat inserts and a dozen other options it can be tough to decide what to go with. In a recent video [Thomas Sanladerer] runs through a few of these options, including some less common ones, and what he personally thinks of them.
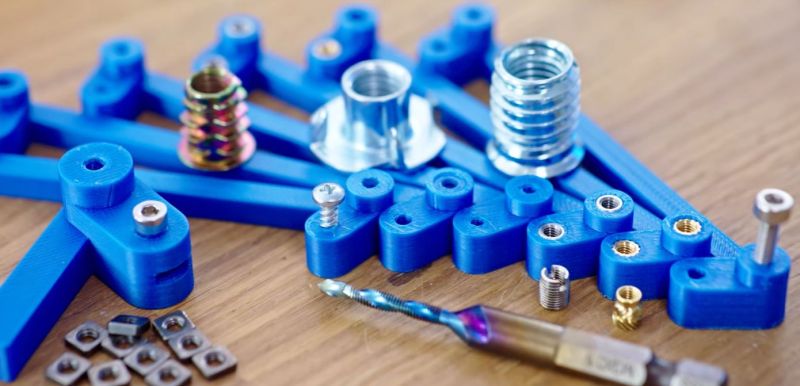
Confounding factors are also whether you’re printing on an FDM or resin printer, what size thread you’re targeting and how often the screw or bolt will be removed. The metal heat inserts are generally a good option for durability, but when you have big bolts you get a few other metal-based options too, including thread repair inserts and prong nuts. Tapping threads into a print can also be an option, but takes a fair bit of patience.
Slotted nuts can be an idea if you don’t mind carving a space into your model, and the comments dove on embedding nuts in the print by pausing during printing. Ultimately [Thomas] really likes to use a type of self-forming threads with just three protruding sections into the hole that the bolt taps into, which reduces the stress on the part and works well enough for parts that only have to be screwed down once or twice.


Me unga bunga caveman. Me cut small hole and use regular M3 screws as redneck self tappers. Ug print many things like this
For my taste cutting M3 into printed plastic is a lala-good-bad-job-random-pain-thing.
I love the riveted nuts (right most at 7:25). They are cheap, easy to design around and do not need any tools, just pull them in with a screw and a washer.
If you own a KLIPPER printer, they can be used very totally easy inside out: just design a hole big enough for them, slice the thing and look for the layer number to insert them with slicer preview. Then open your .gcode file, look for the layer and add “PAUSE” into it. Surprisingly, the print will stop, head moves away and the printer will wait forever until you press “continue” on its screen.
/me loves that stupid user compatible stuff.
Most slicers allow you to add pauses at layers. That is even easier than modifying the gcode file yourself.
Rivet nuts are meant for sheet metal, but if you have the riveting tool, you can squeeze on the rivet just slightly and jam it in place. I recall the tool has a stopper that allows you to do that.
Riveting a small nut like M3 or M4 takes so much force that using the screw and washer method is likely to stretch or snap the screw. That’s my experience with them.
Same here honestly. I just under size the hole I make in my part a bit and pretend that my machine screws are self tapping.
Granted, I’m not relying on the strength of these too much, as usually I’m attaching a lid or some other non-stressed connection.
Just curious….is that better than self tappers, or just because you don’t have self tappers to hand?
If you get the size right, it can be re-inserted without chewing up the threads.
If when reinserting self tapping screws you first rotate the screw counter clockwise while applying slight pressure the screw will drop into the previous thread then you can tighten. This will minimize cutting new threads.
It will still cut into the old thread and turn it sloppy after a couple times.
I have no experience with 3D printing, but for wood, where I need to attach a machine screw I usually use what we call a Rampa nut (aka a threaded insert). But for stiffer woods if the bolt is long and doesn’t need to be reattached and not need to support too much force, you can tap machine screw thread into wood quite well and just thread into the wood.
Plastic taps really well too. For small stuff I use sheetmetal screws.
Me troglodyte too. But make fire first. Me heat up me threaded rod first. Me then screw the tight hole.
Me make block with holes in CAD. Find good hole size for printer. Make more holes of that size, add chamfer because chamfer pretty and fix smooshy hole end
Who amongst us has never resorted to this.. about 200 times
Meh.. embedded nuts are easy enough to design around and cost-effective, otherwise heat-set inserts are my go-to for finish and production-quality stuff.
What if you just use hexagonal hole and put metric screw in it? Might give you some clearance for threads to form…
I had fairly good succes with putting some glue on m3 bolts and putting it in a 3 mm hole. When the glue hardens it does not attache that wel to the metal. Now you can easily unscrew and screw it again. I used PVC glue.
I use brass insert for prototypes, tools, and one-off jigs as they are a bit expensive and finicky to insert, even with the proper tool: too tight and you end with plastic in the thread, too loose is well, too loose.
And almost only plastic screws with deep threads for production parts (injected and 3D printed). Well designed bosses with 3 or 4 inner walls is plenty strong, and easy to apply.
I miss the days when people wrote blog posts when they learned interesting things.
Tom does write up his findings, but there’s a delay between when the videos go up and when the blog post happens. Check out toms3d.org
Thanks for the tip! This is amazing.
https://toms3d.org/2025/01/14/a-better-way-to-add-threads-to-your-3d-prints/
Nope, not Tom.
Just received my heat-set inserts yesterday and I will discover by myself because I couldn’t freaking stand a narcissic youtube video anymore while a blog post with few pictures would have been more than enough.
screw you-youtube
I also cantankerously miss web1.0 text-and-photo tutorials. An art form completely annihilated by jootoob… At least you can rely on the old rule of immediately skipping the first third of the video.
It’s probably possible to use AI to take a tutorial video and auto-convert it into a text summary with step-by-step, accompanied by stills from the video… A ridiculous solution but it might be good for a laugh
While my kids grew up on web videos, I’m still a reluctant YouTube consumer, mostly because they often feel like a waste of time (especially slower than 1.25x), but if a picture is worth 1,000 words, salient moments in a video are worth so much more. Good text + photos tutorials are surprisingly hard to produce (e.g. to me, Instructables feels even more hit or miss than YouTube), but I can imagine a happy medium. Maybe AI will figure out how to take good videos made by bad YouTubers and and turn them into good, clear, and concise video tutorials. Better yet, structured, annotated videos where the viewer doesn’t have to keep pressing “back 10 seconds” over and over or hunt down the minutes:seconds timecode that (say) “step 3” was at.
I usually just put the tap in the drill and tap the holes. Just go slow and make sure the walls are thick enough. It works fine for things that won’t be taken apart much. When you put the screw in, turn it backwards until you feel it drop into the threads so you don’t cross thread it.
I’ve had good results with printing female threads for light duty applications; I download a .stp file of threaded rod from McMaster-Carr and subtract it from my model, or for a looser fit I incorporate a threaded coupler .stp into my model. Rhino / Prusa Mini.
You can also use springs as an insert, they are good for when threads get dammaged
Do you mean helicoils? CNC Kitchen covered those as well. https://www.cnckitchen.com/blog/helicoils-threaded-insets-and-embedded-nuts-in-3d-prints-strength-amp-strength-assessment
I was just thinking Helicoils. Would be good as you could print a corse thread to interface with the outside, and then have a finer pitch for the actual thread. This was used in some PVDF parts at my last company, as a more robust thread insert.
We make parts that are used on machinery and we just make a hexagonal hole the size of a nut, minus about 0.1mm and then squeeze the nut into the hole. Then a normal machine screw will fit into it for repeated fitting.
Rivets can be used with large washers on the ends to spread the load and reduce pull thru, threaded inserts need to be heated then screwed in or they’ll crack the material, machine screws can be utilized by modeling a 6 sided polygon cut to capture and hold the nut it’s threading into, these are all I use
Once more, with feeling.
I just make cavities for standard nuts, slightly undersized, on the opposite side of the part.
Use a screw to pull the nut into the cavity.
Works great, I’ve done this numerous times.
It looks like the commenters are an association of people who have never thought of using the self-forming threads who in the early 19th Century would be joyful Luddites.