LayerLapse Simplifies 3D Printer Time-lapse Shots

We know you’ve seen them: the time-lapses that show a 3D print coming together layer-by-layer without the extruder taking up half the frame. It takes a little extra work compared to just pointing a camera at the build plate, but it’s worth it to see your prints materialize like magic.

Usually these are done with a plugin for OctoPrint, but with all due respect to that phenomenal project, it’s a lot to get set up if you just want to take some pretty pictures. Which is why [Whopper Printing] put together the LayerLapse. This small PCB is designed to trigger your DSLR or mirrorless camera once its remotely-mounted hall effect sensor detects the presence of a magnet.
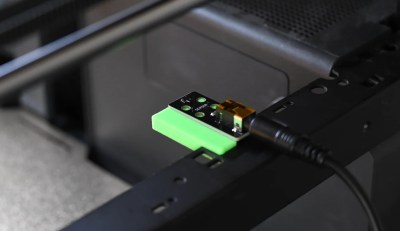
The remote hall effect sensor.

The idea is that you just need to stick a small magnet to your extruder, add a bit of extra G-code that will park it over the sensor at the end of each layer, and you’re good to go. There’s even a spare GPIO pin broken out should you want to trigger something else on each layer of your print. Admittedly we can’t think of anything else right now that would make sense, other than some other type of camera, but we’re sure some creative folks out there could put this feature to use.

Currently, [Whopper Printing] is selling the LayerLapse as a finished product, though it does sound like a kit version is in the works. There’s also instructions for building a DIY version of the hardware using your microcontroller of choice. Whether you buy or build the hardware, the firmware is available under the MIT license for your tinkering pleasure.

Being hardware hackers, we appreciate the stand-alone nature of this solution. But if you’re already controlling your printer through OctoPrint, you’re probably better off just setting up one of the available time-lapse plugins.

Printed Robotic Arm Pumps Up With Brushless Motors

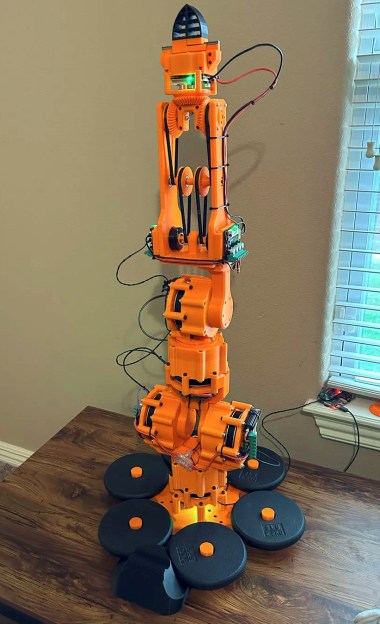
[JesseDarr] recently wrote in to tell us about their dynamic Arm for Robitc Mischief (dARM), a mostly 3D printed six degrees of freedom (6DOF) robotic arm that’s designed to be stronger and more capable than what we’ve seen so far from the DIY community.

The secret? Rather than using servos, dARM uses brushless DC (BLDC) motors paired with ODrive S1 controllers. He credits [James Bruton] and [Skyentific] (two names which regular Hackaday readers are likely familiar with) for introducing him to not only the ODrive controllers, but the robotics applications for BLDCs in the first place.

dARM uses eight ODrive controllers on a CAN bus, which ultimately connect up to a Raspberry Pi 4B with a RS485 CAN Hat. The controllers are connected to each other in a daisy chain using basic twisted pair wire, which simplifies the construction and maintenance of the modular arm.

As for the motors themselves, the arm uses three different types depending on where they are located, with three Eaglepower 8308 units for primary actuators, a pair of GB36-2 motors in the forearm, and finally a GM5208-24 for the gripper. Together, [JesseDarr] says the motors and gearboxes are strong enough to lift a 5 pound (2.2 kilogram) payload when extended in a horizontal position.

The project’s documentation includes assembly instructions for the printed parts, a complete Bill of Materials, and guidance on how to get the software environment setup on the Raspberry Pi. It’s not exactly a step-by-step manual, but it looks like there’s more than enough information here for anyone who’s serious about building a dARM for themselves.

If you’d like to start off by putting together something a bit easier, we’ve seen considerably less intimidating robotic arms that you might be interested in.

Continue reading “Printed Robotic Arm Pumps Up With Brushless Motors”