
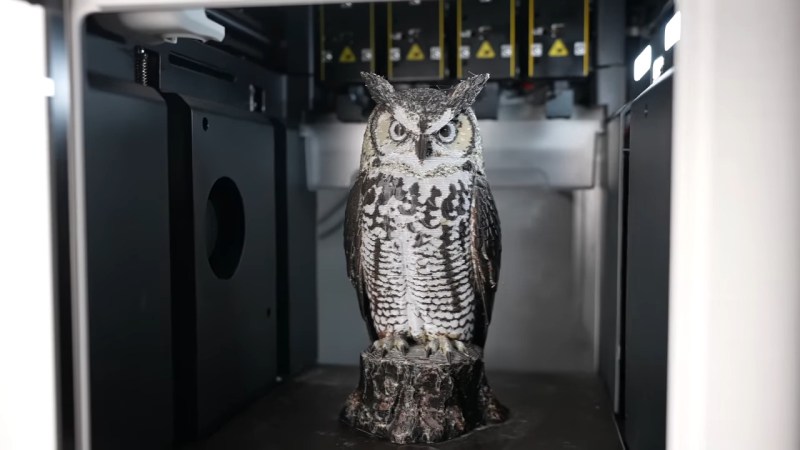
Multi-color 3D printing is notorious for being difficult to get right. Even with modern printers, you often end up using much more filament (and tool changes) than you would for a single-color print. [YKG3D] shows us a new method of color printing that needs far fewer tool changes. It’s the work of [SentientStardust] and you can check it out here.
Based on 2018 research, the new slicer rotates through its palette of colors each layer. Then, either by adjusting the amount of filament dispensed or by displacing the edges, the prominence of each color is adjusted. The result is smoother gradients and better color blending — and it prints faster too!
Of course, nothing is perfect: the more base colors you add, the thicker your apparent layer lines will be. For example, a 3-color print with 0.2 mm layer height will appear as having 0.6 mm layer height. A different issue happens when the walls get too steep; the color blending illusion starts to break down.












I kinda don’t see the point of having coloured 3D prints. The only reason why I would 3D print something is because I want the physical object to be created with its specific mechanical properties. I don’t really care if its red, blue, orange or any other colour. But that’s just me. I only make enclosures for my electronics projects, so everything I 3D print is a box of some sort.
The tabletop RPG community has been 3D (SLA) printing very detailed figures for a long time now, and they always have to hand paint them
If common mutli-colour 3D printing will ever come, I doubt it will take a multi-spool approach. Maybe a spool of a special filament that changes colour when exposed to UV light? Bah I have no idea
I’m not into colorful prints, either. But what they show in the video is the innovations which are pushing the boundaries of our current understanding. Most of these implementations do not have to become mainstream, but more options are welcome. These ideas and implementations inspire the next generation of tooling, hopefully continuing the process for decades to come.
Totally agree. Since 3d printing opened up to the masses there’s been a lot of incredible innovations. All in different areas depending on how people use them but it’s all good as it feeds further development and sparks innovation elsewhere. While colour isn’t for me (yet) it’s amazing to see what people can do.
I still think the filament should be white (or clear) and pigment can be added at just the right time to add color to the plastic as it’s printed. All other methods are wasteful of space, money, material, time, or some combination of these. Given that we have machine learning, and given the vast number of printers out there, it should be a simple problem to crack. It’s not fundamentally different from CMYK and white paper, and that’s used billions of times a day, every day, around the world.
Clear would be the method then. White is a disaster for printing with common nozzles, as white is produced using titanium particles, that wear down nozzles. I try to avoid using white filament for that reason.
Now that is something I never knew! Good information! Is that true for all types of filament?
IIRC titanium dioxide fluoresces under uv light so that could be a way to check (assuming that’s what colors white filament)
You need a Diamond Back nozzle then. It’s made from poly-crystalline diamond, so it’s harder than titanium.
Generally white filament is not considered to be abrasive its titanium dioxide which is not abrasive on its own.
Actually, only the final wall layer needs to be colored. All the color filament spent inside the model is actually wasted color. And if we go even more precise, only the visible part of the filament’s perimeter should be colored. So an inkjet that’d spray around the filament’s melted plastic going out of the extruder should be largely enough. But that means rotating a sprayed in a place that’s very very restricted (and no, you don’t want to pain the filament before it enters the extruder since the plastic goo will melt & merge all your color). In the end, the pragmatic solution is to do like Chinese are doing, print in a single color, then put your model in a 5 axis machine that can spray UV curable colored resin (with 5 colors: CMYKW) where it is due.
Not necessarily if the object is subject to wear in use the outside color layer could be worn away.
HUH?
Im only familiar with the rising number of companies doing full color printing using CMYKWSupport UV cure inkjet with epson heads. Its far more efficient than what this chinese company you speak of is doing. Its not like its the pigment that is costly. Mimaki was one of the first to make these printers with their cheapest printer going for $50K.
Inew3d’s kickstarter back in march dropped the entry level to $8k.
And just yesterday HeyGears launched their kickstarter for their 3d resin jet printer, Their G1X model has brought the price down to $3600 ($5500 msrp aft kickstarter)
Theyre using CMYKWW+Transparent+Support with a 420x330x130mm build area using an epson i3200 printhead Thats a $1300 replacement cost, and you will be replacing them every 6-12 months from what the UV DTF printers using them are saying. So its definitely not a cheap endeavor even at this new more attainable entry point.
Anyway, what chinese company is using 5 axis print painting? As impractical as that sounds Id love to see it.
Heres the thing, the tabletop community exclusively uses resin printers (at least the professionals do) because it allows for much finer detail and doesn’t have any layer lines as far as I know, so this method wouldn’t even apply to them, so its even more pointless. But your idea of a spool that changes color depending on the wavelenghts/amounts of UV applied… I feel like that has some actual potential. But i’m not expert.
What happened to the 3d printer that had an inkjet head attached for after print color adding? I’m guessing it did not work in the long run for some reason.
I have always wondered why the printer discards the excess filament for larger prints, can it not be used as infil instead, this would speed it up, reduce tool changes and use a lot less filament…
Orca at least does have settings to use the flush “waste” as infill and for supports.
https://www.orcaslicer.com/wiki/print_settings/multimaterial/multimaterial_settings_flush_options
PrusaSlicer has had this for a while. You choose the object to infill into and then it will. But often times the amount of infill you have is less than the purge needed so there still is a tower. PrusaSlicer also allows for a waste object. An object will be made with the dimensions you want, but with an unknown color since it is where the waste goes to. You can also adjust how much to purge from each color, to each color to minimize waste. And there is an option for no sparse layers. Basically if a layer doesn’t need a color change the purge tower isn’t added to. This makes the purge tower a different height than the model which can have issues. All of these things combined means waste can be reduced quite a bit from default settings.
Why don’t they just let the printer use the excess filament as infill. An adaptive infill feature will make prints stronger cheaper, faster and reduce the waste you chuck in the bin…
Common multi-color 3D printing is already there. Either by using a toolchanger or a filament swapper, but having some kind of multi-filament solution is pretty standard nowadays.
It’s totally ok that you don’t need multi-filament for your functional prints, but that doesn’t mean that nobody has a use case for them.
Btw, I use multi-filament for enclosures too. I use one color for most of the body, as a base color. Then I use a second color (e.g. white) to print a logo and/or a label onto the case. The third filament is a transparent one so that the charging light can shine through it. The fourth filament is a soft TPU that I use on the top few layers of one of the halves of the case to create a tight seal between both halves of the case when I screw it shut. I also use the same soft TPU to print some flaps that protect e.g. the MicroSD cart slot. That way I can open the flap to access the SD card or tuck it in to have an almost water tight seal.
The technology is here now ….
Forget 4 Colors: This Orca Slicer Fork Unlocks Virtually Unlimited Color Combos | All3DP https://share.google/LKwDCTGOe0lsvxOqF
CMYK INK printer –>
https://www.mimakiusa.com/products/3d/3duj-553/
Pure laziness, wasting more plastic and time, learn how to paint instead, see how the chinese toys are made.
Neh… that was a nice example of lazy thinking.
According to your own logic, if 3D printing in color is lazy, then 3D printing in general is lazy too.
Just cut down a tree (or chisel out a nice piece of rock from a suitable mountain) and cut or sculpt your owl (or whatever you like) from the raw material and then paint it.
That’s not even conditional to this case. That’s the whole point of it – minimizing effort and manual skill.
For art pieces and decorative things, 3D printing without bothering to apply any finishing to the item is the fastest way to communicate its lack of value. It cheapens the object like someone who wrapped their house in tyvek, nailed on the batten strips, then ran out of money and never installed any sidings.
This is an article about a video that showcases a Github repo which implements papers from 2018. Why the video? It’s just a completely superfluous intermediate. Credit the original software/paper authors instead, please!
I’m not into printing figures or anything that requires fancy coloring but I often use multiple colors for markings or just style of manufactured items. My go to solution is to switch filament by layer but not all designs would work with that. With single nozzle you would really spend a lot of time printing with multiple filaments on each layer.
What I would like to see in the slicer, and at some point I may even implement that, is pure purging into infill and wall insides. It won’t always be feasible but for aesthetics you may print color A outside walls, switch filament, print infill and internal wall loops, then color B outside walls. On next layer do the opposite. Start with B outside, then switch, print everything that’s not visible or relevant, then print color A outside. If you have the same filament type, it will mix well and for decently sized prints with thick layers you will purge filament into the print before you reach the outside layer.
Current slicers support purging into infill but it’s still sketchy and often requires prime tower. For purists it’s not acceptable. Color is secondary but it’s nice to have if you only sacrifice print time, not a ton of waste.
You know what would massively save time and material too? Making the figurine hollow.
For sure, but that also reduces structural integrity by a ton, but maybe instead of hollow there can be tons of hollpw triangles. I know triangles are the perfect shape for load bearing
Definitely an interesting approach. I don’t really do any full color printing, but this is a giant leap towards making it more acceptable from a waste:model usage ratio. I am curious about how this might be enhanced by methods like acetone smoothing afterwards to help blur the layers even more. Currently it seems like it’s about right for things that go on a high shelf or otherwise have a forced distance to the observer.
wow, the quality he’s getting on that printer is absolute crap.
The whole concept is a dancing bear. It’s never going to do Swan Lake, but people will still throw money at you to see it.
To me the advantage of colored filament over paint is that it’s the same color inside in case the object gets scratched. I’m not sure this method would hide scratches very well. But… it’s still a novel idea and worth reading about.
You definitely know more than me but could you modify the speed in those areas to slow down ,heat up & push more filament @ that moment to get the amount of droop you need to fill in those areas( plenty of trial & error but I’m sure could be done to get to the correct speeds ,heat & amounts to maximize those drooped areas ). Maybe I’m wrong but seems logical to me .
New materials for 3D printing:
https://techxplore.com/news/2026-07-3d-printable-material-body-robots.html
In my experience, it’s sometimes better to use the standard settings, especially with silky PLA filament like this: https://www.skilteproduktion.dk/pla++-silk_13302.html. Otherwise, the prints won’t be as silky as they should be.
This is the 3D printer I used: https://www.skilteproduktion.dk/bambu-lab-x2d-combo_10766r11757412.html
I keep wondering if it would be better to apply the same tech that has developed for 3d printing to just painting the object afterwards- either in a separate machine or with a different head in the same printer.
Since we already have all the shape data of the object and the kinematics of the printer worked out, a printing head of some kind + a turntable axis should be able to do a decent job of painting the finished object. It wouldn’t be able to paint every part of every model obviously but the kind of objects you would want fancy decoration on would probably be more continuous single surface things anyway- like parts of a model you couldn’t reach are going to be less visible anyway.