Home Made Half Life 2 Turret Powered By Pi

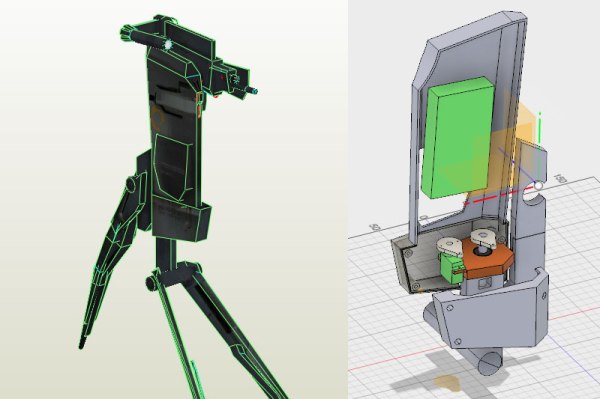
To help expand his inter-dimensional empire, [Solderchips] has decided to build his own Half Life 2 turret. This, he hopes, will automatically track and shoot anyone who hinders the work of Our Benefactors. He’s documenting the process, and has just published his first step: creating a 3D model of the turret and printing it out. The final project will use a Raspberry Pi and a webcam to track rebels and fire on them automatically, especially those with crowbars.

He’s made a promising start, using a papercraft model of the turret to build the 3D model, then modifying it to accommodate the brains (the Raspberry Pi) and the brawns, a couple of small servos that will move the top of the turret around. The next step will perhaps be to add a tilt switch so that the whole thing falls asleep if it falls over. The thing to learn from this project, is that at some point you just have to stop thinking about it and actually make something. This paper model is a big step toward success compared to carrying around the dream in your head.

We’ve seen a few Portal Turret builds and a very nice Wheatley build, but not a decent Half Life 2 turret build, so hopefully [Solderchips] will see this through to completion and release all of his files.

Make A Cheap GoPro Remote From An ESP8266

GoPro cameras are getting pretty sophisticated, but they can’t yet read minds: you have to tell them when to start recording. Fortunately, they can be remote controlled very easily over a WiFi connection, and this neat tutorial from [euerdesign] shows how you can use an ESP8266 to build a very cheap GoPro remote. The idea is simple: you press a button connected to the ESP8266, which is programmed with the details of the ad hoc WiFi network that the GoPro creates. It then posts a simple URL request to the GoPro, which starts recording. Total cost? A few bucks for the ESP8266, a button and a few bits of wire.

What the remote does is defined by the URL you set it to request: pretty much all of the features of a GoPro can be controlled this way. If you wanted to get fancy, you could expand this to create a multiple button remote that could do other things, such as change frame rate or start streaming to the interwebs in a situation where you don’t want to risk a smartphone or something equally expensive.

Continue reading “Make A Cheap GoPro Remote From An ESP8266”

Four Seasons In One Photo

What an interesting way to show a year: Norwegian hacker [Erikso] created a condensed timelapse that shows a year in a single photo. He had taken a timelapse of the view from his living room window in the frozen north every day during 2010, using a camera that was locked in place taking an image every 30 minutes. Then, with the help of some hacker friends, he came up with a script that slices these images up and combines them so that each day is represented by a vertical slice. The result is a gorgeous image that gives a wonderful sense of the seasons, and how that affects the trees. You can see the leaves grow and fall, and the snow on the ground come, go and come again.

Continue reading “Four Seasons In One Photo”

Build Your Own Thermal Camera

We have featured thermal camera projects by [Max Ritter] before, but [Max] has just taken the next step: he is offering the latest version as a build-it-yourself kit. The DIY Thermocam improves on his previous designs by capturing 60 by 80 pixel thermal images, which can be combined with visible light images from an accompanying  640 by 480 pixel camera to produce the final image. It is built around the FLIR Lepton module that has been used in many of the recent commercial thermal cameras that we have seen. Max has also added a battery and display, making the whole thing a standalone camera.

The firmware that runs all this is open-source and written in C++ for easy modification, so users can build their own thermal camera.”The approach is to offer people the self-assembly kit so that they can use it as a development platform to do whatever they want to achieve with thermal imaging”[Max] told us. The kit runs €429 (about $468), with free shipping worldwide.

Continue reading “Build Your Own Thermal Camera”

Here Comes Santa Claws

Liberty Games in the UK was looking for a fun way to support charity for the holidays, and we think they succeeded. They decided to set up an arcade crane machine to run over the internet, with each type of toy snagged earning  a donation. Snag a bear, and they will donate £5 to St Mungos, a UK charity that works with homeless or at risk people. Snag one of the rarer Santa toys, and they will donate £20. It’s a great cause, and a nice hack. Behind the scenes, the Internet side of things runs on a Raspberry Pi connected to a PiRack and a couple of PiFace digital interface cards that are wired into the electronics of the crane machine so they could control the buttons on the machine from a Web interface. Unfortunately, it didn’t seem to be running when we tried it, but hopefully someone will give the machine a swift kick shortly to get it going until the Hackaday traffic invariably brings it down again.

One of the interesting thing that they discovered while working on these hacks: they have a pay-out ratio that is determined by the strength of the grabbing arm. The owner can tweak this so that the arm does not grab very firmly, which means a dropped bear. Want to torture your friends with hopes of snagging the best stuffed animals?. Follow the example of this claw machine build all from parts on hand.

Hacking The Leapfrog TV To Play Doom

In a few hours, millions of fresh-faced children will be tearing open presents like the Leap TV, a Wii for the pre-school crowd that has a number of educational games. And, once they get bored with them, what could be more educational than fighting your way through a horde of demons to save the earth? Yup, [mick] has hacked the Leap TV console to play Doom. After some poking around he discovered that the Leap TV is built around a quad-core nxp4330q arm7-A processor, with 1GB of RAM and 16GB of flash memory, while the controller links to the main console using Bluetooth LE. That’s more than enough to run Doom on (in fact… too much), so he whipped out his handy compiler and got Doom and SDL running with only a few minor code changes.

This isn’t [Mick]s first such hack: he previously hacked the V-Tech InnoTab, a cheap tablet for kids, which persuaded the manufacturers to release the full source code for the tablet. Will Leapfrog follow suit? That remains to be seen, but in the meantime, [Mick]s work gives us some insight into the internals of this device.

Continue reading “Hacking The Leapfrog TV To Play Doom”

Hackaday Explains: Li-Fi & Visible Light Communications

A new way to transmit data is coming that could radically change the way that devices talk to each other: LiFi. Short for Light Fidelity, LiFi uses visible light to send data, creating the link between router and device with invisible pulses of light. This type of Visible Light Communication (VLC) uses something that is present in pretty much every room: an LED lightbulb.

What is LiFi?

Li-Fi sounds like the an engineer’s fevered dream: it is fast, cheap, secure and simple to implement. Speeds of up to 10Gbps have been demonstrated in the lab, and products are now available that offer 10Mbps speed. It is cheap because it can use a modified LED lightbulb. It is secure because it only works where the light is visible: step out of the room and the signal is lost. It is simple to implement because it uses an existing technology: LEDs.

The basis of the technology is in turning the LED light on and off very fast. By switching an LED on and off millions of times a second, you can create a data signal that can be detected by a sensor, but which is invisible to the human eye. At the other end, another LED detects these pulses, and can send light pulses back in response, creating a bi-directional link. If you combine this with wired Ethernet or a WiFi network, you have an awesome combination: an Internet connection that uses visible light for the last link.

Continue reading “Hackaday Explains: Li-Fi & Visible Light Communications”