Four Seasons In One Photo

What an interesting way to show a year: Norwegian hacker [Erikso] created a condensed timelapse that shows a year in a single photo. He had taken a timelapse of the view from his living room window in the frozen north every day during 2010, using a camera that was locked in place taking an image every 30 minutes. Then, with the help of some hacker friends, he came up with a script that slices these images up and combines them so that each day is represented by a vertical slice. The result is a gorgeous image that gives a wonderful sense of the seasons, and how that affects the trees. You can see the leaves grow and fall, and the snow on the ground come, go and come again.

Continue reading “Four Seasons In One Photo”

Little Helper: Open Source Hardware Hacker Multitool

We love a good multitool. There’s something seductive about knowing that if, for some reason, you need to saw down a tree on a moment’s notice, you have a tiny saw in your pocket. We also like electronic versions of the multitool: gadgets that serve a lot of purposes as you develop and debug hardware. One of the most polished-looking ones we’ve seen is [Phillip Schuster’s] Little Helper.

The open source gadget looks like an iPod (if an iPod had header pins sticking out of it). It has basic analog I/O capability, can generate PWM pulses, sniff I2C traffic, and do lots of other features. It is open source, so you can always add more capabilities if you need them.

Continue reading “Little Helper: Open Source Hardware Hacker Multitool”

Cyberpunking Home Alone

[Macaulay Culkin] err… [Kevin McCallister] pulled off some epic 1990 hacks to scare off a couple of bumbling burglars in the classic film Home Alone. Now celebrating its 25th Anniversary, it’s fun to see the tricks [Kevin] used to spoof a house party brought into this age of high-technology.

The trick in the original movie was all about silhouettes in the windows that made the house look full of people. [Michael Jordan’s] cardboard cutout taped to a model train is fairly believable. But really, who has a half-dozen mannequins just sitting in their attic? Creepy.

The marketing company RedPepper are behind the facelift of this pop culture icon. They outfitted their offices with some window dressings that are perfect for the silhouettes. In a delightful cyberpunk twist they went with projects and digital silhouettes. Embracing our current tech-heavy lives is the mobile aspect of it all. Of course there’s an app for that. It means [Kevin] doesn’t have to pull the strings. He can hide outside the building and decide which animations are played by the projectors within. Check it out after the break.

Continue reading “Cyberpunking Home Alone”

Nikon Resurrection: Repairing A Broken Lens

Modern DSLR cameras are amazing devices. Mechanics, electronics, and optics, all rolled up in a single package. All that technology is great, but it can make for a frustrating experience when attempting any sort of repair. Lenses can be especially difficult to work on. One misalignment of a lens group or element can lead to a fuzzy image.

[Kratz] knew all this, but it didn’t stop him from looking for a cheap lens deal over on eBay. He found a broken Nikon DSLR 55-200mm 1:4-5.6 AF-S VR camera lens for $30. This particular lens is relatively cheap – you can pick up a new one for around $150 online. Spending $30 to save $120 is a bit of a gamble, but [Kratz] went for it.

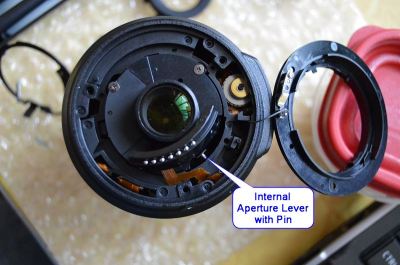
The lens he bought mostly worked – the auto-focus and vibration reduction system seemed to be fine. The aperture blades however, were stuck closed. Aperture blades form the iris of a lens. With the blades closed down, the lens was severely limited to brightly lit situations. All was not lost though, as the aperture is a relatively simple mechanical system, which hopefully would be easy to repair.

pinNikonKeeping screws and various parts in order is key when taking apart a lens. [Kratz] used a tip he learned right here on Hackaday: He drew a diagram of the screw positions on a thick piece of paper. He then stuck each screw right into the paper in its proper position.

Carefully removing each part, [Kratz] found a pin had slipped out of the rod that connects the lens’ internal parts with the external aperture control arm. Fixing the pin was simple. Getting the lens back together was quite a bit harder. Several parts have to be aligned blindly. [Kratz] persevered and eventually everything slipped into alignment. The finished lens works fine, albeit for a slightly noisy auto-focus.

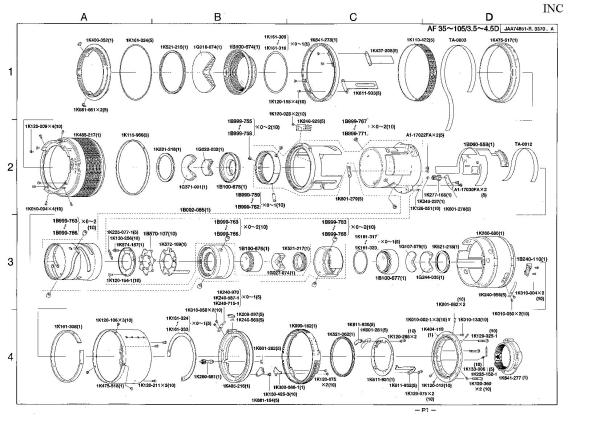
It’s worth noting that there are service and repair manuals for many cameras and lenses out there in the dark corners of the internet, including [Kratz]’s 55-200 lens. Reading the repair procedures Nikon techs use shows just how many tools, fixtures, and custom bits of software go into making one of these lenses work.

Build Your Own Thermal Camera

We have featured thermal camera projects by [Max Ritter] before, but [Max] has just taken the next step: he is offering the latest version as a build-it-yourself kit. The DIY Thermocam improves on his previous designs by capturing 60 by 80 pixel thermal images, which can be combined with visible light images from an accompanying  640 by 480 pixel camera to produce the final image. It is built around the FLIR Lepton module that has been used in many of the recent commercial thermal cameras that we have seen. Max has also added a battery and display, making the whole thing a standalone camera.

The firmware that runs all this is open-source and written in C++ for easy modification, so users can build their own thermal camera.”The approach is to offer people the self-assembly kit so that they can use it as a development platform to do whatever they want to achieve with thermal imaging”[Max] told us. The kit runs €429 (about $468), with free shipping worldwide.

Continue reading “Build Your Own Thermal Camera”

You Need A Self-Righting Thrust-Vector Balloon Copter

Cornell University’s microcontroller class looks like a tremendous amount of fun. Not only do the students learn the nitty-gritty details of microcontroller programming, but the course culminates in a cool project. [Brian Ritchken] and [Jim Liu] made a thrust-vector controlled balloon blimp. They call this working?!?!

Three balloons provide just enough lift so that the blimp can climb or descend on motor power. Since the machine is symmetric, there’s no intrinsic idea of “forward” or “backward”. Instead, a ring of eight LEDs around the edge let you know which way the blimp thinks it’s pointing. Two controls on the remote rotate the pointing direction clockwise and counter-clockwise. The blimp does the math to figure out which motors to run faster or slower when you tell it to go forward or back.

The platform is stabilized by a feedback loop with an accelerometer on board, and seems capable of handling a fairly asymmetric weight distribution, as evidenced by their ballast dangling off the side — a climbing bag filled with ketchup packets that presumably weren’t just lifted from the dining halls.

It looks like [Brian] and [Jim] had a ton of fun building and flying this contraption. We’d love to see a distance-to-the-floor sensor added so that they could command it to hover at a given height, but that adds an extra level of complexity. They got this done in time and under budget, so kudos to them both. And in a world full of over-qualified quadcopters, it’s nice to see the humble blimp getting its time in the sun.

Yep, you heard right… this is yet another final project for a University course. Yesterday we saw a spinning POV globe, and the day before a voice-activated eye test. We want to see your final project too so please send in a link!

‘LinuxCNC-Features’ Is The Garage-Fab’s Missing CAM Tool

It takes a long toolchain to take the garage-machinist-to-be through all the hoops needed to start cranking out parts. From the choice of CAD software to the CAM tools that turn 3D models into gcode, to the gcode interpretters that chew up this source code and spit out step and direction pulses to turn the cranks of a cnc mill, there’s a multitude of open-and-closed source tools to choose from and even an opportunity to develop some of our own. That’s exactly what [Nick] and the folks over on the cnc-club forums did; they’ve written their own CAM tool that enables the end user to design a procedure of cuts and toolpaths that can export to gcode compatible with LinuxCNC.

Their tool, dubbed “LinuxCNC-features”, embeds a LinuxCNC-compatible graphical gcode programming interface directly into the LinuxCNC native user interface. Creating a part is a matter of defining a list of sequential cuts along programmable toolpaths. These sequential cuts are treatments like drilled holes, square pockets, bolt holes, and lines. The native embedding enables the machinist to preview each of the 3D toolpaths in LinuxCNC’s live view, giving him-or-her a quick-and-dirty check to make sure that their gcode performs as expected before running it. [Nick] has a couple of videos to get you up-and running on either your mill or lathe.

LinuxCNC-features has been out in the wild for almost two years now, but if you’re looking to get started cranking out parts in the garage, look no further for a CAM tool that can quickly generate gcode for simple projects. In case you’re not familiar with LinuxCNC, it’s one of the most mature open-source gcode interpreters designed to turn your PC into a CNC controller, and it’s the brains behind some outstanding DIY CNC machines like this plasma cutter.

Continue reading “‘LinuxCNC-Features’ Is The Garage-Fab’s Missing CAM Tool”