Glass PCBs


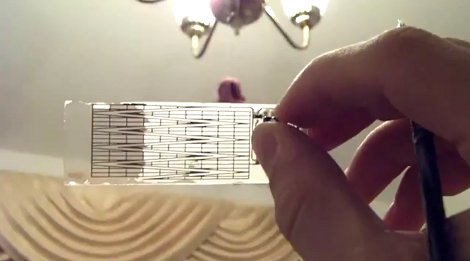
Our friend [Jeri] tipped us off about this cool video on youtube where the author makes his own “transparent” PCB’s using some nontraditional materials. One ounce copper foil is found online along with some clear glass microscope slides, from there it is just a matter of cementing the foil onto the glass slides with some thin UV curing glue. Once the 2 parts are mated the entire thing is popped into an eeprom eraser for its intense UV light, then excess is trimmed.

The normal routine of toner transfer is used to copy a circuit pattern onto the copper clad glass and it’s etched in standard ferric chloride. The copper is removed but the UV glue that was holding it is still left, some special care needs be followed as this stuff is pretty weak against even mild solvents, and you do not want your traces peeling up. Next no clean solder paste is applied and parts are soldered down with a heat gun, keeping the glass evenly heated to prevent it from cracking.
This leaves you with a board that looks like frosted glass, and in order to protect the glue while clearing up the frosted effect, some polyurethane is applied which fills in all the little bumps and smoothes the surface bout out to almost 100% clear.
The end application in this video is a touch sensitive board which works fine though the back side of the glass and presents a nice smooth interface for the user. Join us after the break for the video.

Continue reading “Glass PCBs”

DIY Electron Accelerator

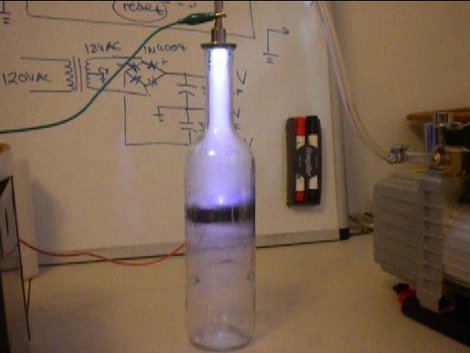
Reader [Xellers] sent in his newest instructable: DIY Electron Accelerator: A Cathode Ray Tube in a Wine Bottle. While not exactly what you might think of a cathode ray tube, the basics are in place. A wine bottle is used as a vacuum chamber and a 9kv neon transformer is attached to a stopped in the top. A cathode is placed mid way, the air is sucked out with a pump, and high voltage is applied.

Naturally as more air gets pumped out the electric arc intensifies into a pretty solid plasma filling the space between the two contacts. While mixing drilled glass with a vacuum and high voltage sounds like an awesome hospital story [Xellers] does cover some safety points including the possibility of this thing putting out some nasty waves.

One thing that is not mentioned (that I saw)  is this is very similar to how florescent light tubes work and without florescent material lining the chamber it will spit out quite a bit of UV light (notice germicidal UV lights are clear). So you will want to watch your eyes!

Join us after the break for a quick video.

Continue reading “DIY Electron Accelerator”

Got An ILight?

[KaRMaN] sent us a piece from his blog on what to do with a busted iPhone (google translate). As many iPhone owners have found out, it does not take that much of a fall to render your shiny hand-held command center into a pile of shattered glass. Replacement parts and insurance are available so life goes on, but what else can you do?

One thing you could do if your screen split apart like [KaRMaN]’s is remove the white LED back light strip from the device and reuse it. Once he removed the LED he had to repair a couple of traces but that is no big deal. Then the strip is probed to see how the individual LED’s are situated, in this case is 6 in series. The strip is hooked up to a 12v power source and now you have a small, but bright light for some midnight hacking.

Large 7 Segment Display Made From Glue

We here at Hack A Day love LED’s, and all things LED related, but one of the biggest problems with LED’s are the small size. We want bigger and brighter, matrices the size of our TV, seven segments as big as a wall and a single white led the size of a baseball, and brighter than the sun!

I was recently commissioned to make a device which uses a pretty large number display, and I went out shopping. The seven segment we liked best was still quite pricey, and would not fit our enclosure correctly anyway. We ended up going a different route, but it really got me thinking… What if you wanted to make something with a fairly large display? And how could one go about doing it cheaply at home?

I first thought about acrylic rods, but no one near me had any of small diameter, or at a decent price. Never mind that I don’t have that many tools on hand, and I could just see me trying to drill out the end of a thin plastic rod using a electric hand drill, and my knees as a clamp. Looking around the HQ I found my stash of glue-sticks. I thought would make an interesting display and it is easy to work with.

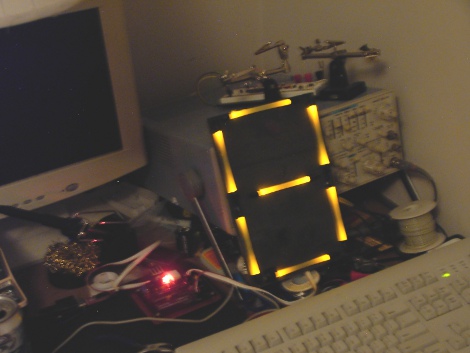
Before I knew it I had a working (serial and expandable) 9 inch tall 6 inch wide 7 segment display. I will be the fist to admit, its not spectacular in quality, or brightness, though the display itself did only cost four dollars in material. A quick and easy project, especially if you need a quick scoreboard or large clock.

Join us after the break to see how the display and the controller circuit are made.

Continue reading “Large 7 Segment Display Made From Glue”

Evalbot OS Set Free

[Theo] tipped us off about something that every TI Evalbot owner may be interested in, the The manual and source code for the uC/OS-III kernel is now available for download. UC/OS-III is what came with the evalbot, and it is a realtime operating system for that and many other chips. The problem with it for most hobby level people is that just the manual was 100$, and unless you already knew something about the system it did not sound very attractive.

But now micrium, the author of US/OS-III, has released the source code free to use in non commercial applications, and manuals for every chip supported it may drum up some more interest in this neat little RTOS. Though it does require a subscriber login.

Excerpt:

Dear Subscriber,

The ideal scenario for developers wishing to evaluate embedded software is to be granted easy access to the software’s full source code.  In the case of Micriµm’s celebrated real-time kernel, µC/OS-III, this ideal has become reality.  Last week, Micriµm announced a new policy for µC/OS-III: the kernel is now “source available.” µC/OS-III’s incomparably clean source code, as well as PDFs of the popular books describing the kernel, can be downloaded from Micriµm’s Web site at no cost, giving developers a refreshingly fast and simple means of beginning an evaluation

Installing Linux On Old PC’s Part 2

In part one I showed you that you could install a linux distro on a new computer and transplant it into a 386 computer in a short amount of time and with little effort. Now it is time to move on to bigger and beefier machines like 486’s, Pentiums and better.

I am going to break this quick tutorial down into sections based on installed RAM. While this won’t be a “how to” for all old PCs in the world I hope to at least send you in the right direction. I will mention a few distributions mainly for the super low ram machines. Its not my intent to start a distrubution war, and I have not personally sat down with every single one to make a educated assessment. However, you’re more than welcome to chime in.

Join us after the break and see what options you have for that old “boat anchor” sitting in the closet!

Continue reading “Installing Linux On Old PC’s Part 2”

Power Up With Knowledge

The LM317 is a favorite for many people who want quick, cheap, reliable and ajustable power. It only takes a few parts to set up and it does its job rather well. Sometimes though, you just need a power supply.While there are a million tutorials out there, not many go as in depth as [Phil] does in his 2 newest videos.

Covering everything from the wall outlet to the final output, [Phil] explains each part step by step, stating what it does and the math and formulas behind it all to produce quality results. He then goes over to a working model and reviews each part showing its real output on a oscilloscope, which is very handy if you do not have one yourself.

In the second video he takes that knowledge and builds it all up into a professional looking bench top model with LCD meter readout and varnished paper to complete the front look. If you’re looking to build your first bench supply or want a better grasp on what exactly is happening in the one you have now, you should join us after the break for these 2 quality productions.

Continue reading “Power Up With Knowledge”