Toilet Sink Saves Water

Saving The Planet One Flush At A Time

Water is a natural resource that some of use humans take for granted. It seems that we can turn on a facet to find an unlimited supply. That’s not true in all parts of the world. In the US, toilets use 27% of household water requirements. That’s a lot of water to only be used once. The water filling the toilet after the flush is the same as that comes out of the sink. [gregory] thought it would make sense to combine toilet tank filling with hand washing as those two activities happen at the same time.

To accomplish this, a DIY sink and faucet were put in-line with the toilet tank fill supply. The first step was to make a new tank lid. [gregory] used particle board and admits it probably isn’t the best material, but it is what he had on hand. A hole was cut in the lid where a metal bowl is glued in. Holes were drilled in the bottom of the bowl so that water could drain down into the tank. The faucet is just standard copper tubing. The curve was bent by hand using a wire wrap method to keep it from kinking. The only remaining part was to connect the fill line (after the fill valve) to the faucet. Now, when the toilet is flushed, the faucet starts flowing.

Continue reading “Saving The Planet One Flush At A Time”

Bicycle Generator with Cordless Drill

Cordless Drill Turned Into Bicycle-Powered Generator

The bicycle is a great invention. It is an extremely efficient method of transportation, even more so than walking. So why not harness that efficiency for other things? [Tony] had that same thought so he ordered a bike generator but after waiting too long for the company to send it, he decided to make his own.

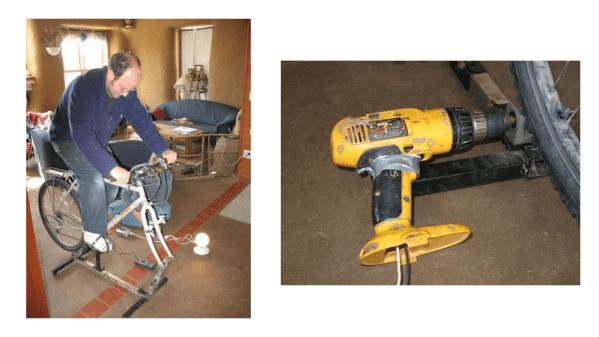
[Tony] is an bicycle enthusiast so he had an old bike and an old training stand he could use for the project. Generating electricity from pedaling the bike requires some sort of generator. Lucky for him, [Tony] happened to have a cordless drill that stopped going in reverse. Since he had since upgraded, this was the perfect candidate for the generator. The drill was mounted to the training stand so that a pulley inserted in the chuck pressed against the rear wheel. Wires were added to connect the drill’s battery connectors to a 12vdc to 120vac inverter. As the bike is pedaled, the rear wheel spins the drill, which spins the drill motor creating DC voltage. That DC voltage is then converted to AC by the inverter. With a multimeter connected to the output from the drill, it is easy to adjust the pedaling speed to keep the output in the 11-14v range which is required by the inverter.

In the photo above, you can see a light bulb being powered by the bike. However, the bike powered generator could not power the larger load of a computer. The remedy for this was to purchase a solar charge controller and a 12 volt battery. The bike charges the battery and the battery can power the computer through the inverter.

extending an ebike

Extending The Range Of An Electric Bike

Cruising around town on your electric bike is surely a good time…. unless your bike runs out of juice and you end up pedaling a heavy bike, battery, and motor back to your house. This unfortunate event happened to Troy just one too many times. The solution: to extend the range of his electric bike without making permanent modifications.

Troy admits his electric bike is on the lower side of the quality scale. On a good day he could get about 15 miles out of the bike before it required a recharge. He looked into getting more stock battery packs that he could charge and swap out mid-trip but the cost of these was prohibitive. To get the extra mileage, Troy decided on adding a couple of lead-acid batteries to the system.

The Curry-brand bike used a 24vdc battery. Troy happened to have two 12v batteries kicking around, which wired up in series would get him to his 24v goal. The new batteries are mounted on the bike’s cargo rack by way of some hardware store bracketry. The entire new ‘battery pack’ can be removed quickly by way of a few wing nuts.

Connecting the new batteries to the stock system go a little tricky and the stock battery pack did have to be modified slightly. The case was opened and leads were run from the positive and negative terminals to two new banana plugs mounted in the battery pack’s case. The leads from the new batteries plug right into the banana plugs on the stock battery pack. The new and old batteries are wired in parallel to keep the voltage at 24.

Troy found that he’s getting about twice the distance out of his new setup. Not to bad for a couple on-hand batteries and a few dollars in odds and ends.

Delta 3 Space 3D Printer

Prints In Space (Said In “Pigs In Space” Voice)

3D Printing on Earth is soooo last year. Recently, NASA has sent a 3D Printer to the International Space Station in order to test printing capability in space. The agency’s ultimate goal is to have a means to make parts and tools for astronauts that are far away from earth.

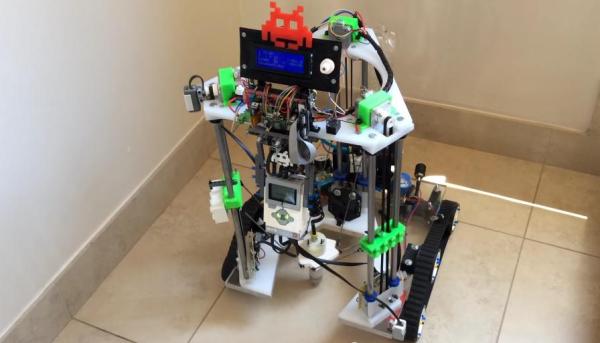
So, why should NASA have all of the extra-terrestrial printing fun? Three 15 year-olds thought that same thing and decided to build their own space printer. It’s goal, however, is a bit different from the one on the ISS. This printer is made to print on other celestial bodies such as the moon or Mars, not in a space station. The students call their project the DELTA 3 and as its name implies, is a delta-style printer and that’s where all similarities with conventional printers end. This printer has tank tracks so that it can maneuver itself around the planet. There is no print bed. The printer prints directly to the surface of which it is resting on. The frame is open at the front of the printer so that it can back up leaving a free-standing print in its wake. It certainly beats the hot-glue versions seen before and we think this is the Automated Build Platform of the future, today!

The DELTA 3’s electronic controls are also quite different from the norm. There is a Lego EV3 controller that is responsible for navigating the printer around obstacles to find a suitable print area. Once a location has been picked out, the EV3 triggers the standard Arduino Mega/RAMPS combo to coordinate the printing.

The young creators brought their DELTA 3 to the World Robot Olympiad just last month. They came in 4th in their division.

[via 3Dprint.com]


e-waste small 3d printer

E-Waste Printer Looks Nice, Prints Really, Really Small

Prices of 3D Printers have certainly been falling quite a bit over the last few years. Even so, it is still, at a minimum, a few hundred dollars to get going in the hobby. [mikelllc] thought it would be a fun challenge to see if he can build a functional 3D printer for under $100.

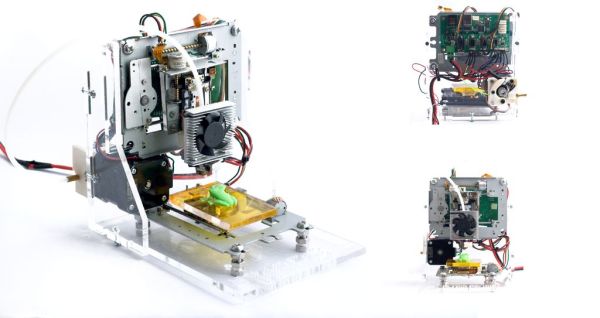
To stay under his budget, [mikelllc] took a reasonable route and decided to use as many recycled parts as he could. In every DVD and floppy drive, there is a stepper motor, lead screw and carriage that is used to move the read/write head of the drive. These assemblies will be used to drive the 3 axes of the printer. Two DVD drives and one floppy drive were dissembled to access the needed components.

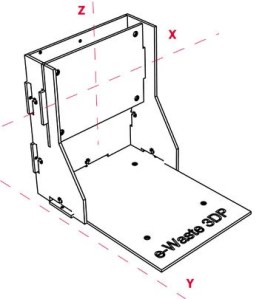
e-waste small 3d printerLuckily [mikelllc] has access to a laser cutter. He made the frame from 5mm acrylic sheet stock. All of the pieces have slots and tabs to ease assembly and keep everything straight and square. The motors and frames from the DVD and floppy drives are mounted to the acrylic frame pieces in strategically pre-planned holes. The Y axis is responsible for moving the print bed back and forth. It is mounted on screws so that it can be adjusted to ensure a level bed.
A little DVD drive stepper motor just isn’t powerful enough to be used as an extruder motor so a standard NEMA17 motor was purchased for this task. The motor is part of a MK7/MK8 style direct drive extruder that is made from mostly 3D printed parts. The extruder is mounted on the frame and a bowden tube guides the filament to the hot end mounted to the printer’s moving carriage. Remotely mounting the extruder motor keeps it’s mass off of the axes, which in this case may be too heavy for the small, scavenged drive stepper motors.

The electronics are standard RepRap type and the same with for the hotend. The recycled motors work well with the RepRap electronics. After all that hard work, the printable area is a mere 37mm x 37mm x 18mm, but that’s not the point of this project! [mikelllc] met his goal of building a super cheap printer from recycled parts. He has also made the extruder and laser cut frame files available for download so anyone can follow in his footsteps. If you’re digging this e-waste 3D Printer but want a larger print volume, check out this printer.


DIY Head Mounted Display Based On Movie Based On Stephen King Story

Ever since [will1384] watched “The Lawnmower Man” as a wee lad, he’s been interested in virtual reality. He has been messing around with it for years and even had a VictorMaxx Stuntmaster, one of the first available head mounted displays. Years later, the Oculus Rift came out and [will1384] wanted to try it out but the $350 price tag put it just out of his price range for a discretionary purchase. He then did what most of us HaD readers would do, try building one himself, and with a goal for doing it for around $100.

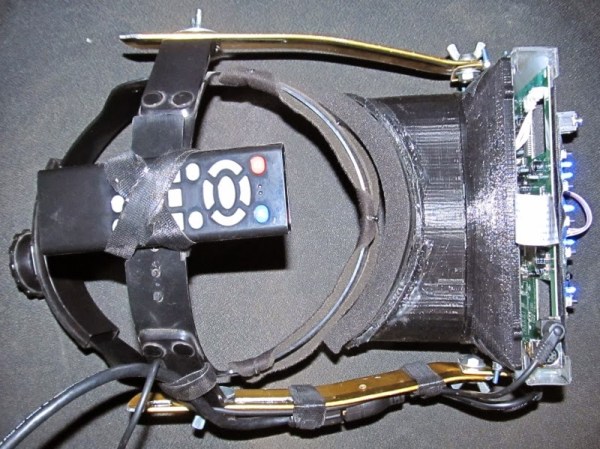
The main display is a 7″ LCD with a resolution of 1024×600 pixels and has a mini HDMI input. Some DIY head mounted display projects out on the ‘web use ski goggles or some sort of elastic strap to hold the display to the wearer’s head. [will1384] took a more industrial approach, literally. He used the head mounting system from a welding helmet. This not only has an adjustable band but also has a top strap to prevent the entire contraption from sliding down. Three-dimensional parts were printed out to secure the LCD to the welding helmet parts while at the same time creating a duct to block out external light.

diyhmd-lenses

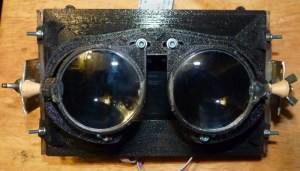
Inside the goggles are a pair of 5x Loupe lenses mounted between the user’s eyes and the LCD screen. These were made to be adjustable so that the wearer can dial them in for the most comfortable viewing experience. The remote mounted to the top strap may look a little out-of-place but it is actually being used to capture head movement. In addition to a standard wireless remote, it is also an air mouse with internal gyroscopes.

PoughkeepsieMMF

First Ever Poughkeepsie Mini Maker Faire

This past Saturday was the first Mini Maker Faire held in Poughkeepsie, NY. Although it was the first in the area, the event went extremely well having over 60 makers and countless attendees. It was held at the Poughkeepsie Day School and made use of a large percentage of the indoor area.

roboticarm

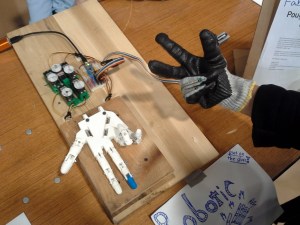
Ninth graders of the hosting school [Liam], [Johnson] and [Matt] were proudly displaying some of their projects. One of which was a robotic hand controlled by a glove the user wears. Flex sensors sewn into the glove detect how much each finger is bent. That information is read by an Arduino which then commands 5 independent servos to pull string ligaments to bend the fingers of the 3D printed robotic hand. The kids give credit to this Instructable which was the inspiration for their desire to build such a project.

No Maker Faire would be complete without some 3D printers. On hand was a father/son team that built a Mini Kossel. The design is simple and elegant, and apparently assembly is no problem for even the youngest maker. 3D printing guru [Ed] was on hand with his MakerGear M2 to show some practical uses for 3D printers. They are not just for making Yoda heads! [Ed] also gave a presentation on the matter, explaining why 3D printing is important and useful to people, even the common non-techno-nerd consumer.

Continue reading “First Ever Poughkeepsie Mini Maker Faire”