This Bike Sonar Is Off The Chain

On paper, bicycling is an excellent form of transportation. Not only are there some obvious health benefits, the impact on the environment is much less than anything not directly powered by a human. But let’s face it: riding a bike can be quite scary in practice, especially along the same roads as cars and trucks. It’s hard to analyze the possible threats looming behind you without a pair of eyes in the back of your head.

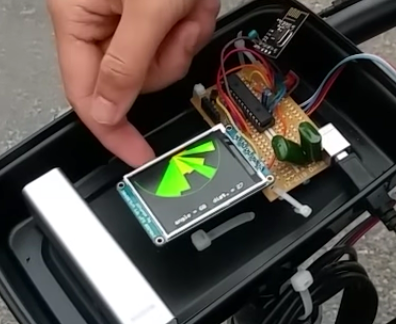
radar-sweep-display[Claire Chen] and [Mark Zhao] have come up with the next best thing—bike sonar. It’s a two-part system that takes information from an ultrasonic rangefinder and uses it to create sound-localized pings in a rider’s ears. The rangefinder is attached to a servo mounted on the seat post. It sweeps back and forth to detect objects within 4 meters, and this information is displayed radar-sweep-style graphic on a TFT screen via a PIC32.

Though the graphic display looks awesome, it’s slow feedback and a bit dangerous to have to look down all the time — the audio feedback is by far the most useful. The bike-side circuits sends angle and distance data over 2.4GHz to another PIC mounted on a helmet. This PIC uses sound localization to create a ping noise that matches the distance and location of whatever is on your tail. The ping volume is relative to the distance of the object, and you just plug headphones into the audio jack to hear them. Bunny-hop your way past the break to check it out.

Continue reading “This Bike Sonar Is Off The Chain”

All This Bike Needs Is Some Snow!

It’s safe to say that the southern UK is not known for its winter snowfall. If you have lived through a British February then the chances are you’ll know a lot about rain and grey skies.

Happily this hasn’t deterred [Stuart]. Ever the optimist, he’s turned a pile of scrap metal and an unloved mountain bike into a fully functional ski-bike, and he’s just ready to go should the jet stream deliver a covering of the white stuff on the Thames Valley.

Using the facilities of rLab – Reading Makerspsce (he’s also a founder member of the up-and-coming Newbury and District Hackspace), [Stuart] didn’t just bodge together his “iCycle”. Instead he’s made it a really high quality build, with CNC’d aluminium fork stanchions to mount his skis, and foot pegs that are engineered not to let him down on the slopes. Best of all, the bike is nearly all made from scrap materials, only the bearings, axles and paint were brought in for the project.

Skiing hasn’t been featured very often in our coverage of the world of makers, however we have featured a skiing robot, back in 2009.

Square Bicycle Design

Building A Square Bicycle

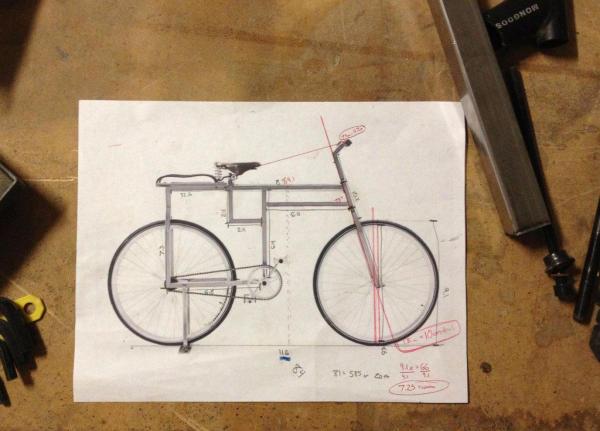
Inspired by [Michael Ubbesen Jakobsen’s] BauBike design, [Aaron Seiter] decided to try building his own.

The entire frame was made out of 1″ square steel tubing and welded together in no time at all. Actually intending to ride this bike, he had to make a few changes to the original BauBike design. Most importantly, he raised the seat up to allow for proper leg extension while pedaling.

The funny thing is most people on Reddit thought it wasn’t going to work, so shortly after posting the gallery to imgur, [Aaron] also uploaded a short video to YouTube to prove, yes, he can actually ride it. Stick around after the break to see it in action.

Continue reading “Building A Square Bicycle”

Try Not To Fall Off The Backwards Brain Bike

[Destin] of SmarterEveryDay fame has a challenge for your brain : a bicycle where the handlebars turn the front wheel in the opposite direction of a typical bike (YouTube link). For example, turning the handlebars left turns the wheel right and vice versa. He warns you it’s harder than it looks.

The hack that pulls this off is a simple one compared to bike hacks we’ve previously covered. Gears on the head tube make this possible. It was built by his welder friends who challenged him to ride it. He couldn’t at first; determined to overwrite his brain’s memory of bike riding, he practiced until he finally succeeded. It took him eight months. When it was time to ride an old-fashioned bike, it only took him about twenty minutes to “un-learn” the Backwards Brain Bike. [Destin’s] biking illustrates neuroplasticity, memory, and learning in a fun way (fun for us; no doubt frustrating for him).

As a testament to the sponge-like brains of youth, [Destin’s] son learned to ride the Backwards Brain Bike in only two weeks.

Continue reading “Try Not To Fall Off The Backwards Brain Bike”

Edge Lit Plastic Bike

Edge-Lit Clear Plastic Bike Combines Nighttime Riding Safety With Aurora Borealis Flair

Several years ago [dan] saw some plastic frame bikes designed by MIT students. Ever since he saw those bikes he thought it would be cool to make an edge-lit plastic framed bike.

The frame is made from 1/8″ and 3/8″ thick polycarbonate sheet. The parts were designed with tongue and grooves so they fit together nicely. The joints were glued to hold everything together. Holes were drilled in the edge of the plastic large enough to fit an LED. Once the LED was inserted in the hole, it was wired up and secured with hot glue. There are about 200 LEDs on the bike, powered by a constant current LED driver circuit that [dan] designed specifically for this project.

The build process was certainly not flawless. For example, the plastic holding the bottom bracket (where the crank and pedals attach) broke. This can be avoided by increasing the amount of material in that area prior to cutting out the pieces. [dan] was able to fiberglass his broken parts back together.

[dan] admits that the bike is heavy and a little wobbly, but is definitely ride-able. He did us a favor and made all his CAD files available to anyone that wants to make one themselves. If polycarbonate is too expensive for your blood, check out this bike make from cardboard.

extending an ebike

Extending The Range Of An Electric Bike

Cruising around town on your electric bike is surely a good time…. unless your bike runs out of juice and you end up pedaling a heavy bike, battery, and motor back to your house. This unfortunate event happened to Troy just one too many times. The solution: to extend the range of his electric bike without making permanent modifications.

Troy admits his electric bike is on the lower side of the quality scale. On a good day he could get about 15 miles out of the bike before it required a recharge. He looked into getting more stock battery packs that he could charge and swap out mid-trip but the cost of these was prohibitive. To get the extra mileage, Troy decided on adding a couple of lead-acid batteries to the system.

The Curry-brand bike used a 24vdc battery. Troy happened to have two 12v batteries kicking around, which wired up in series would get him to his 24v goal. The new batteries are mounted on the bike’s cargo rack by way of some hardware store bracketry. The entire new ‘battery pack’ can be removed quickly by way of a few wing nuts.

Connecting the new batteries to the stock system go a little tricky and the stock battery pack did have to be modified slightly. The case was opened and leads were run from the positive and negative terminals to two new banana plugs mounted in the battery pack’s case. The leads from the new batteries plug right into the banana plugs on the stock battery pack. The new and old batteries are wired in parallel to keep the voltage at 24.

Troy found that he’s getting about twice the distance out of his new setup. Not to bad for a couple on-hand batteries and a few dollars in odds and ends.

Bike Persistance of Vision

Simple POV Bike Effects With WS2811 Strips

[Andrew] wrote in with a new take on the classic persistence of vision bike spoke hack. While many of these POV setups use custom PCBs and discrete LEDs, [Andrew]’s design uses readily available off-the-shelf components: WS2811 LED strips, an Arduino, an Invensense IMU breakout board, and some small LiPo batteries.

[Andrew] also implemented a clever method of controlling his lights. His code detects when the rider taps the brakes in certain patterns, which allows changing between different light patterns. He does note that this method isn’t incredibly reliable due to some issues with his IMU, so now he senses when the rider taps on the handlebars as well.

If you want to build your own bike POV setup, you’re in luck. [Andrew] wrote up detailed instructions that outline the entire build process. He also provides links to sources for each part to make building your own setup even easier. His design is pretty affordable too, coming in at just under $50 per wheel. Check out a video of [Andrew]’s setup in action after the break.

Continue reading “Simple POV Bike Effects With WS2811 Strips”