Under Water Record Player Is Very Mesmerizing

Once in a while we get a really awesome tip about a technical art installation — there sometimes isn’t much info behind it, but the idea and concept behind it alone sparks our curiosity. That is most definitely the case for this submerged record player.

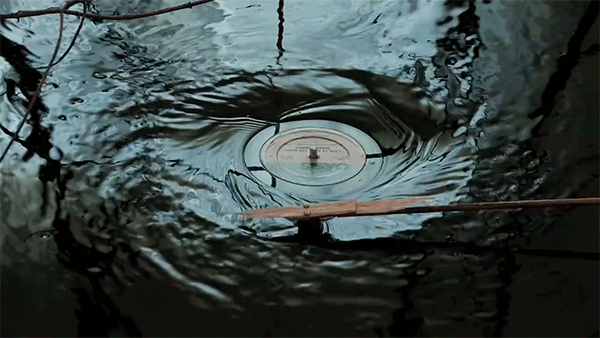
Artist [Evan Holm] has created this awesome installation which features a black pool of water — with a built-in record player. He’s somehow waterproofed the player itself, and integrated the controls and needle into a tree, which is part of the installation.

He has a very long and artsy description about the meaning of it, how it represents loss and mystery, and the collective subconscious of the human race… We just see it as a really cool hack. There’s also a full documentary about how he sets up the installation at various shows.

We’ve included both videos following the break — it is very tempting to try recreating something similar!

Continue reading “Under Water Record Player Is Very Mesmerizing”

ReSCan — Automated Resistor Identification!

Need a quick and easy way to sort through a few hundred random resistors? You could do them one at a time by reading the color codes yourself… or you could get a machine to do it for you!

When [Robert] was faced with a pile of unsorted resistors he quickly decided he did not have the patience to sort them manually. So, he started by writing an Android app using OpenCV to detect and identify resistor color codes. The problem is, most phones have trouble focusing at short distances — and since resistors are so small, holding the phone farther back results in color rings only being a few pixels wide — not the greatest for image recognition!

So, he started again on his computer, using a cheap LED-lit webcam instead. He wrote the app in java so he could re-use parts of the code from the Android app. It seems to work pretty well — check it out in the following video! This would be perfect to pair up with your illuminated storage bin hack.

Continue reading “ReSCan — Automated Resistor Identification!”

Ion Propelled Tie Fighter Now Has A Laser!

ion

[Steven Dufresne] has been playing around with ion propulsion using high voltage lately, and he’s added another spaceship to his experiments — Darth Vader’s TIE Fighter — and as an added bonus, he’s thrown on a laser too!

We originally covered his Ion Wind Propelled Star Trek Enterprise a few months ago, after someone had mentioned that the ion winds he was generating in experiments kind of looked like the warp drives on the Enterprise. Well, someone else pointed out that a TIE Fighter was an even better candidate for this. After all, TIE stands for Twin Ion Engines. So he decided to build one too. The ion winds look even better on this one as he’s turned the entire back of the fighter into the electrode, which creates a wide and very visible arc.

Oh, he also decided to add lasers to it for some extra flare — unfortunately TIE Fighters used green lasers — not red ones. Stick around for the following videos to see the TIE Fighter in all its ionic glory.

Continue reading “Ion Propelled Tie Fighter Now Has A Laser!”

SMD Soldering On… Hot Sand?

Need to do some SMD soldering? No tools? No problem! Here’s a creative method that could be a handy tool to add to your belt: SMD soldering using hot sand.

[Oliver Krohn] recently released this little video demonstrating how to perform re-flow soldering using hot sand. He’s using a bunsen burner to heat up a ceramic pot of sand to use as a kind of hot plate. It seems to work pretty well, and it’s a very unique way of doing it — if you wanted to get a bit more technical, you could also throw a temperature probe in the sand to get a much finer heat control!

Of course there are lots of other ways of doing re-flow soldering, like using a re-purposed toaster oven, frying up some circuits on a skillet after you’ve had your bacon, or if you want to be fancy, you could even build your own toolkit for it!

Anyway, stick around for the epic video of SMD soldering on hot sand.

Continue reading “SMD Soldering On… Hot Sand?”

Hanging Glass Speakers Look Super Cool

FWXDXNDHRCK3KUJ.MEDIUM

Looking for a modern way to spice up your apartment? Well if you’re not too much of an audiophile, these hanging glass speakers look awesome!

First off, we know the question you’re already asking — how do they sound? Well, to be honest, not that bad! You could describe it as being glassy (ha ha), but you would be surprised how nice the bass comes through. The speakers suffer when it comes to treble though as it comes out a bit muffled. This could be corrected with a few strategically placed hidden tweeters though!

So how do they work? Well, like any speaker, the sound comes from vibration — in this case, the glass is vibrated to produce the sound. To achieve this, [Evan] is using a pair of HiWave HIAX32C20-8 tactile transducers, which are actually designed to turn most surfaces into speakers. The tricky part of this build is how to hang them.

Having limited space in his room, [Evan] opted to hang the speakers from the ceiling with wire — the only problem is drilling glass isn’t that easy. He shares a few tips, and eventually succeeded using a Dremel tool. From there it was just a matter of installing some hooks in the ceiling, and stringing it all together.

Check out the following video to hear them in action!

Continue reading “Hanging Glass Speakers Look Super Cool”

An Easy Way To Power Flyback Transformers

FJISRREHR3EF3OP.LARGE

Let’s be honest. Playing with high voltage is awesome. Dangerous, but awesome — well, as long as you handle it properly. Flyback transformers are a great way to make a nice big electrical arc, but powering them isn’t that easy — or is it?

First off, for those that may not know, a flyback transformer is the type of transformer most commonly found in old TVs and CRT monitors. They typically can put out anywhere from 10kV to 50kV — the problem is, they aren’t that easy to power. Common methods include using a transistor style driver, or zero voltage switching (ZVS) — which is how [Skyy] cooked some s’mores at 50,000V.

As it turns out there’s another much easier and straight forward method. All you need is a fluorescent light ballast. Use the output on the ballast as the input on the primary winding of the flyback transformer — which can be found using a multimeter, just find the highest resistance between pins to identify it. Now because you’re working with such high voltages, you may want to insulate the flyback transformer by submerging it in mineral oil as to not short it out. That’s it.

Now it’s time to make some sparks.

Continue reading “An Easy Way To Power Flyback Transformers”

Valentine’s PCBs To Make Your Heart Melt

valentines

Have you ever sat in bed, staring at a bottle of Iron III Chloride, and thought “I should do something with that…”? [Tobias] has. He wanted to use his tinkering skills to make his girlfriend happy, so he decided to make this beautiful etched PCB that professes his love to her.

The cool thing about this project is that [Tobias] has never etched a PCB, or even worked with SMD parts before! After designing the PCB layout on his computer, he printed it out on an inkjet transparency film and applied it to his PCB. After 14 minutes of exposure he then put the board into development fluid for about 60 seconds — it was starting to look good already! He then pulled out his trusty bottle of Iron III Chloride and began the etching process.

Once the board was etched, he soldered 18 red PLCC-2 LEDs in place, each with its own 330Ohm resistor. Not content with a simple on/off switch, [Tobias] decided to program a Trinket with a voltage regulator and mosfet to have it pulse on and off, similar to a beating heart! The finished project looks great, and we’re sure his girlfriend will love it.

Another bonus to doing something geeky like this for your loved ones means it will increase their acceptance of tools laying about, and half-finished projects that aren’t quite as pretty!