[Jason Kridner] – the BeagleBone guy – headed out to the Midwest RepRap Festival this weekend. There are a lot of single board computers out there, but the BeagleBoard and Bone are perfectly suited for controlling printers, and motion control systems thanks to the real-time PRUs on board. It’s not the board for you if you want to play retro video games or build a media center; it’s the board for building stuff.
Of interest at the BeagleBooth were a few capes specifically designed for CNC and 3D printing work. There was the CRAMPS, a clone of the very popular RAMPS 3D printer electronics board made for the Beagle. If you’re trying to control an old mill that is only controllable through a parallel port, here’s the board for you. There are 3D printer boards with absurd layouts that work well as both printer controller boards and the reason why you should never come up with the name of something before you build it.
[Jason]’s trip out to MRRF wasn’t only about extolling the virtues of PRUs; Machinekit, a great motion control software, was also there, running on a few Beagles. The printer at the BeagleBooth was running Machinekit and apart from a few lines of GCode that sent the head crashing into the part, everything was working great.
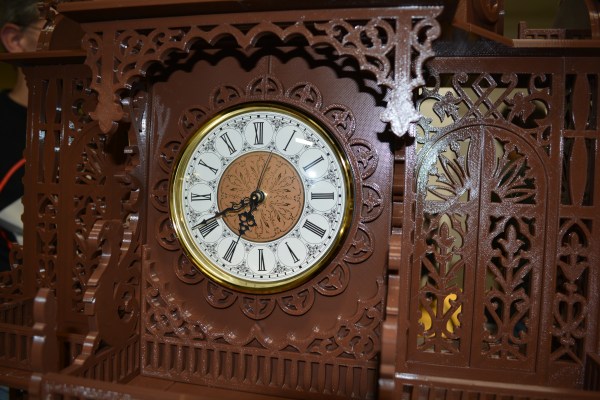
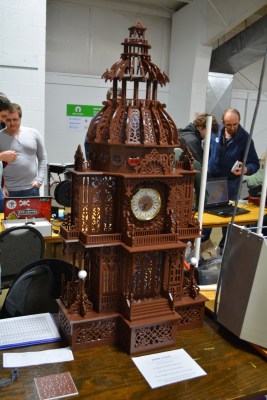
[Jason] is a woodworker. At least, he was until he saw his first 3D printer. While he may still work in wood, he particularly likes adapting scroll saw patterns for 3D printing. His clock started as a woodworking pattern for use on a scroll saw. To adapt it for 3D printing, [Jason] scanned the plotter-sized pattern pieces into Inkscape, where he was able to do things like add bevels before sending the pieces to OpenSCAD.
As you might imagine, a great deal of work went into this build, beginning with the scanning. [Jason] starting scanning last October and finished in January. Printing started January 9th, and he told me the final pieces were printed early this morning. We know you want all the details, so here goes: this build took just over six rolls of PLA at 20% infill. It’s 48″ tall and about 24″ wide. It was printed on what [Jason] referred to as his “very modified” Replicator 2. He glued the pieces together with Testor’s, and that took about 30 hours. All through the project, he kept meticulous notes in a spreadsheet of print times and filament used.
We were honored to be among the first to see [Jason]’s incredible clock build at this year’s Midwest RepRap Festival. He would like to take it on tour this year to the nearby Maker Faires. If he can figure out how transport it safely, he’d like to show it at World Maker Faire in NYC.
Every filament-based 3D printer you’ll find today heats plastic with resistive heaters – either heater cartridges or big ‘ol power resistors. It’s efficient, but that will only get you so far. Given these heaters can suck down only so many Watts, they can only heat up so fast. That’s a problem, and if you’re trying to make a fast printer, it’s also a limitation.
Instead of dumping 12 or 24 VDC into a resistive heater, induction heaters passes high-frequency AC through a wire that’s inductively coupled to a core. It’s also very efficient, but it’s also very fast. No high-temperature insulation is required, and if it’s designed right, there’s less thermal mass. All great properties for fast heating of plastic.
A few years ago, [SB] over on the RepRap blog designed an induction heater for a Master’s project. The hot end was a normal brass nozzle attached to a mild steel sleeve. A laminated core was attached to the hot end, and an induction coil wrapped around the core. It worked, but there wasn’t any real progress for turning this into a proper nozzle and hot end. It was, after all, just a project.
Finally, after several years, people are squirting plastic out of an induction heated nozzle. [Z], or [Bulent Unalmis], posted a project to the RepRap forums where he is extruding plastic that has been heated with an induction heater. It’s a direct drive system, and mechanically, it’s a simpler system than the fancy hot ends we’re using now.
Electronically, it’s much more complex. While the electronics for a resistive heater are just a beefy power supply and a MOSFET, [Z] is using 160 kHz AC at 30 V. That’s a much more difficult circuit to stuff on a printer controller board.
This could be viewed as just a way of getting around the common 24V limitation of common controller boards; shove more power into a resistor, and it’s going to heat faster. This may not be the answer to hot ends that heat up quicker, but at the very least it’s a very neat project, and something we’d like to see more of.
You can see [Z]’s video demo of his inductive hot end below. Thanks [Matt] for the tip.
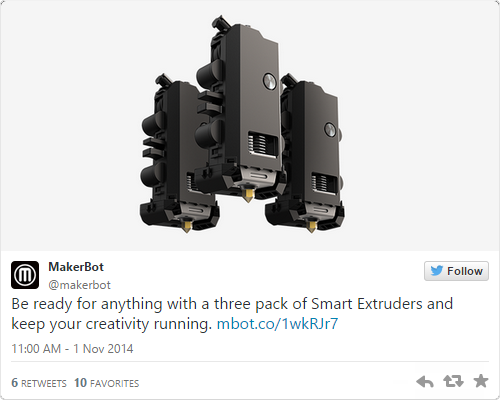
A direct link to Makerbot’s 3-pack of Smart Extruders is very hard to find
It’s been a little over a year since Makerbot introduced their new line of printers, and since then there have been grumblings about the quality of the Smart Extruder that each one of these printers comes with. While there is no 3D printer extruder that will not eventually clog, wear down, or otherwise break, there are reports of the Makerbot Smart Extruder failing in only hundreds or even tens of hours of use. Considering that a single large print can take a dozen or so hours to complete, you can easily see the why the Smart Extruder is so despised and why even the availability of a three-pack of Smart Extruders is a joke in the 3D printing community.
Of course a cheap shot at Makerbot that plays right into your preconceived ideas and prejudices is far too easy. We’re here to solve problems, not just state them, so here’s what we’re working with: to quantify the long-term reliability of 3D printers we need a way to measure the mean time before failure of extruders. This is already a solved problem; it’s just not implemented.
On aircraft and some very expensive engines that power things like buildings and ships, there’s one gauge, tucked away in the control panel, that keeps track of how long the engine has been running. It’s called a hobbs meter, and the idea behind it is extremely simple – when there is power going to the Hobbs meter, it counts out hours on a small clockwork display. The resolution of the display is only tenths of an hour, usually, but that’s good enough for scheduling maintenance and to be mentioned in NTSB accident reports.
Spend enough time with a 3D printer, and you’ll quickly realize the ‘estimated print time’ is merely a ballpark, and with failed prints the ‘total print time for this object’ isn’t exactly a perfect measure of how many hours you’ve been using your extruder. Only by directly measuring how many hours are logged on a hot end or how many kilometers of filament have been sent through an extruder will you ever get an accurate idea of how long an extruder has been running, and how reliable a printer is.
Hobbs meters are available from Mouser, but you’ll be overpaying there. The better option is from a vendor in a different niche; $30 for a meter that can connect directly to the extruder heater. If enough people add this and keep proper logs, there’s a slight chance of improving the state of 3D printers with real data and not the prejudices of people trying to justify their own designs and purchases.
But perhaps that’s too hard; adding a $30 item to a printer’s BOM just for the sake of data is a bit much. Luckily, there’s an even simpler solution that won’t cost a dime. Just measure the time a heater has been on in the firmware, or save the total length of extruded filament in a microcontroller’s EEPROM. Every printer firmware out there, from Marlin to Repetier to Sprinter has in it a way to calculate both the length of time a heater has been on or how much filament has been pushed through a nozzle.
However, this is 3D printing we’re dealing with. An organized community is not a luxury we currently enjoy, and for this to work several things are needed. The first is somewhere to upload failure statistics. This would be a web site, naturally, with the ability to input the printer make, extruder and hot end model, and the time since last clogged nozzle. The website itself is just a database, some JavaScript, a bit of CSS, and some hosting costs; not hard until you consider tens of thousands of operators would have to know about this website and contribute.
Secondly, if we’re not going with mechanical Hobbs meters there would need to be a ‘total time heater on’ or ‘total length of extruded filament’ variable in the various firmwares. There would hopefully be standardized Gcodes or Mcodes to read and reset this variable.
Will this happen? Of course not. Organization isn’t a strong suit of the RepRap project, and any company that implements Hobbs meter functionality will probably lock that up in proprietary obfuscation. However, Makerbot isn’t dumb, and given they’re selling three-packs of extruders, I would bet they have some data on the MTBF of their extruders. A community-based measurement of the most common cause of broken printers is certainly possible, but like all problems it’s one of organization, not technology.
3D Printering is a semi-weekly column that digs deep into all things related to 3D Printing. If you have questions or ideas for future installments please sending us your thoughts.
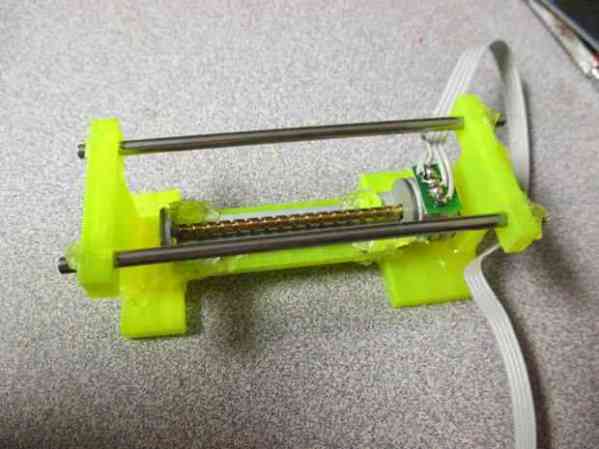
It wasn’t that long ago that wanting to own your own 3D printer meant learning as much as you possibly could about CNC machines and then boostrapping your first printer. Now you can borrow time on one pretty easily, and somewhat affordably buy your own. If you take either of these routes you don’t need to know much about CNC, but why not use the tool to learn? This is what [Wootin24] did when building a 3D printed plotter with DVD drive parts.
Plotters made from scrapped floppy, optical drives, and printers are a popular hand, and well worth a weekend of your time. This one, however, is quite a bit different. [Wootin24] used the drives to source just the important parts for CNC precision: the rods, motors, motors, and bearings. The difference is that he designed and 3D printed his own mounting brackets rather than making do with what the optical drive parts are attached to.
This guide focuses on the gantries and the mechanics that drive them… it’s up to you to supply the motor drivers and electrical side of things. He suggests RAMPS but admins he used a simple motor driver and Arduino since they were handy.
Misumi is doing something pretty interesting with their huge catalog of aluminum extrusions, rods, bolts, and nuts. They’re putting up BOMs for 3D printers. If you’ve ever built a printer with instructions you’ve somehow found on the RepRap wiki, you know how much of a pain it is to go through McMaster or Misumi to find the right parts. Right now they have three builds, one with linear guides, one with a linear shaft, and one with V-wheels.
So you’re finally looking at those fancy SLA or powder printers. If you’re printing an objet d’arte like the Stanford bunny or the Utah teapot and don’t want to waste material, you’re obviously going to print a thin shell of material. That thin shell isn’t very strong, so how do you infill it? Spheres, of course. By importing an object into Meshmixer, you can build a 3D honeycomb inside a printed object. Just be sure to put a hole in the bottom to let the extra resin or powder out.
Remember that episode of The Simpsons where Homer invented an automatic hammer? It’s been reinvented using a custom aluminum linkage, a freaking huge battery, and a solenoid. Next up is the makeup shotgun, and a reclining toilet.
[Jan] built a digitally controlled analog synth. We’ve seen a few of his FM synths VA synths built from an LPC-810 ARM chip before, but this is the first one that could reasonably be called an analog synth. He’s using a digital filter based on the Cypress PSoC-4.
The hip thing to do with 3D printers is low-poly Pokemon. I don’t know how it started, it’s just what the kids are doing these days. Those of us who were around for Gen 1 the first time it was released should notice a huge oversight by the entire 3D printing and Pokemon communities when it comes to low-poly Pokemon. I have corrected this oversight. I’ll work on a pure OpenSCAD model (thus ‘made completely out of programming code’) when I’m sufficiently bored.
Some of the first popular printers that made it into homes and schools were Apple Imagewriters and other deafeningly slow dot matrix printers. Now there’s a laser printer in every office that’s whisper quiet, fast, and produces high-quality output that can’t be matched with dot matrix technology.
In case you haven’t noticed, 3D printers are very slow, very loud, and everyone is looking forward to the day when high-quality 3D objects can be printed in just a few minutes. We’re not at the point where truly silent stepper motors are possible just yet, but with the Trinamic TMC2100, we’re getting there.
Most of the stepper motors you’ll find in RepRaps and other 3D printers are based on the Allegro A498X series of stepper motor drivers, whether they’re on breakout boards like ‘The Pololu‘ or integrated on the control board like the RAMBO. The Trinamic TMC2100 is logic compatible with the A498X, but not pin compatible. For 99% of people, this isn’t an issue: the drivers usually come soldered to a breakout board.
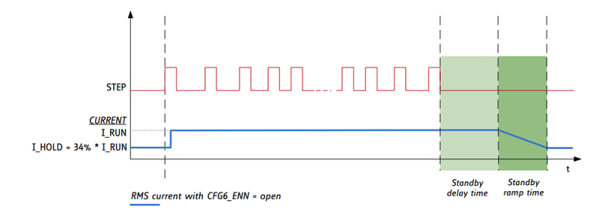
There are a few features that make the Trinamic an interesting chip. The feature that’s getting the most publicity is a mode called stealthChop. When running a motor at medium or low speeds, the motor will be absolutely silent. Yes, this means stepper motor music will soon be a thing of the past.
However, this stealthChop mode drastically reduces the torque a motor can provide. 3D printers throw around relatively heavy axes fairly fast when printing, and this motor driver is only supposed to be used at low or medium velocities.
The spreadCycle feature of the TMC2100 is what you’ll want to use for 3D printers. This mode uses two ‘decay phases’ on each step of a motor to make a more efficient driver. Motors in 3D printers get hot sometimes, especially if they’re running fast. A more efficient driver reduces heat and hopefully leads to more reliable motor control.
In addition to a few new modes of operation, the TMC2100 has an extremely interesting feature: diagnostics. There are pins specifically dedicated as notification of shorted outputs, high temperatures, and undervolt conditions. This is something that can’t be found with the usual stepper drivers, and it would be great if a feature like this were to ever make its way into a 3D printer controller board. I’m sure I’m not alone in having a collection of fried Pololu drivers, and properly implementing these diagnostic pins in a controller board would have saved those drivers.
These drivers are a little hard to find right now, but Watterott has a few of them already assembled into a Pololu-compatible package. [Thomas Sanladerer] did a great teardown of these drivers, too. You can check out that video below.

 As you might imagine, a great deal of work went into this build, beginning with the scanning. [Jason] starting scanning last October and finished in January. Printing started January 9th, and he told me the final pieces were printed early this morning. We know you want all the details, so here goes: this build took just over six rolls of PLA at 20% infill. It’s 48″ tall and about 24″ wide. It was printed on what [Jason] referred to as his “very modified” Replicator 2. He glued the pieces together with Testor’s, and that took about 30 hours. All through the project, he kept meticulous notes in a spreadsheet of print times and filament used.