LED Light Staffs For The Ultimate Portable Rave

3531621392887203462

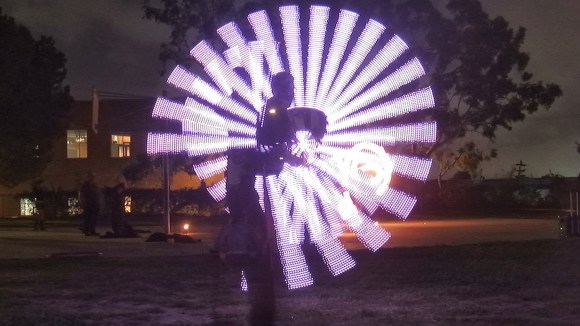
[risknc] and [mpinner] have been working on a couple of LED light staff designs for a while now and have come up with a prototype that can light up the night with an array of streaming colors. There is even a dial that can turn up and down the brightness.

Originally, [risknc] began developing his own project at SpaceX and dove further into the idea right before Burning Man. The visual effects, when twirled through the air, produced an extremely bright flow of energy that can be seen circling around the user.

The 8ft long carbon fiber staff was stuffed to the edges with RGB LEDs. Neopixel strips at 60 LED per meter were used to alternate between colors, and a whole bunch of white capable LEDs were embedded into the staff as well. One of early designs was purposefully left at a local hackerspace called Crashspace in Culver City, California. Photos of community members trying it out surfaced on the hackerspace’s website. In addition, a description of the staff and a few high-quality photos of the ‘Sparkle Stick’ were uploaded on to the Suprmasv projects page. Searching through the pictures reveal an instance that shows the LED light staff being used during a flow session with a fire poi spinner in the background. Perhaps there is a way to combine LEDs and fire? Anyways, a later version of the staff was tested out at the 2014 Maker Faire in San Francisco.

Full specs and logs of the project can be found on Hackaday.io. A quick video of [mpinner]’s light staff being spun around comes up after the break. In the video, it looks like they are testing it out outside of Crashspace as they run through the darkness of the alleyway in the back, lighting up the area with a nice LED glow. Plans for the future include building a bunch of them and wirelessly syncing them up. CAD models will be uploaded soon as well.

Continue reading “LED Light Staffs For The Ultimate Portable Rave”

Make Your Own Mac Pi For Some Desktop Nostalgia

Mac Pi

Do you miss your Mac Classic? Well if you’re looking for a fun little project, why not build yourself a Mini Mac Pi that emulates Mac OS 7?

It’s a fairly simple project that makes use of the Raspberry Pi B, a 320×240 2.8″ touchscreen LCD (the PiTFT), a lithium-ion battery, a buck-boost circuit and of course, a power switch. The cute enclosure is made by 3D printing, and all the files are available on Thingiverse — they’ve been sliced up in a way that they will be printable on most consumer printer bed sizes.

Once everything is assembled, you’ll need to run Mini vMac alongside Raspbian in order to run Mac OS 7. There are a few caveats though — The original resolution is 512×342, so there’s a bit of screen clipping that occurs. There’s also minor application support, but for the purpose of nostalgia, we think the included selection is more than enough to satisfy most memories.

Continue reading “Make Your Own Mac Pi For Some Desktop Nostalgia”

THP Semifinalist: Theta Printer

theta
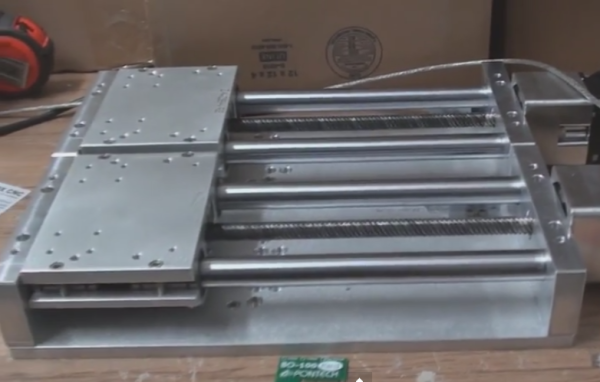
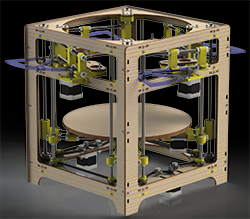
The early 3D printers of the 80s and 90s started off as cartesian bots, and this is what the RepRap project took a cue from for the earliest open source 3D printer designs. A bit later, the delta bot came on the scene, but this was merely a different way to move a toolhead around build plate. We haven’t really seen a true polar coordinate 3D printer, except for [Tyler Anderson]’s incredible Theta printer.

[Tyler]’s theta printer is designed to print in as many different materials as possible, without the reduction in build volume that comes with multiple toolheads on more traditional printers. It will be able to lay down different colors of plastic in a huge build volume, and even some of the weirder filaments out there, all in a single print.

The theta printer is based on a polar coordinate system, meaning instead of moving a hot end around in the X and Y axes, the build plate rotates in a circle, and the extruders move along the radius of the circle. This spinning, polar coordinate printer is the best way we’ve seen to put multiple extruders on a printer, and has the added bonus of being a great platform for a 3D scanner as well.

With four extruders, four motors to control the position of each extruder, a rotation motor, and the Z axis (that’s 10 steppers if you’re counting), this is very likely the greatest number of motors ever put in a 3D printer. Most electronics boards don’t support that many stepper drivers, and the one that will won’t be ready for the end of The Hackaday Prize. Right now, [Tyler] is running a fairly standard RAMPS board, running two extruders and R axes in parallel. Still, it’s good enough for a proof of concept.

One interesting aspect of [Tyler]’s design is something even he might not have realized yet: with a single bed and four extruders, he’s effectively made a 3D printer geared for high-volume production; simply by printing the same part with all the extruders, he’s able to quadruple the output of a 3D printer with the same floor space as a normal one. This may not sound like much, but when you realize Lulzbot has a bot farm producing all their parts, the Theta printer starts to look like a very, very good idea.

Videos of [Tyler]’s Theta below.


SpaceWrencherThe project featured in this post is a semifinalist in The Hackaday Prize.

Continue reading “THP Semifinalist: Theta Printer”

Stupid Security In A Security System

alarm

[Yaehob]’s parents have a security system in their house, and when they wanted to make a few changes to their alarm rules – not arming the bathroom at night – an installer would come out, plug a box into the main panel, press a few buttons, and charge 150 €. Horrified at the aspect of spending that much money to flip a few bits, [yaehob] set out to get around the homeowner lockout on the alarm system, and found security where he wasn’t expecting.

Opening the main panel for the alarm system, [yaehob] was greeted with a screeching noise. This was the obvious in retrospect tamper-evident seal on the alarm box, easily silenced by entering a code on the keypad. The alarm, however, would not arm anymore, making the task of getting ‘installer-level’ access on the alarm system a top priority.

After finding a DE-9 serial port on the main board, [yaehob] went to the manufacturer’s website thinking he could download some software. The website does have the software available, but only for authorized distributors, installers, and resellers. You can register as one, though, and no, there is no verification the person filling out a web form is actually a distributor, installer, or reseller.dist

Looking at the installer and accompanying documentation, [yaehob] could see everything, but could not modify anything. To do that would require the installer password, which, according to the documentation was between four and six characters. The system also responded quickly, so brute force was obviously the answer here.

After writing up a quick script to go through all the possible passwords, [yaehob] started plugging numbers into the controller board. Coming back a bit later, he noticed something familiar about what was returned when the system finally let him in. A quick peek at where his brute force app confirmed his suspicions; the installer’s code was his postal code.

From the installer’s point of view, this somewhat makes sense. Any tech driving out to punch a few numbers into a computer and charge $200 will always know the postal code of where he’s driving to. From a security standpoint, holy crap this is bad.

Now that [yaehob]’s parents are out from under the thumb of the alarm installer, he’s also tacked on a little bit of security of his own; the installer’s code won’t work anymore. It’s now changed to the house number.

Droning On: Maiden Flights

do-55

When we last left off, the Hackaday Drone Testbed was just a box of parts on workbench. Things have changed quite a bit since then! Let’s get straight to the build.

With the arms built and the speed controls soldered up, it was simply a matter of bolting the frame itself together. The HobbyKing frame is designed to fold, with nylon washers sliding on the fiberglass sheets. I don’t really need the folding feature, so I locked down the nylock nuts and they’ve stayed that way ever since. With the arms mounted, it was finally starting to look like a quadcopter.

drone1

Using the correct screws, the motors easily screwed into the frames. I did have to do a bit of filing on each motor plate to get the motor’s screw pattern to fit. The speed controls didn’t have a specific mount, so I attached them to the sides of the arms with double-sided tape and used some zip ties to ensure nothing moved. In hindsight I should have mounted them on the top of the arms, as I’m planning to put LED light strips on the outside of edges of the quad. The LEDs will help with orientation and ensure a few UFO sightings during night flights.

Power distribution is a major issue with multicopters. Somehow you have to get the main battery power out to four speed controls, a flight controller, a voltage regulator, and any accessories. There are PCBs for this, which have worked for me in the past. For the Hackaday Testbed, I decided to go with a wiring harness. The harness really turned out to be more trouble than it was worth. I had to strip down the wires at the solder joint to add connections for the voltage regulator. The entire harness was a bit longer than necessary. There is plenty of room for the excess wire between the main body plates of the quad, but all that copper is excess weight the ‘bench’ doesn’t need to be carrying. The setup does work though. If I need to shed a bit of weight, I’ll switch over to a PCB.

Click past the break to read the rest of the story.

Continue reading “Droning On: Maiden Flights”

800IPM Linear Slide Control

800 Inches Per Minute At 0.00025″ Resolution

The folks over at PONTECH have just released a pretty impressive opensource PIC32 library for controlling a linear slide at speeds of 800 inches per minute!

PONTECH makes the Quick240 (Quick Universal Industrial Control Kard) which is based on the open source chipKIT platform. It was designed for industrial automation systems, where typically a ladder logic PLC might be used. The benefits to using a system like this is that because it is open, you are no longer stuck with proprietary hardware, and it is much more flexible to allow you to “do your own thing”. Did we mention it is also Arduino compatible?

Using this system they’ve successfully controlled two 8″ Velox slides at a whopping 800 inches per minute with a resolution of 0.00025″ — just take a look at the following video to appreciate how freaking fast that is.

Continue reading “800 Inches Per Minute At 0.00025″ Resolution”

Extrinsic Motivation: Integrated Room Sunrise Simulator

4544731407291141702

A Hackaday Prize entry that didn’t make the semifinal cut but deserves its own featured post is this wireless alarm clock that simulates a sunrise in the morning. It was created by [Ceady] and connects to an in-wall dimmer that slowly but surely increases the light over 10 minutes to help gently wake a sleeping person up . The Wireless Interface controls the speed of the illumination mechanism and has the ability to turn the lights off when the snooze button is pressed. Is is a neat little hack that brings together a typical alarm system and in-house lighting in a nice internet-of-things type of way. We foresee items like this being used in everyday household bedrooms in the near future.

Circuit schematics have been uploaded to the Hackaday.io page, along with detailed project logs and a list of the component’s parts. A video of the alarm clock being tested out comes up after the break:


SpaceWrencherThis project is an official entry to The Hackaday Prize that sadly didn’t make the quarterfinal selection. It’s still a great project, and worthy of a Hackaday post on its own.

Continue reading “Extrinsic Motivation: Integrated Room Sunrise Simulator”