Chocolate Extrusion Printer Is Halfway To Making S’mores

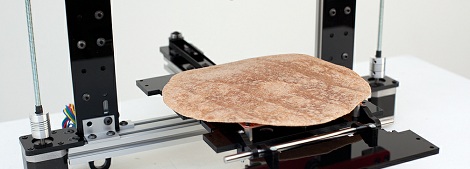
Chocolate has got to be one of the worst choices as a printing medium. It’s extremely fussy when it comes to melting point, and even in the right state the flow of the material is not going to play nicely with high-resolution designs. With this in mind, we applaud the progress the student team from Carnegie Mellon University has made with WonkaBot,  their chocolate extrusion printer.

Unlike the syringe-based paste extruder from last month, this offering uses an auger to push chocolate through a heated printer head. They’re using it to print designs on graham crackers. We love the UI they came up with for the task. It uses a virtual graham cracker as a canvas on your laptop and allows you to use the touchpad or mouse to draw your design. That input is then converted to g-code and sent to the CNC machine for printing. See it in action after the break.

Continue reading “Chocolate Extrusion Printer Is Halfway To Making S’mores”

DIWire Bender Makes Nearly Any Shape Imaginable

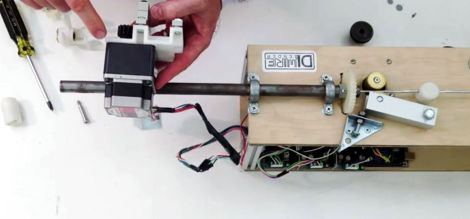
The people over at Pensa posted an awesome CNC wire bender on their blog. Robotic wire benders are common industrial machine that are very fun to watch. These machines can turn out custom wire-bent parts or sculptures in a matter of seconds. The Pensa team’s “DIWire Bender” might not be as fast as the big boys, but it works just the same.

From their Tumblr blog, we see that there are motors to draw the wire off a spool and into a hollow shaft. At the business end of the machine, there’s a small gear-driven bender that can form wire in just about any shape. There’s an awesome video of the DIWire Bender in action after the break if your mind is still trying comprehend how wire top hats and glasses can be made.

The Pensa team says they built this to fill a void in DIY fabrication machines – 3D printers are great and all, but some things can be done more easily by bending some wire.

Continue reading “DIWire Bender Makes Nearly Any Shape Imaginable”

Printing Point-to-point Circuits On A 3D Printer

[CarryTheWhat] put up an Instructable on his endeavours in printing circuit boards for solder free electronics. He managed to print a flashlight where the only non-printed parts are a pair of batteries and a couple of LEDs.

The circuit is a weird mix of point to point and Manhattan style circuit construction; after modeling a printed plastic plate, [CarryTheWhat] added a few custom component holders to hold LEDs, batteries, and other tiny electronic bits.

To deliver power to each electronic bit, the components are tied off on blue pegs. These pegs are attached to each other by conductive thread much like wirewrap circuit construction.

Right now, the circuits are extremely simple, but they really remind us of a few vintage ham radio rigs. While this method is most likely too complex to print 3D printer electronics (a much desired and elusive goal), it’s very possible to replicate some of the simpler projects we see on Hackaday.

[CarryTheWhat] put the models and files up on GitHub if you’d like to try out a build of your own.

Printing Custom Whistles For Everyone At Your RepRap Conference

When [Josef Prusa] speaks at a conference extolling the virtues of 3D printing, he likes to give out printed objects to show off the possibilities home-brew fabrication. A favorite of [Prusa] are whistles – they’re functional and show off exactly what a 3D printer can do. Printing out hundreds of whistles is a job for a factory and not a printer, so [Prusa] decided to customize each whistle with the initials of a conference attendee.

When [Prusa] was asked to attend the INFOTRENDY conference in Bratislava, he had a small audience (only 150 people) and a list of all the attendees a week before hand. It was the perfect scenario to whip up a Python script to generate the models for a whistle with the initials of each attendee emblazoned on the side.

The WhistleGen code is up on [Prusa]’s GitHub ready to print out custom whistles for your next conference. While the capabilities of WhistleGen are limited to just two letters of text, we’re sure someone will figure out a way to automate the generation custom conference badges very shortly.

See the example he sent us after the break.

Continue reading “Printing Custom Whistles For Everyone At Your RepRap Conference”

Zen Rock Garden Table Uses Magnets And Sand

[Nick] is working on a prototype of a coffee table sand plotter that draws patterns in sand a lot like a zen rock garden.

[Nick]’s zen rock garden uses a magnet to draw a ball bearing across the sand in interesting patterns. The build uses 3D printed gears and laser cut parts to rotate the table around and move the magnet along a radius of the circle. During the first test of the prototype, the ball bearing jerked around but this problem was solved by adding a piece of foam under the sand. Power is supplied through a slip ring in the base, and the table is controlled through Bluetooth.

Speaking of magnet-and-ball-bearing zen coffee tables, we ran across this video of a more professional-looking prototype that was the basis for a successful Kickstarter campaign. Like [Nick]’s prototype, the entire build relies on magnets and a ball bearing to move sand around in patterns. Because this zen table uses an XY axis instead of [Nick]’s polar setup, drawing logos is a lot easier math-wise, lthough it doesn’t look quite as cool as a circular rock garden.

After the break you can see these zen rock garden coffee tables in action.

Continue reading “Zen Rock Garden Table Uses Magnets And Sand”

Incredible Home Made Miniature Engines

On the heels of a small stirling engine we featured, an astute Hackaday reader sent in a few awesome builds from HMEM, the home model engine machinist forum.

First up is a fantastic looking stirling engine made entirely from scratch. The build is modeled on a Moriya Hot Air Fan, but instead of making a fan spin around, [IronHorse] put a flywheel on the engine. It also uses propane instead of an alcohol or other liquid fuel lamp for the heat source.

Next up is a pee-wee sized V8 engine by [stevehuckss396]. Unlike the model engines we’re used to, this one runs on gasoline. The engine started out as a 3 x 3 x 5 inch block of aluminum. This thread goes on an amazing 85 (!) pages and makes for great afternoon reading, but here’s a video of the engine in action.

Last is [keith5700]’s amazing 1/4 scale V8. Not only is this [keith]’s first project, he also completed this entire project on manual mills and lathes. There’s an electric starter thrown in there, and the pictures are simply incredible.

Thanks to [Norberto] for sending this one in, and if you’ve got an example of amazing machining skill, send it on it to the tip line.

Cheap And Easy Linear Supported Rail

Some of the very largest – and coolest – CNC machines use supported linear rail for their movement axes. For any home tinkerer trying to reproduce these supported rails, the problem of cost comes up very quick; these rails can run over $100 for just a few feet. [Michael] came up with a great way to build his own supported rail so he can build his very large CNC router.

There aren’t many tools needed to build [Michael]’s rail. He put a 90° notch in a 2×4 to support his 25mm rail, and clamped it down with a piece of plywood. After drilling a 5/16″ hole every 12 cm, he tapped these holes out to receive 3/8″ threaded rod. Yes, we also hate the mix of metric and imperial units in that description, but the results speak for themselves.

The now-supported rail was mounted to a piece of MDF with a few bolts and washers. MDF isn’t the most dimensionally stable material, so [Michael] will be covering the whole thing in a coat of epoxy very soon. Now, he’s one step closer to his gigantic CNC gantry router.

You can check out [Michael]’s demo video after the break.

Continue reading “Cheap And Easy Linear Supported Rail”