The Shuttle Engine Needed 3D Printing, But…

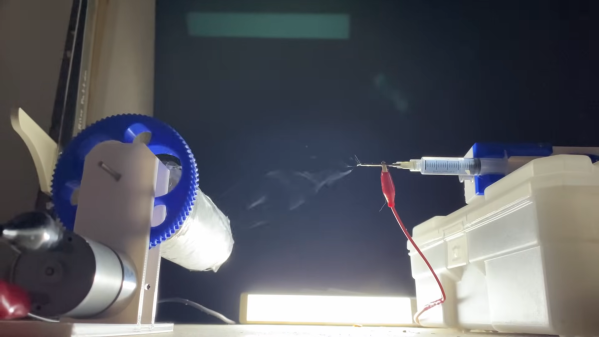
If we asked you to design a circuit to blink a flashing turn signal, you would probably reach for a cheap micro or a 555. But old cars used bimetallic strips in a thermomechanical design. Why? Because, initially, 555s and microcontrollers weren’t available. [Breaking Taps] has the story of NASA engineers who needed some special cooling chambers in a rocket design for the Space Shuttle. Today you’d 3D print them, but in the 70s, that wasn’t an option. So they used wax. You can see a video about the process, including a build of a model rocket engine, in the video below.

The issue is the creation of tiny cooling channels in the combustion chamber. You can use additional thin pipes brazed onto the engine. However, there are several disadvantages to doing this way, but early rocket engines did it anyway. Having the cooling path integrated into the system would be ideal, but without 3D printing, it seems difficult to do. But not impossible.

Continue reading “The Shuttle Engine Needed 3D Printing, But…”

A small speaker with an LCD showing chatbot responses

AI-Powered Speaker Is A Chatbot You Can Actually Chat With

AI-powered chatbots are pretty cool, but most still require you to type your question on a keyboard and read an answer from a screen. It doesn’t have to be like that, of course: with a few standard tools, you can turn a chatbot into a machine that literally chats, as [Hoani Bryson] did. He decided to make a standalone voice-operated ChatGPT client that you can actually sit next to and have a conversation with.

The base of the project is a USB speaker, to which [Hoani] added a Raspberry Pi, a Teensy, a two-line LCD and a big red button. When you press the button, the Pi listens to your speech and converts it to text using the OpenAI voice transcription feature. It then sends the resulting text to ChatGPT through its API and waits for its response, which it turns into sound again through the eSpeak speech synthesizer. The LCD, driven by the Teensy, shows the current status of the machine and also provides live subtitles while the machine is talking.

To spice up the AI box’s appearance, [Hoani] also added an LED ring which shows a spectrogram of the audio being generated. This small addition really makes the thing come alive, turning it into what looks like a classic Sci-Fi movie prop. Except that this one’s real, of course – we are actually living in the future, with human-like AI all around us.

All code, mostly written in Go, is freely available on [Hoani]’s GitHub page. It also includes a separate audio processing library called toot that [Hoani] wrote to help him interface with the micophone and do spectral analysis. Anyone with basic electronic skills can now build their own AI companion and talk to it – something that ham radio operators have been doing for a while.

Continue reading “AI-Powered Speaker Is A Chatbot You Can Actually Chat With”

New Tool Helps Create Laser-Cut Doom Maps

Doom has a larger cultural footprint than the vast majority of video games ever made. That inspired [Theor] to see if it was possible to laser-cut some of the game’s maps to create a real-world model of those famous original levels.

Level data was extracted from the game’s original WAD data files using code written in Rust. Maps are described by multiple “lumps” within the WAD file format, each containing information on vertexes, walls, and floors. This data was scraped and converted into SVG files suitable for laser cutting. [Theor] then built a visualizer that could display what a stacked-up laser cut map would look like in 3D, to verify everything worked correctly. With that done, the map could be laser cut without worries that it would come out a jumbled, janky mess.

[Theor] kept the finished product simple, creating the map as a stack of blue acrylic pieces. We can imagine this tool being perfect for creating a high-quality diorama though, with some work done to paint the map to match what the player sees in game. If you happen to take that approach, don’t hesitate to notify the tipsline!

Little Twitter Game Boy Won’t Work Now The API Is Dead

Twitter, like many social networks, used to feature a useful API. This let people do fun things like create toasters that could automatically post breaderly updates, or even load Twitter posts on machines that couldn’t handle full-fat websites. That API is now history, but [NEKOPLA] used it for a cute Game Boy-like Twitter device in its dying days earlier this year.

Swap out the TW BOY for a smartphone and this photo wouldn’t be nearly as good.

The “TW BOY”, as it is known, runs on a Raspberry Pi Zero 2 W, which includes a WiFi chip on board for easy internet connectivity. A Python script was charged with fetching Tweets for viewing using the now-dead Twitter API. Dithering was used to display color images on the 320×240 monochrome screen. Everything was wrapped up in a tidy 3D-printed housing to complete the look. The device uses two action buttons, and four directional buttons for navigation. It’s the layout popularized by the original Game Boy, and it looks super cute here, too.

The project was built as [NEKOPLA] has a penchant for single-use devices, due to their solitary focuses on doing one thing well. We can appreciate that ethos, and we love the final product, even if Twitter decreed it would no longer work. (Time to move on to Mastodon?) More images after the break.

Continue reading “Little Twitter Game Boy Won’t Work Now The API Is Dead”

RoboGaggia Makes Espresso Coffee On Its Own

[Nicholas DiPatri] very much loves his Gaggia Pro. It’s an amazing espresso machine, but it’s also kind of fussy and requires a lot of manual attention to brew a cup. As an engineer, he set about fettling the machine to run with a little less oversight. Enter RoboGaggia.

Stock, the Gaggia Pro requires regular water refills. The coffee-thirsty user must also wait for the brew heater to reach temperature before clicking the go button. Knowing the weight of coffee in the machine is key to getting the brew right, too. Steaming must also be done by hand. Overall, it’s a lot of work.

[Nicholas]’s goal was to get the machine to a point where he could load it with fresh ground coffee, hit a button, and walk away. On his return, the machine should be ready for steam. To achieve this, he went ham on outfitting the Gaggia Pro with fancy modern equipment. It scored a scale that sits in the drip tray, PID temperature controllers, a flow rate controller to manage the extraction profile, and an auto-fill water reservoir. The entire brew process is carried out under the command of a microcontroller, with live telemetry also sent to Adafruit.io for logging.

It’s by no means a lightweight project, but [Nicholas] has shared files on Github for the curious. However, if you’re in love with your Italian espresso machine and don’t want to switch, this might just be the kit you need to end your morning headaches. After all, when we’re in need of coffee, we’re at our worst for managing a complicated chemical processing plant. Video after the break.

Continue reading “RoboGaggia Makes Espresso Coffee On Its Own”

A New Commodore C128 Cartridge

A new Commodore C128 cartridge in 2023?  That’s what [idun-projects] set out to do and, as you can see in the video below, did. I did the original C128 hardware design and worked with the amazing team that turned this home computer out in 1985. Honestly, I am amazed that any of them are still working 38 years later, let alone that someone is making new cartridges for it.

I also never thought I would hear about someone’s in-depth experience designing for the ‘128. The post takes us through [idun-project’s] decision to use the ‘128 and how modern expectations apply to all computers, even the old ones. Hot on the list was connectivity and reasonable storage (looking at you, floppy disks).

Continue reading “A New Commodore C128 Cartridge”

An aluminium case with a small PCB and two nine-volt batteries inside

A Low-Noise Amplifier To Quantify Resistor Noise

Noise is all around us, and while acoustic noise is easy to spot using our ears, electronic noise is far harder to quantify even with the right instruments. A spectrum analyzer is the most convenient tool for noise measurements, but also adds noise of its own to whatever signal you’re looking at. [Limpkin] has been working on measuring very small noise signals using a spectrum analyzer, and shared his results in a comprehensive blog post.

The target he set himself was to measure the noise produced by a 50 Ohm resistor, which is the impedance most commonly seen on the inputs and outputs of RF systems. The formula for Johnson-Nyquist noise power tells us that the expected noise voltage in a one-hertz bandwidth is just 0.9 nanovolts – tiny by any standard, and an order of magnitude smaller than the noise floor of a typical spectrum analyzer. [Limpkin] therefore designed an amplifier and signal buffer to crank up the noise signal by a factor of 100, using ultra-low noise op amps running off a pair of nine-volt batteries.

There was a problem with this circuit, however: any stray DC voltage present at its input would also be amplified to levels that could damage the analyzer’s sensitive input port. To prevent this, [Limpkin] decided to add a clipper circuit to his amplifier. This consists of a pair of comparators that continuously monitor the amplifier’s output voltage and disconnect it through a silicon switch if it goes beyond 200 millivolts. [Limpkin] packaged his circuit in a beautifully-machined case and ran various tests to ensure the clipper worked reliably even in the presence of fast input transients.

With the clipper in place, it was safe to run the planned noise measurements. The end result? About 0.89 nV, just as predicted by theory. Measuring nanovolt-level signals usually requires extremely accurate equipment and lots of tricks to minimize noise. Sometimes though, noise is just what you need to make a radio transmitter. Thanks for the tip, [alfonso32]!