Swapping Nunchucks For A Steering Wheel

Rather than chasing pure performance and high quality graphics like other gaming companies, Nintendo has made a name for themselves over the last few decades by favoring not only artistic design and gameplay, but the physical design of the game systems. Of course the hybrid handheld Switch console is among these, but it also includes things like the novel design of the Nintendo 64 controller and, of course, the Wii nunchuck controllers. They’re not always met with resounding approval, though. Some of us tend to prefer more traditional gamepad design, and will go to extreme lengths to get it like this D-pad for playing Mario Kart Wii.

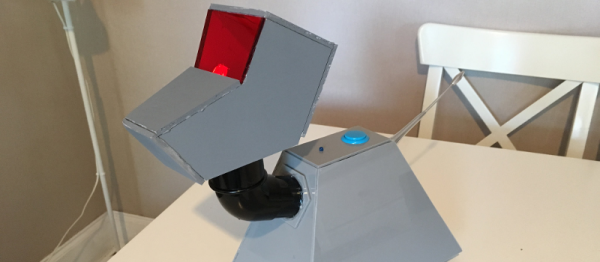
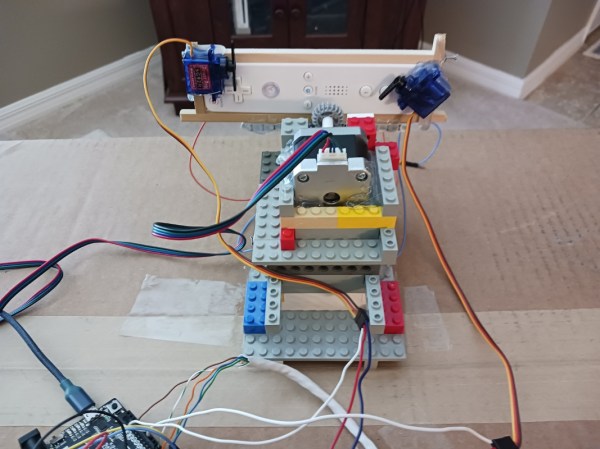
Rather than simply building a compatible controller for the Wii, or even using a GameCube controller, this controller setup takes a more roundabout approach. A Wiimote is placed in a holster built from Lego, and the game is set up to recognize it as if it were being used in its steering wheel mode. The Lego holster has a servo attached which can tilt the Wiimote from side to side, mimicking a player holding it to play the game, with another set of servos set up to press the various buttons. To control the controller, a homebrew D-pad built on perfboard with an Arduino at its core is used to send commands to the servos, allowing for a more standard controller layout to be used for the classic kart racing game than the steering wheel Wiimote allows.

While it’s quite obvious that there are simpler, easier solutions that avoid the sometimes awkward nature of using Wiimotes, we certainly appreciate the Rube Goldberg-like approach to setting up your gaming experience exactly the way you like. Whether that’s setting up an antique CRT effect for the authentic retro gaming experience or building a complete racing simulator from scratch, the gaming experience is ripe for personalization and unique builds like this one.

Continue reading “Swapping Nunchucks For A Steering Wheel”

Wii-Inspired Controller Built Using Raspberry Pi Pico

We all thought Nintendo was going to change the world of gaming when it released the Wii all those years ago. In the end, it was interesting but not really fundamentally life-changing for most of us. In any case, [Sebastian] and [Gabriel] decided to build a Wii-like controller for their microcontroller class at Cornell.

The build uses a pair of Raspberry Pi Pico microcontrollers, communicating over HC-05 Bluetooth modules. One Pico acts as a controller akin to a Wiimote, while the other runs a basic game and displays it on a screen via VGA output. The controller senses motion thanks to a MPU6050 inertial measurement unit, combining both gyros and accelerometers in all three axes.

The duo demonstrate the hardware by using it as a pointer to play a simple Tic-Tac-Toe game. It’s in no way going to light up the Steam charts, but the project page does go into plenty of useful detail on how everything was implemented. If you want to create your own motion gaming controller, you could do worse than reading up on their work.

We’ve seen some other great examples of motion controls put to good use, like this VR bowling game. Video after the break.

Continue reading “Wii-Inspired Controller Built Using Raspberry Pi Pico”

Light Guns Aren’t Just For CRTs Anymore

For how much of a cultural phenomenon light gun games like Duck Hunt were, they didn’t survive the transition from CRT televisions to LCDs particularly well because of all of the technological quirks the light guns exploited in older technology that simply disappeared with modern TVs. But it’s not impossible to get a similar gameplay from modern technology as evidenced by the success of the Wii and its revolutionary Wiimote, and there are plenty of modern games that use similar devices. There are a few paths to getting older light guns working again, though.

The first system to note, called SAMCO, uses a system of LEDs and a camera to synchronize the game’s flashes to the new technology and translate the input back into the game. Gun4ir uses a similar technique, and boasts extremely high accuracy and low latency largely due to being programmed in assembly. Both systems can use either an infrared tracking sensor or a Wiimote sensor as the LEDs and while the SAMCO system can run on a Raspberry Pi Pico, Gun4ir exclusively uses ATmega32U4 boards with the optimized assembly programming.

Both SAMCO and Gun4ir offer PCBs for anyone looking to try them out without designing their own circuit boards, and once the electronics are assembled they can either be put in an original NES-era light gun, put in a custom printed enclosure, or even stuffed into a Nerf gun. For others looking for a more turnkey solution, there are also offerings from companies like Sinden which make complete system. You can always build your own system to restore the functionality of original light guns from scratch if that’s more your style.

Thanks to [LookAtDaShinyShiny] for tipping us off to the latest happenings in the light gun community!

Photo courtesy of Wikimedia Commons

Study Hacker History, And Update It

Looking through past hacks is a great source of inspiration. This week, we saw [Russ Maschmeyer] re-visiting a classic hack by [Jonny Lee] that made use of a Wiimote’s IR camera to fake 3D, or at least provide a compelling parallax effect that’ll fool your brain, without any expensive custom hardware.

[Lee]’s original demo was stunning, and that alone is reason to revisit it. Using the Wiimote as the webcam was inspired back in 2007, because it meant that there was no hard computer vision work to be done in estimating the viewer’s position – the camera only sees IR LEDs anyway. The tradeoff is that you had to wear two IR LEDs on your head, calibrate it just right, and that only the person with the headset on gets the illusion just right.

This is why re-visiting the past can be fruitful. As [Russ] discovered, computing power is so plentiful these days that you could do face/eye position estimation with a normal webcam easier than you could source an old Wiimote. Indeed, he’s getting the positioning so accurate that he’s worried about to which eye he’s projecting the illusion. Clearly, it’s time for a revamp.

So here’s the formula: find a brilliant old hack, and notice if it was hampered by the state of technology back when it was done. Update this using modern conveniences, and voila! You might just find that you can take the idea further, simply because you have more tools in your toolbox. Nothing wrong with standing on the shoulders of giants.

But beware! Time isn’t sitting still for you either. As soon as you make your killer 3D vision hack, VR goggles will become cheap and ubiquitous. So get it done today, before your hack becomes inspiration for the future.

Run Your Favorite 8-bit Games On An ESP32

Here at Hackaday HQ we’re no strangers to vintage game emulation. New versions of old consoles and arcade cabinets frequently make excellent fodder for clever hacks to cram as much functionality as possible into tiny modern microcontrollers. We’ve covered [rossumur]’s hacks before, but the ESP_8-bit is a milestone in comprehensive capability. This time, he’s topped himself.

There isn’t much the ESP 8-bit won’t do. It can emulate three popular consoles, complete with ROM selection menus (with menu bloops). Don’t worry about building a controller, just connect any old (HID compliant) Bluetooth Classic keyboard or WiiMote you have at hand. Or if that doesn’t do it, a selection of IR devices ranging from joysticks from the Atari Flashback 4 to Apple TV remotes are compatible. Connect analog audio and composite video and the device is ready to go.

The system provides this impressive capability with an absolute minimum of components. Often a schematic is too complex to fit into a short post, but we’ll reproduce this one here to give you a sense for what we’re talking about. Come back when you’ve refreshed your Art of Electronics and have a complete understanding of the hardware at work. We never cease to be amazed at the amount of capability available in modern “hobbyist” components. With such a short BOM this thing can be put together by anyone with an ESP-32-anything.

There’s one more hack worth noting; the clever way [rossumur] gets full color NTSC composite video from a very busy microcontroller. They note that NTSC can be finicky and requires an extremely stable high speed reference clock as a foundation. [rossumur] discovered that the ESP-32 includes a PLL designed for audio work (the “APLL”) which conveniently supports fractional components, allowing it to be trimmed to within an inch of the desired frequency. The full description is included in the GitHub page for the project and includes detailed background of various efforts to get color NTSC video (including the names of a couple hackers you might recognize from these pages).

Continue reading “Run Your Favorite 8-bit Games On An ESP32”

DJ Hero Controller Gets A New Gig

Fans of the Guitar Hero etc. franchise may be interested to hear about Spin Rhythm XD, a similar rhythm game which uses a jog wheel for much of the chase-down-the-notes action. Although it can be played with a keyboard and mouse, the ideal input is a professional DJ MIDI controller — imagine two capacitive “turntables” the size of 45s, and a lot of buttons, knobs, and sliders.

Like most of us, [Dave] doesn’t have one of those. But what he does have is an old DJ Hero controller made for the Wii. It’s a lot like the big boy version of a DJ MIDI controller as far as the inputs go, except that the turntable isn’t capacitive.

Since the Wii brain is just sending I²C over a funny-looking connector, [Dave] was able to replace the Wiimote with a Teensy LC, and write new firmware for the controller inputs using a breakout board built for another project.

[Dave] tried to use as many of the DJ Hero controller’s inputs as he could, so in addition to mapping the wheel and wheel buttons to the main game controls, he wired up the joystick, effects knob, and buttons to navigate through the game menus. The game’s designers had the forethought to map these to keyboard keys, so it was pretty easy to do. He can even use dual turntables and mix or isolate them with the crossfader. Slide past the break to check out the build video, and stick around for a full-length song demo.

Are these games a little too frantic for you? Turn those ‘tables into an Etch-A-Sketch instead.

Continue reading “DJ Hero Controller Gets A New Gig”

Building A K9 Toy

[James West] has a young Doctor Who fan in the house and wanted to build something that could be played with without worrying about it being bumped and scratched. So, instead of creating a replica, [James] built a simple remote controlled K9 toy for his young fan.

K9 was a companion of the fourth Doctor (played by Tom Baker) in the classic Doctor Who series. He also appeared in several spin-offs. A robotic dog with the infinite knowledge of the TARDIS at hand, as well as a laser, K9 became a favorite among Who fans, especially younger children. [James] wanted his version of K9 to be able to be controlled by a remote control and be able to play sounds from the TV show.

Using some hand-cut acrylic, [James] built K9’s body, then started on plans for the motion control and brains. [James] selected the Raspberry Pi Zero for the controller board, a Speaker pHat for the audio, a couple of motors to move K9 around, and a motor controller. K9 is controlled by a WiiMote and has a button on his back to start pairing with the WiiMote (K9 answers with “Affirmative” when the pairing is successful.) When it came to the head, [James] was a little overwhelmed by trying to make the head in acrylic, so he got some foam board and used that instead. A red LED in the head lights up through translucent red acrylic.

It’s a great little project and [James] has put the Python code up on Github for anyone interested. We’ve had a couple of robot dog projects on the site over the years, like this one and this one.

Continue reading “Building A K9 Toy”