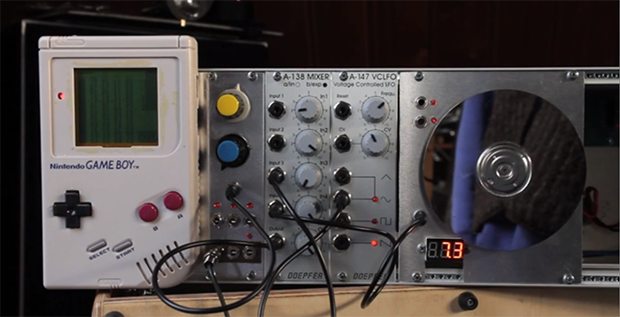
Raspberry Pi Synth Gives A Softsynth Dedicated Hardware

For all the musicians out there, here’s a great use for your Raspberry Pi. All the features you would expect from a nice analog synth are implemented in a Raspberry Pi-based polysynth – dual oscillators, LFOs, and phasers – and it looks like there will be a few more features added before the Raspi synth is released.

Even though the ‘synthesis’ part of the Raspi synth already sounds wonderful, getting MIDI on the Rasberry Pi leaves much to be desired. The creator of the Raspi synth thought about using the GPIO pins as a MIDI interface, but because the GPIO pins cannot run natively at 31250 bps (the MIDI spec), the Raspberry Pi has to waste most of its CPU cycles just listening for MIDI traffic.

Right now the Raspberry Pi synth is controlled by a USB-connected MIDI interface, and as you can hear after the break, sounds wonderful. We can’t wait to hear what this synth will be able to do in a few months’ time.

Continue reading “Raspberry Pi Synth Gives A Softsynth Dedicated Hardware”

Playing With DSP And Building A Guitar Pedal

Building guitar pedals has come a long way from hooking up a few transistors and building a simple boost circuit. [Cloudscapes] has been working on a Anti-nautilus auto glitch, auto repeat pedal, and if you’re looking for something that sounds like a spaghetti western soundtrack skipping on a record player, we couldn’t think of anything better.

[Cloudscapes] was already familiar with 8-bit AVRs, but when doing real-time audio sampling, a more powerful microcontroller was in order. He turned to the MikroElektronika MINI-32 board for development purposes. This small board fits a PIC32 microcontroller into an easily breadboardable DIP-40 form factor, perfect for playing around with some very capable hardware.

For the DAC, [Cloudscapes] had some experience with the 16-bit PT8211, but finding a good 16-bit ADC in a convenient package was a bit of a challenge. He eventually settled on the 12-bit MCP3201 ADC, more than enough for a pedal that is supposed to sound lo-fi.

After [Cloudscapes] got a few boards made, he started on his DSP adventure. Unfortunately, the initial code used unsigned 16-bit words to represent each sample, meaning every time the loop repeated it would start at 0 and produce a short pop in the speaker. After a week of debugging, [Cloudscapes] realized signed integers are a much better data format for storing audio data and got rid of the problems plaguing his project.

Now [Cloudscapes] has a wonderful DSP dev board, perfect for making new and strange guitar effects. After the break you can listen to a demo of what the Anti-nautilus pedal actually does, and we’ve got to say it sounds great.

Thanks [Chris] for sending this one in.

Continue reading “Playing With DSP And Building A Guitar Pedal”

Making Chiptunes With 32 Bytes Of RAM

Ah, chiptunes. One of the few remaining human endeavours where less RAM, less storage space, and fewer capabilities are actually considered an improvement. [dop3joe] over at the Stuttgart hackerspace Shackspace sent in a tiny chiptune playing circuit using the most bare-bones hardware we’ve ever seen.

The Noiseplug, as [dop3joe] calls it, is based on a very, very small 6 pin ATtiny9. With 1 kB of Flash memory and only 32 bytes of RAM [dop3joe] was able to create a small device inside an RCA jack that plays chiptunes whenever it is powered by a battery.

If you’d like to make your own noise plug, [dop3j0e] put all the code up in his Git. There are two relevant pieces of software for this build: a Windows app to create the chiptunes, and the ATtiny9 firmware itself. Of course to program the tiny, you’ll have to deal with the Atmel TPI, so here’s the application note (PDF).

Oh, [dop3joe] won third place at the Evoke demoscene party last weekend with the Noiseplug. Awesome.

Servo Controlled Wine Glass Plays The Music Of The Angels

[youtube=http://www.youtube.com/watch?v=tUNuTgNU-3c&w=470]

There’s a lot of cool stuff brewing on the Hackaday forums. [igor_b] posted a project he’s been working on that uses a servo, motor, wine glass, and a balloon to create a one-glass armonica.

A glass harmonica is a series of nested bowls turned on a spindle that is played by running your finger along the rims of the glasses. They’re very unique sounding instruments and something [igor] decided to emulate using only one glass.

Because the note produced from a wine glass varies with the volume of liquid, [igor]’s first thought was to use a pump to change the level of the water. He discarded this idea when he realized he could displace water by tying a balloon to a servo.

The rest of the build is a simple 555-based motor driver, a phone app written with GoOSC, and a Teensy dev board. To change the pitch of his instrument, [igor]’s phone sends a command via WiFi to his computer, which in turn controls the Teensy, servo, and ultimately the level of water in the glass.

It’s a very cool build, but there is a small change in timbre as the water balloon displaces more liquid in the glass. [igor] tried a few other objects – a peach and a plum – but using a balloon filled with water produced the clearest tone.

Now to make a few more of these and connect them to a MIDI keyboard…

Making Music With Tennis Balls And Lego

We’ve seen a lot of interesting MIDI controllers, but this one uses some unconventional materials. The World’s Coolest Keystroke, built by [Audiobody], is made from a combination of tennis balls, Lego bricks, servos, and switches.

When a tennis ball is lifted up, a Lego arm is actuated. It looks like a servo is used to move the Lego arm so it hits a switch. An Arduino is used to detect this and send a message to their computer.

They use the device to control Ableton Live and play different clips depending on which tennis ball was removed. It’s an interesting way to control sound with a tactile interface, and it looks pretty nifty.

After the break is a short video of the device in action, but [Audiobody] says that they will be releasing more information soon. We’re looking forward to seeing other interesting controllers that they have in the works.

[Via Make]

Continue reading “Making Music With Tennis Balls And Lego”

Turning An Old Keyboard Into A Work Of Art


The 1970s were the glory days for analog synthesizers, and for [Stefan] listening to huge modular Moogs and ARPs resulted in a wondrous seething jealousy. In 2009, wanting to relive just a little bit of his childhood, [Stefan] picked up a PAiA Stringz’n’Things from eBay. It’s a great little keyboard, but [Stefan] his new purchase to look little classier than a tolex-covered flight case. After getting rid of the old tolex case, [Stefan] made a new enclosure and added some extra circuitry to expand the capabilities of this classic synth.

After replacing the electrolytic capacitors and fixing a voltage regulator issue, [Stefan] made a new enclosure for his keyboard out of beautifully lacquered mahogany. A new key bed stolen from an old Yamaha organ was brought in, and new control panels above the keys provide a more sensible organization than the keyboard’s previous incarnation.

The original Stringz’n’Things was laid out more like an organ than a synthesizer, a reflection of its polyphonic nature. This meant there wasn’t a very diverse tonal palette, but [Stefan] remedied that with a wave folder to generate extra harmonics, a tremolo, and an envelope generator to provide attack and decay for each note.

Now [Stefan] has a lovely polyphonic synth that has found its place on top of an old Hammond organ. As a bonus, the synth sounds really good. Not bad for an instrument generally regarded as being very limited.


Refurbing An Old Piano With Carbon Fiber

[Chris] picked up a baby grand. Of course for a complex mechanical device made out of wood, it wasn’t in the best shape. He’s doing his best to refurbish this $350 piano and turn it into something that plays and sounds like a $200,000 concert grand

The 1941 Kimball baby grand piano [Chris] picked up for $350 was a complete mess when it arrived in his house. After cleaning up the wood and replacing some felt the piano looked much better, but [Chris] wanted to make it play better.

After picking up a set of hammers from a 1909 Steinway, [Chris] tore apart the action on his Kimball. The Steinway hammers were removed from their shanks, carbon fiber shanks glued into place, and the entire assembly put back into the piano.

With new felt, new hammers, and light weight shanks on every key, [Chris] has a remarkable piano that is most likely better than new. Not a bad result for a $350 piano.

You can check out [Chris]’ build video after the break along with a little [Mozart] (we think) after the break.

Continue reading “Refurbing An Old Piano With Carbon Fiber”