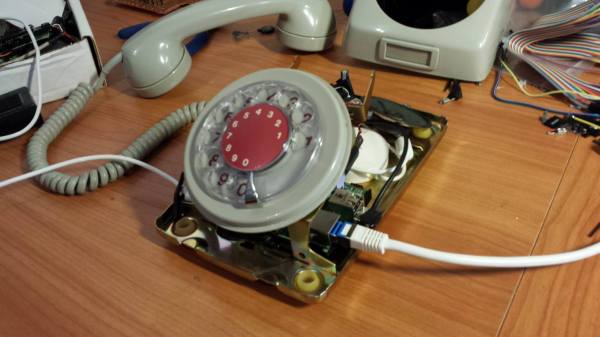
The PebblyPi: A Smart Doorbell

PebblyPi

A Pebble smart watch, and a Raspberry Pi. They are a perfect match. This is probably what [Daniel] thought when he embarked upon his latest project, a smart doorbell called the PebblyPi (tip submitted by [Ben]).

The actual project is quite easy to implement. All you need really need is a Raspberry Pi, a switch, a resistor, and a Pebble Smart Watch (plus a smart phone). Using a simple Python script on the Raspberry Pi, button press notifications are sent to Pushover, which allows the notification to arrive on your smart phone (and thus your Pebble Smart Watch). Pushover is a very cool notification service for Android devices, iPhones, iPads, and your Desktop. The concept behind this project is great, and the fact that it is so simple to implement opens up many other possibilities for interfacing your home electronics with the Pebble Smart Watch (or even just your smart phone). The ability to create custom notifications on any of your devices using any internet connected system is amazing!

You could receive notifications from your absurdly accurate weather station, or even your soil moisture monitor. Have you used Pushover in any of your projects? The possibilities are endless!

Continue reading “The PebblyPi: A Smart Doorbell”

Input And Output On A Single Pin

IO

[Emilio] has a Raspberry Pi with a few sensors running totally headless. It’s a great way to gather data and post it on the Internet, but for the rare occasions when the Pi needs to be turned off for maintenance, [Emilio] needs to connect a monitor, a keyboard, and a mouse. Not a perfect solution when a simple pushbutton and indicator LED would suffice. There’s one problem with adding a simple button and LED combo: there’s only one GPIO pin available in the setup. That’s nothing a few resistors won’t fix.

After wiring up a very simple circuit on a piece of perfboard, [Emilio] met his design goal of being able to tell if the Pi was running and giving it a software reset button using only a single GPIO pin. The circuit requires only two resistors, and the software to make everything run – a simple Python script – toggles the pin between input and output, checking if the button is held down for five seconds. If it is, the Raspi powers off for [Emilio]’s routine maintenance.

My First Robot: A Dad’s Journey In Robotics For His Daughter

My first robot

[Joel Miller] wants to get his daughters into electronics early (his oldest is only 3), so he’s decided to foray into the wonderful world of robotics as a fun way to get them interested. As bonus to us and all other would-be robotics enthusiasts out there, he’s keeping track of the project on his blog!

He started by sketching out some ideas about what he wanted his robot to be capable of — it should be able to move around, be remote controlled, have sensors for experiments, and even have some personality — expression capable eyes maybe? Oh and it should be able to automatically charge itself, and have tank treads!

It’s been a few weeks since he started scheming up ideas… and he already has a prototype complete! Talk about a productive father! He decided to try 3D printing a continuous tank tread using ABS, but unfortunately it was a bit too stiff, so he’s opted to use a tried and true Lego system instead — although maybe he should try printing in two materials, like we just saw with the FlexyDualie extruder!

Continue reading “My First Robot: A Dad’s Journey In Robotics For His Daughter”

Recycled Foam Box Is Now A Weather Station

Raspberry pi in foam box

When [Ioannis] received some high resolution LCD’s in a tattered foam box, he posed to himself a most interesting question – Should he throw the foam box away, or use it as a container for a project? Fortunately for us, he decided on the latter and threw together a very capable weather station!

Having only an hour to spare, [Ioannis] grabbed a Raspberry Pi, WiFi USB stick and a camera module and went to work. He mounted the camera module to the foam lid using a highly advanced technique, and soldered a cable that would power the device directly to D17 – a Zener diode that sits on the bottom of the board.

For the weather data, he’s using another design of his – the Sensor Stick. This nifty device — which we featured over the weekend — is about the size of a stick of chewing gum, and sports an array of sensors including the popular BMP085, which can measure pressure and temperature .

He wraps up everything using open source software to get the data from the weather station. Pretty impressive for an old foam box and an hours time! This would be an interesting start to a home automation system. Connect it to motorized windows and/or a sprinkler system and he’s on his way to claiming The Hackaday Prize.

Raspi, GPS, USB hub and battery hooked together

NSA Technology Goes Open Hardware

When [Edward Snowden] smeared the internet with classified NSA documents, it brought to light the many spying capabilities our government has at its disposal. One the most interesting of these documents is known as the ANT catalog. This 50 page catalog, now available to the public, reads like a mail order form where agents can simply select the technology they want and order it. One of these technologies is called the Sparrow II, and a group of hackers at Hyperion Bristol has attempted to create their own version.

The Sparrow II is an aerial surveillance platform designed to map and catalog WiFi access points. Think wardriving from a UAV. Now, if you were an NSA agent, you could just order yourself one of these nifty devices from the ANT catalog for a measly 6 grand.  However, if you’re like most of us, you can use the guidance from Hyperion Bristol to make your own.

They start off with a Raspi, a run-of-the-mill USB WiFi adapter, a Ublox GY-NEO6MV2 GPS Module, and a 1200 mAh battery to power it all. Be sure to check out the link for full details.

Thanks to [Joe] for the tip!

Mirror Mirror On The Wall…

Who wouldn’t want a mirror that compliments them first thing in the morning? [Michael]’s  Magic Mirror does this and more.  [Michael] got the idea for his mirror during an epic Macy’s shopping trip with his girlfriend. While looking for a boyfriend chair, [Michael] noticed a mirror with a lighted sign behind it. Intrigued by the effect, [Michael] realized he could build it – and build it better!

Back at home [Michael] set to work. The Magic Mirror uses a piece of one-way mirror, similar to infinity mirrors. Instead of LED’s and another mirror, [Michael] wanted to embed an entire monitor behind the glass. In order to keep the mirror thin, [Michael] needed a monitor with cables exiting toward the side or bottom rather than directly out the back. He found what he was looking for in an Iiyama monitor. Yanking the case off a brand new LCD can be a bit nerve-wracking, but [Michael] pulled it off in pursuit of a thin final product.

Magic Mirror’s frame is built with standard 2×4 lumber. [Michael] had the foresight to include some cooling holes for the heat generated by the monitor. The heavy 6.5Kg final product required a double mounting point.

With a good-looking case, it was time to get some equally good-looking data to display. [Michael] used a Raspberry Pi to drive his display. He switched the Pi’s display mode to portrait and installed Chromium  in kiosk mode. The entire mirror is essentially a web page. [Michael] used some simple HTML, CSS and Javascript to pull time and weather data down from various feeds. The page is rendered in a clean Helvetica Nueve Neue font with matching icons. A handsome build indeed!

Sink Your Teeth Into PiPhone

Raspberry Pi cell phoneHave you ever dreamed of independence from smartphone bloatware? If you have a Raspberry Pi and an Adafruit TFT, you’re halfway to making your own version of [Dave]’s PiPhone.

This tasty proof-of-concept cellular sandwich is made by adding a Sim900 GSM/GPRS module, which communicates via UART, to the Pi/TFT hardware while using a piece of foam core board in the middle to prevent shorts. You won’t get free service or anything, but you can pop a pre-paid SIM card into it. He’s powering it with a LiPo battery and using a DC-to-DC converter to set up the 3.7V to 5V. You could do a lot worse than the $158 BOM, and we’re betting you have a Pi lying around already. We wish more phones had baby rocker switches.

There’s a slight problem with the PiPhone: it gets pretty warm and there isn’t a lot of room for air circulation. For best results, let it cool on a well-attended windowsill or operate it near a fan like [Dave] did. He doesn’t have the code up on GitHub as of this writing, but he will capitulate to high demand. Make the jump to see [Dave]’s tour of the PiPhone and watch him make a call with it.

Continue reading “Sink Your Teeth Into PiPhone”