Roving Hexapod Poops Out 3D Prints

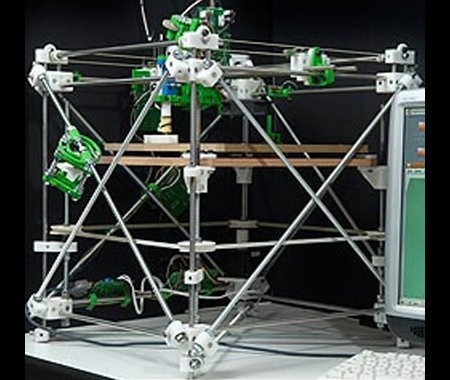
[Jia Wu, Mary Sek, and Jeff Maeshiro], students  at the California College of the Arts (CCA) in San Francisco, took on the task of developing a walking 3D printer. The result is Geoweaver, a hexapod robot with a glue gun extruder system. Hackaday has seen walking CNC machines before, but not a 3D printer. Geoweaver uses two servos on each of its six legs to traverse the land. The team was able to program several gaits into the robot, allowing it to traverse uneven terrain. Walking is hard enough on its own, but Geoweaver also uses a glue gun based extruder to make 3D prints. The extruder head uses two servos to swing in a hemispherical arc. The arc is mapped in software to a flat plain plane, allowing the robot to drop a dollop of glue exactly where it is programmed to. Geoweaver doesn’t include much in the way of on board processing – an Arduino Uno is used to drive the 15 servos. Those servos coupled with a glue gun style heater pull quite a bit of power, which has earned Geoweaver nicknames such as Servo Killer, Eater of Shields, Melter of Wires, and Destroyer of Regulators.

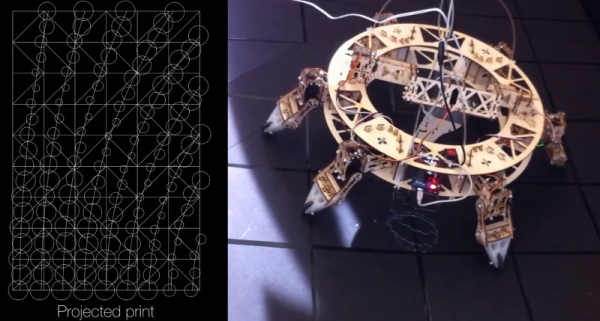
Geoweaver’s prints may not be much to look at yet, however the important thing to remember is that one of the future visions for this robot is to print on a planetary scale. Geoweaver currently uses reacTIVision to provide computer control via an “eye in the sky”. ReacTIVision tracks a fiducial marker on the robot, and applies it to a topographical map of the terrain. This allows Geoweaver to change its height and print parameters depending on the flatness of the ground it is printing on. On a scaled up Geoweaver, reacTIVision would be replaced by GPS or a similar satellite based navigation system.  Most of the software used in Geoweaver is opensource, including Grasshopper and Firefly, written by the team’s professor, [Jason Kelly Johnson]. The exception is Rhino 5. We would love to see an option for a free or open source alternative to laying out ~$1000 USD in software for our own Geoweaver.

Continue reading “Roving Hexapod Poops Out 3D Prints”

3D Printing Lithium Ion Cells

demo.web_.8x645_0

[Jennifer Lewis] is a Harvard Materials Scientist, and she’s recently come up with a type of Lithium Ion “Ink” that allows her to 3D print battery cells.

You might remember our recent 3D Printering article on Pastestruders, but this research certainly takes it up a few notches. The ink is made up of nano-particles of Lithium Titanium in a solution of de-ionized water and ethylene glycol. When producing the ink, small ceramic balls are added to the mixture to help break up microscopic clumps of said particles. The mixture is then spun for 24 hours, after which the larger particles and ceramic balls are removed using a series of filters. The resulting ink is a solid when unperturbed, but flows under extreme pressures!

This means a conventional 3D printer can be used, with only the addition of a high pressure dispenser unit. We guess we can’t call it a hot-end any more…  The ink is forced out of a syringe tip as small as 1 micrometer across, allowing for extremely precise patterning. In her applications she uses a set up with many nozzles, allowing for the mass printing of the anodes and cathodes in a huge array. While still in the research phase, her micro-scale battery architectures can be as small as a square millimeter, but apparently compete with industry batteries that are much larger.

And here’s the exciting part:

Although she says the initial plan is to provide tools for manufacturers, she may eventually produce a low-end printer for hobbyists.

3D Printable electronics. The future is coming!

[Thanks Keith!]

Low Cost Filament Extruder

Here’s a great low cost filament extruder solution. It uses basic parts available from any hardware store, and a few 3D printed ones — estimated cost is well under $100.

It’s very similar to the Lyman Filament Extruder, but can be built for even less money. By using 200C set-point heaters, his setup requires absolutely no electronics — although a cheap PID controller from China could give him more extrusion capabilities with temperature control… Regardless, the system appears to make good filament and he uses it exclusively for his personal filament consumption in his Delta printer. He’s even hacked up the ABS casing of a refrigerator, ground it down, and turned it into filament using this machine! If you’re hungry for more details, the full build log and discussion can be found on the RepRap forums.

He also has a guide on making your own ABS color masterbatch to make your own filament colors!

[Thanks Liam!]

3D Printed Injection Molds

A team at Budapest University has successfully created a functional injection mold for prototyping by using a Stratasys 3D printer.

Prototype injection molds are expensive. They are typically machined out of steel or aluminum which is both costly and time consuming, due to the complex geometries of most molds. [Dr. Jozsef Gabor Kovacs] works in the Department of Polymer Engineering at Budapest University, which is where he came up with the innovative approach of using 3D printing to produce a prototype mold.

The mold was printed in Digital ABS PolyJet Photopolymer plastic using a Objet Connex 3D printer. The injection material used was polyacetal; which has a fairly low melting point of 175°C. By using this method they were able to go from a prototype mold to a test part in less than 24 hours. We don’t even want to think about how expensive that would be to expedite from a machine shop.

After the break you can watch the entire production process from printing to molding.

Continue reading “3D Printed Injection Molds”

3D Mineral Printer

The last few days many people have been talking about the USC’s contour printer. It’s a device that prints concrete outlines with the hopes of eventually printing entire houses. Caterpillar has decided to back the initiative.

It reminded us of a project we came across at Maker Faire. [Leif Ames], [Matthew Bowman], [Marides Athanasiadis], and [Terrell Edwards] built a 3D Mineral Printer as their senior engineering design project at UC Santa Cruz. The printer works by first laying down a layer of dry concrete powder. It then selectively wets the powder where it wants a solid form. The reaction doesn’t require air to dry, so the next layer can be applied immediately. The printer only creates contours and the team imagines this being used to create temporary casting molds. The build envelop is nearly a cubic meter. When we talked to them, they were experimenting with many different types of material mixes. A video of the first test is after the break. Continue reading “3D Mineral Printer”

RepRap Universal Constructor Achieves Self-replication


RepRap, the self-replicating universal constructor has had our attention since it first started spitting out globs of shapeless goo, but its speculative potential turned in a real benchmark recently when a RepRap machine made parts for an identical machine in a few hours (a child, in other words), then the second RepRap successfully made parts for a third or grandchild machine.

RepRap does not fully assemble copies of itself, but produces the 3D-printed plastic components necessary to assemble another copy. It has also successfully produced other plastic goods like sandals and coat hooks. [Dr. Adrian Bower] is the leader of the RepRap team, and he will be exhibiting its capabilities at this week’s Cheltenham Science Festival.

[via BoingBoing]