Newsstand Shotgun Hack Poised To Further Ruin Air Travel

The people who go nuts over 3D printed guns are going to have a field day with this one. It’s a shotgun and ammo built entirely from items you can purchase after passing through airport security. Now look, obviously the type of folks who read Hackaday understand that security in any form is something of an illusion. House keys don’t keep people from breaking into your home. Encryption doesn’t keep the government from looking over your shoulder. And no level of security screening can eliminate every possible hazard. So let’s just enjoy this one for the fine act of hacking that it is.

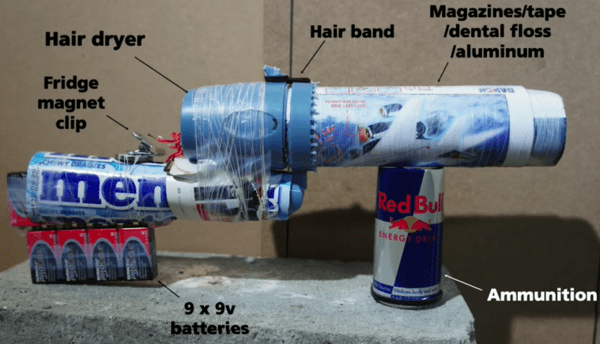
[Evan Booth] put his mind to work on the items you can buy at the stores inside of an airport terminal. Above you can see the diagram of all the parts. The break action accepts a Red Bull can that acts as the cartridge for the shotgun (our calculations put this at just under 0.25 Gauge). The bottom of the can contains water separated from Lithium metal (from cellular phone accessories?) by a condom. When the nonet of 9V batteries are connected to the heating element from the hair dryer it melts a hole in the prophylactic, mixing the water with the metal causing a reaction that propels pocket change as the projectile. The video after the break shows that this does take a while… perhaps 10 seconds from the time the trigger is pulled. Oh, and you might not want to be holding the thing when it goes off. We’d say the firearm can barely contain the explosion.

If you like this (or were horrified by it) [Evan’s] got a whole collection of weapons built inside the airport terminal. For those that care, here’s a link to the most recent of 3D printed gun posts which we referenced earlier.

Continue reading “Newsstand Shotgun Hack Poised To Further Ruin Air Travel”

3D Printing Lithium Ion Cells

demo.web_.8x645_0

[Jennifer Lewis] is a Harvard Materials Scientist, and she’s recently come up with a type of Lithium Ion “Ink” that allows her to 3D print battery cells.

You might remember our recent 3D Printering article on Pastestruders, but this research certainly takes it up a few notches. The ink is made up of nano-particles of Lithium Titanium in a solution of de-ionized water and ethylene glycol. When producing the ink, small ceramic balls are added to the mixture to help break up microscopic clumps of said particles. The mixture is then spun for 24 hours, after which the larger particles and ceramic balls are removed using a series of filters. The resulting ink is a solid when unperturbed, but flows under extreme pressures!

This means a conventional 3D printer can be used, with only the addition of a high pressure dispenser unit. We guess we can’t call it a hot-end any more…  The ink is forced out of a syringe tip as small as 1 micrometer across, allowing for extremely precise patterning. In her applications she uses a set up with many nozzles, allowing for the mass printing of the anodes and cathodes in a huge array. While still in the research phase, her micro-scale battery architectures can be as small as a square millimeter, but apparently compete with industry batteries that are much larger.

And here’s the exciting part:

Although she says the initial plan is to provide tools for manufacturers, she may eventually produce a low-end printer for hobbyists.

3D Printable electronics. The future is coming!

[Thanks Keith!]

Hackaday Links: December 1, 2013

hackaday-links-chain

Since our ‘ol buddy [Caleb] left Hackaday for EE Times, he’s been very busy. One of his latest projects is doing Antique Electronics Autopsies. This time around it’s a 1953 Heathkit Grid Dip Meter. It’s a beautiful piece of engineering with Point to Point wiring and metal gears.

We love microcontroller breakout boards, and so does [Tim] apparently. He built a breadboard friendly breakout for the NXP LPC812. It’s an ARM Cortex M0+ with 16kb of Flash and 4kb of SRAM. The entire breakout board is smaller than the through-hole DIP LPC1114. When are we going to see these on Tindie, [Tim]? Here’s the Git with the board files. You can also pick up a board at OSH Park – $3.30 for a set of three.

What do you do when you have the perfect idea for a Kickstarter, but don’t have the funds for the perfect sales pitch? The obvious solution is to start an Indiegogo campaign to raise funds for your Kickstarter. Unfortunately, this campaign has already been successfully funded, so it’s already too late to get in on the ground floor. Relevant xkcd.

We’ve seen this DIY cell phone before but now it’s just about ready for production. [David] at the MIT Media Lab has been working on a bare-bones, ATMega & GSM module phone for a while now, and now you can grab the firmware and board files. Make your own cell phone!

Here comes Hanukkah, so drink your gin and tonica. Here’s a pedal powered menorahica so put on your yarmulke, it’s time to celebrate Hanukkah.

Arduino Christmas Lights

Here’s a cool hack to get you in the December holiday mood! Arduino controlled Christmas lights!

It all started because [Anx2k] had some leftover LED’s from one of his other projects, so he decided to make use of them as permanently mounted Christmas lights. He’s installed them underneath his tiled roof, and run all the wires into his attic where he has an electrical box serving as the main control hub. He uses an Arduino Uno to control them, and a 460W computer power supply to provide the juice. The LED modules themselves are Adafruit RGB pixel strings. There’s actually three of the LED modules per tile — two shining up to illuminate the tile, and one shining out.

He’s set up a ton of different patterns to run, and they are pretty awesome! Check out the video after the break.

Continue reading “Arduino Christmas Lights”

DIY Thermal Imaging Camera

Thermal imaging cameras – those really useful devices that give you Predator vision – are incredible tools. If you’re looking for heat escaping your house through a window, or just trying to figure out where your electronics project will explode next, they’re invaluable, if expensive, tools. [Kaptein QK] figured out an easy and cheap way to make your own thermal imaging camera using nothing just a few dollars worth of parts.

[Kaptein] based his camera off of a non-contact IR temperature gun. This device is useful for spot checking temperatures, but can’t produce an IR image like it’s $1000 cousins. By taking the thermopile out of this temperature gun, adding an op-amp, an A/D converter, and connecting it to an Arduino Nano with pan and tilt servos, [Kaptein] was able to slowly scan the thermopile over a scene and generate an image.

In the video below, you can see [Kaptein]’s scanning camera in action reading the ambient temperature and creating an imaging program for his PC. It works very well, and there a lot more [Kaptein] can improve on this system; getting rid of the servos and moving to mirrors would hopefully speed everything up, and replacing the 8-bit grayscale display with colors would give a vastly improved dynamic range.

Continue reading “DIY Thermal Imaging Camera”

Levitating Wireless LED Ring

magnetic levitation

Here’s an impressive example of a completely home built magnetic levitation setup… with wireless power transmission to boot!

[Samer] built this from scratch and it features two main sub-systems, a electromagnet with feedback electronics and a wireless power transfer setup.

The ring of LEDs has a stack of neodymium magnets which are levitated in place by a varying magnetic field. This levitation is achieved by using a Hall effect sensor and a PID controller using a KA7500 SMPS controller.

The wireless power transmission uses a Class E DC/AC inverter that operates at 800KHz. Two coils of wire pass the current between the stand and the LEDs.

It’s very similar to a build we featured last year, but it’s a great hack, so we had to share it! Check out the video after the break.

Continue reading “Levitating Wireless LED Ring”

A Shell For The Stellaris & Tiva

cli

When [antoker] is working on a microcontroller project, he often has to write short bits of test code to make sure everything in his circuit is working properly. This is a time-consuming task, and a while back he started on a small side project. It’s a command line interface for a microcontroller that allows him to send short commands to the uC over a serial connection to play around with the ADC, UART, and GPIO pins.

[antoker]’s tiny Unix-like environment is based on modules  that can keep track of the time, print the current commands and stack to a terminal, and query things like the current speed of the uC and the available Flash and RAM.

This tiny shell also has scripting capabilities and a jump function, making this a true programming language, however minimal it is. Right now [antoker]’s work is available for the TI Stellaris and Tiva series microcontrollers, and a video of a scripted Larson scanner is available below.

Continue reading “A Shell For The Stellaris & Tiva”