The Fridge Hacking Guide By BrewPi

brewpi-fridge-conversion-51

The team behind BrewPi are at it again! This time they have created an online guide showing how to convert a min-fridge into a Raspberry Pi & Arduino controlled fermentation chamber. In it, they describe 3 possible options:

  • Option 1: Make a simple switched power cord, without hacking into the fridge electronics.
  • Option 2: Make a switched power cord, but also override or remove the thermostat.
  • Option 3: Rip out the thermostat and fully integrate the SSRs into your fridge (which is what [Koen] and [Elco] did).

First things first though. They had to clean the fridge. And depending on where they got it or how long it has been unplugged for, the inside might have been pretty rank and disgusting from mold growing out of every corner. This took a good hour or so to clean properly lest the brewing process get infected with external grossness. This is all worth it because a well-controlled fermentation chamber results in a superior batch of beer.

They put their laser cut case on top of the fridge, holding an LCD, Raspberry Pi, Arduino and the BrewPi Arduino shield. The Arduino reads the temperature sensors inside the fridge, the beer and the ambient temperature. Then it controls the SSRs they added to switch the compressor and a heater. Then, the cables were routed through the fridge and take control of the compressor.

Continue reading “The Fridge Hacking Guide By BrewPi”

Tweeting Beer Dispenser Requires Co-worker Approval

tweeting-beer-dispenser

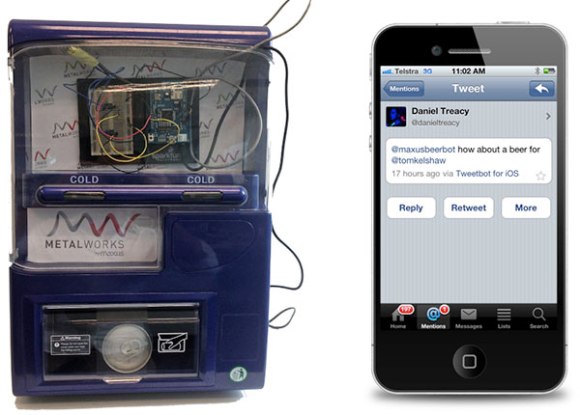
Having been faced with an empty beer fridge one too many times the team at Metalworks came up with an approval system for dispensing malted beverages. The trick was to remove the physical controls on a can dispenser. The only way you can get a cold one is to ask the machine via its twitter account. If there’s beer inside, it waits for one of your approved co-workers to give the go-ahead.

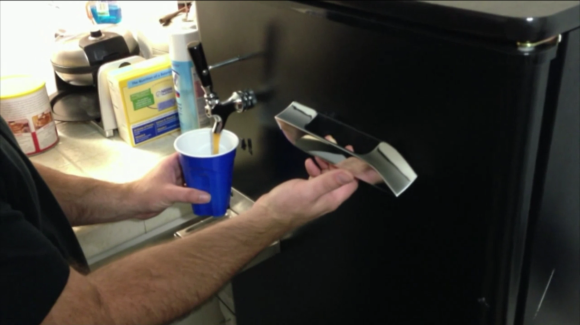
There are two versions of the machine. The first is a hacked refrigerator with a dispenser hole cut in the door. This resides in their Sydney office, apparently doesn’t work all that well, and is only shown in the video after the break.

The image above is version 2.0 which is located at their Singapore branch. It’s a much smaller device, but works very well since it started as a commercially available can dispenser. You can see the Arduino Leonardo and breadboard which make up the driver circuits.

There aren’t a ton of details on this, but it’s not hard to find about a million examples of an Arduino using Twitter. Here’s one that takes Morse code as an input and posts the message as a Tweet.

Continue reading “Tweeting Beer Dispenser Requires Co-worker Approval”

Tesla Model S Handle Dispenses Beer; Hides When Done

tesla-model-s-beer-dispenser

Let’s face it, sometimes you need to take time out from engineering cutting-edge electric vehicles to over-engineer a beer fridge. And to tell you the truth, after seeing what [Matt Brown] managed to pull off we now have a gut-felt yearning for one of our own. He took a beer fridge and added a vanishing dispenser handle from a Tesla Model S.

You might be thinking that this an expensive part, and you’ve be more correct than you realize. It’s not even a stock part. This is a prototype that someone threw in the trash. [Matt] plucked it from oblivion and milled a spot for it in the door of the fridge. Your average [Joe] probably doesn’t know that the Model S comes with handles that pull themselves flush with the body of the vehicle.

[Matt] dug out insulation on the inside of the door until there was room to cut a hole for the handle. The clamped the assembly in place and used spray foam to re-insulate as well as glue it in place. An Arduino monitors the area below the tap. When you put your glass under the spout the handle extends. When you pull on it a solenoid drives the tap handle forward. This sounds pretty dry, but we think the demo after the break will have you lusting after one as well.

Continue reading “Tesla Model S Handle Dispenses Beer; Hides When Done”

Brew Fridge Thermostat

thermostat-1

Reader [Will R] sent in a thermostat mod for his brew fridge. His friends had found a perfectly fine bar refrigerator and wanted to repurpose it for brewing beer. A previous batch of microbrew had been mangled by the Australian heat so they wanted something that could maintain the perfect temperature. The fridge’s built-in thermostat wouldn’t rise above 5 degrees so they had to build their own. [Will] used a 10K NTC thermistor to measure the temperature. It’s connected to an ATtiny25 microcontroller that does the comparison and determines whether to turn on the compressor. He referenced SparkFun’s relay tutorial for the switching side. Although he didn’t etch a board for this project, the design file is included along with all the code on the project site.