The Fridge Hacking Guide By BrewPi

brewpi-fridge-conversion-51

The team behind BrewPi are at it again! This time they have created an online guide showing how to convert a min-fridge into a Raspberry Pi & Arduino controlled fermentation chamber. In it, they describe 3 possible options:

  • Option 1: Make a simple switched power cord, without hacking into the fridge electronics.
  • Option 2: Make a switched power cord, but also override or remove the thermostat.
  • Option 3: Rip out the thermostat and fully integrate the SSRs into your fridge (which is what [Koen] and [Elco] did).

First things first though. They had to clean the fridge. And depending on where they got it or how long it has been unplugged for, the inside might have been pretty rank and disgusting from mold growing out of every corner. This took a good hour or so to clean properly lest the brewing process get infected with external grossness. This is all worth it because a well-controlled fermentation chamber results in a superior batch of beer.

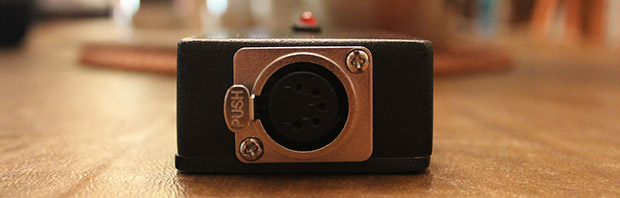
They put their laser cut case on top of the fridge, holding an LCD, Raspberry Pi, Arduino and the BrewPi Arduino shield. The Arduino reads the temperature sensors inside the fridge, the beer and the ambient temperature. Then it controls the SSRs they added to switch the compressor and a heater. Then, the cables were routed through the fridge and take control of the compressor.

Continue reading “The Fridge Hacking Guide By BrewPi”

Supersonic NERF Dart Speedometer

ATtiny Chronograph

[John] was faced with an interesting problem: after he built his own air cannon, how could he tell exactly how fast his NERF darts were moving? Luckily he had some spare parts on hand and hacked together a fully functional projectile speedometer for less than the cost of an Arduino.

A device is essentially two detectors spaced a precise distance apart from one another. When something passes the first detector, a timer is activated which measures how long it takes the object to reach the second detector. From this, the device calculates the speed. [John] used infrared emitter/detector pairs spaced exactly three inches apart and wired them to an ATtiny2313. After a little bit of coding, he now knows just how fast he can fire those squishy ballistic missiles.

The infrared emitter/detector pairs are mounted to a PVC pipe through which the projectile travels. [John] notes that in theory this could be used to measure almost anything that could fit through the pipe, although this particular device might be damaged by muzzle flash or a pressure wave from an actual gun.

We’ve seen other NERF dart air cannons before, and we wonder if maybe there should be some sort of competition to see who can shoot a NERF dart the fastest now that there’s an easy way to measure speed?


Hackaday Links: August 3, 2014

hackaday-links-chain

A ton of people sent in this video of crazy Russians who have taken a microwave, removed the magnetron, taped it to a broom, and turned it on. Don’t try this at home. Or near us.

You know the Google Cardboard kit that’s a real VR headset made of cardboard (and a smart phone)? Google may have gotten their inspiration from Oculus, because every Oculus Rift DK2 ships with a Samsung Galaxy Note 3 inside.

paul allen

Ever design a PCB and be disappointed by the quality of the silkscreen? [Paul Allen] has been defining the edges of his PCB labels with the copper layer, and the examples are dramatic. Etching copper is what you actually pay for when you fab a board, so it should come as no surprise that the quality is a little higher.

Dunk tanks are fun, but how about competitive dunk tanks? [Chad] built a dunk tank (really more of a ‘dunk shower’) out of a 2×4 tripod, a garbage can, and a few parts from a the toilet aisle of Home Depot’s plumbing department. Then he built a second. Set up both dunk showers across from each other, give two people a few balls, and see who gets soaked last. Looks fun.

Want a MAME cabinet, but don’t want it taking up room in your house? Build a MAME coffee table! Here’s the reddit thread. Maybe we’re old-fashioned, but we’d rather have a giant NES controller coffee table.

Last week we saw a 16-bobbin rope braiding machine, but odd braiding machines like this aren’t limited to fibers. Here’s a wire twisting machine for making RS422 cables. It only produces a single twisted pair, but that’s really all you need to create a cable. Somebody get some paracord and make some Cat5.

Brushless DC Motor Used For High Speed CNC Spindle

Brushless DC Motor CNC Spindle

Brushless DC motors are common place in RC Vehicles. They are small, light, fast and can be inexpensive. [Raynerd] wanted a new spindle for his CNC machine and thought that a brushless DC motor would be a great platform to build from.

[Raynerd] started with an off the shelf motor that had an 8mm shaft. This shaft size was important because the motor shaft was to be replaced with an ER16 collet arbor of the same size. A collet is a device used to hold cutting tools by collapsing a segmented ring around the tool. Collets allows for quick tool changes while providing a strong clamping force. ER16 is a designation of one of many collet standards.

The main housing was machined out of aluminum specifically for this project. This housing holds two radial load ball bearings that support the new rotating collet arbor. There’s another bearing in this assembly, a thrust washer this time, that keeps the arbor from moving axially in the housing.

The 12 volt output of a standard ATX power supply was used to power the system for testing purposes. A general RC Vehicle electronic speed control and a servo tester work in conjunction to manually regulate the spindle speed. Check out the bench test video and an exploded photo after the break.

Continue reading “Brushless DC Motor Used For High Speed CNC Spindle”

THP Entry: A Theatrical Lighting Controller Powered By A Calculator

DMX

Theatrical lighting usually runs with the help of DMX, a protocol that’s basically MIDI for lights; small, lightweight, ancient, and able to run on the lowest spec computers imaginable. For his Hackaday Prize entry, [Alex] figured a regular ‘ol graphing calculator was sufficient to run a complete DMX controller, and with the help of an Arduino, figured out a way to do it.

The hardware for the system consists of a TI-84 graphing calculator, a few bits and bobs in the way of components, and an Arduino Pro Mini powered from the USB port on the calculator. The Arduino handles the transmitting of DMX packets at 250 kbaud using the DMXSimple library over a 5-pin XLR jack.

The software running on the calculator is where the novel part of the project begins. The software is designed to be extremely lightweight, sending packets to the Arduino using the 2-wire link cable. DMX Commands are wrapped up and transferred using the TI-83/84 link protocol, decoded on the Arduino, and sent out to the lighting rig.

While this probably won’t replace the multi-thousand dollar lighting consoles found in theatres, it’s still a very handy and portable tool for debugging lights. It’s also [Alex]’s My First Electronics Project™, and a pretty good one at that.


SpaceWrencherThe project featured in this post is an entry in The Hackaday Prize. Build something awesome and win a trip to space or hundreds of other prizes.

Behold! The Most Insane Crowdfunding Campaign Ever

Hold on to your hats, because this is a good one. It’s a tale of disregarding the laws of physics, cancelled crowdfunding campaigns, and a menagerie of blogs who take press releases at face value.

Meet Silent Power (Google translation). It’s a remarkably small and fairly powerful miniature gaming computer being put together by a team in Germany. The specs are pretty good for a completely custom computer: an i7 4785T, GTX 760, 8GB of RAM and a 500GB SSD. Not a terrible machine for something that will eventually sell for about $930 USD, but what really puts this project in the limelight is the innovative cooling system and small size. The entire machine is only 16x10x7 cm, accented with a very interesting “copper foam” heat sink on top. Sounds pretty cool, huh? It does, until you start to think about the implementation a bit. Then it’s a descent into madness and a dark pit of despair.

There are a lot of things that are completely wrong with this project, and in true Hackaday fashion, we’re going to tear this one apart, figuring out why this project will never exist.

Continue reading “Behold! The Most Insane Crowdfunding Campaign Ever”

Fixing A BASIC Calculator

HP
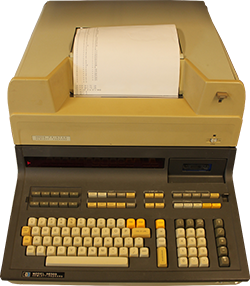
The early days of modern computing were downright weird, and the HP 9830B is a strange one indeed: it’s a gigantic calculator, running BASIC, on a CPU implemented over a dozen cards using discrete logic. In 2014 dollars, this calculator cost somewhere in the neighborhood of $50,000. [Mattis] runs a retrocomputer museum and recently acquired one of these ancient machines, and the walkthrough of what it took to get this old machine running is a great read.

There were several things wrong with this old computer when it arrived: the keyboard had both missing key caps and broken switches. The switches were made by Cherry, but no one at Cherry – or any of the mechanical keyboard forums around the Internet – have ever seen these switches. Luckily, the key cap connector isn’t that complex, and a little bit of bent wire brings the switches back up to spec. The key caps were replaced from a few collectors around the globe.

Getting as far as booting the machine, [Mattis] found some weirdness when using this old calculator: the result of 2+2 was 8.4444444, and 3+1 was 6.4444444. Simply pressing the number 0 and pressing execute resulted in 2 being displayed. With a little bit of guesswork, [Mattis] figured this was a problem with the ALU, and inspecting the ROM on that board proved to be correct: the first 128 nibbles of the ROM were what they were supposed to be, and the last 128 nibbles were the OR of the last half. A strange error, but something that could be fixed with a new replacement ROM.

After hunting down errors with the printer and the disk drive, [Mattis] eventually got this old calculator working again. For such an astonishingly complex piece of equipment, the errors were relatively easy to hunt down, once [Mattis] had the schematics for everything. You can’t say that about many machines only 10 years younger than this old calculator, but then again, they didn’t cost as much as a house.