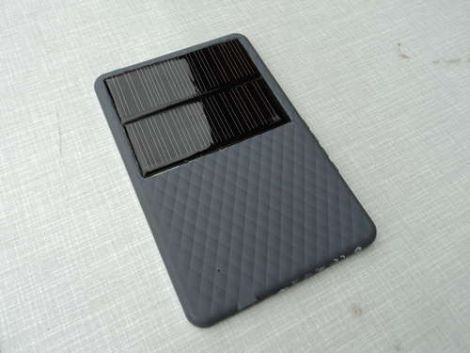
EReader Battery Never Goes Flat (in The Sun)

solar_powered_kobo

Instructables user [flapke] has a Kobo eReader and wanted to add some solar cells to it in order to charge the battery for free. The modification is similar to others we have seen recently, though his work was done so well that it almost looks stock.

He started out by sourcing a pair of solar panels from DealExtreme that purported to supply 5.5v @ 80mA. Like most of us are inclined to do, he tested them before use and found that they actually put out around 50mA instead. While the performance was a bit off, they still fit his needs pretty well, as the charge current needed to be at or less than 100mA to avoid damaging the battery.

He opened the Kobo’s case, and carefully removed a section of the back panel to make room for the solar panels. Once they were soldered together in parallel, he wired them to the eReader’s battery through a Schottky diode to prevent the battery from draining.

While we think his solar modification is a great way to ensure that he never runs out of juice while reading by the pool, we would certainly add a bit of extra charge circuitry to ours to prevent damage to the battery. What do you think?

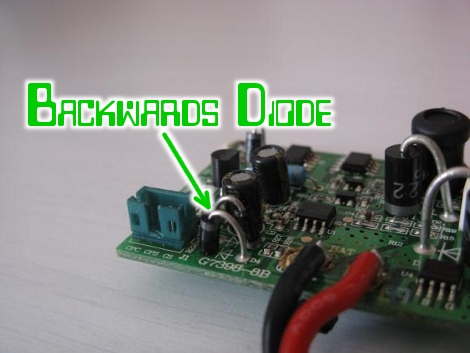
Fixing The Rovio Battery Charging Circuit

[Chris] was unhappy with the battery performance of his Rovio. It seems that he’s not alone, so he set out to reverse engineer the battery charging circuit to see if there was a fix. Boy is there, what he found is the diode above, apparently installed backwards when compared to the silk screen diode symbol. Now it’s entirely possible that the silk screen is wrong and this was fixed during assembly. We think that’s unlikely because if the closer of the two diodes was supposed to have the same polarity as the one next to it there should have been room to install them both in exactly the same orientation. [Chris] pulled out a soldering iron and changed the diode to match the silk screen. That fixed his problem and he’s now getting better performance than he ever has.

[From our comments section]

Nintendo DS Mini USB Plug

DSCompare

Noting that so many of his electronics are using the mini USB plug for charging, [Xavier] decided to modify his Nintendo DS to charge via the same adapter. It looks like the existing adapter is basically a proprietary mini USB plug, so replacing it was actually almost a perfectly clean swap job. He has nice pictures of the process and some helpful tips as well. If you’re thinking of consolidating your charging devices, this looks like a step in the right direction.

Willow Garage’s PR2 Robot

[youtube=http://www.youtube.com/watch?v=0S2dc_B-6Kg]

We would like you to meet PR2. Made by Willow Garage, PR2 is a platform for research into robotic programming.  The bot itself is simple compared to some of the humanoid bots we see, but its behavior is quite complex. In the video above, you see PR2 completing milestone 2 of its development. This includes navigating an office with closed doors and plugging itself into a standard wall outlet for a charge.  We’re especially fond of the “wiggle”. You can hear some of the developers talk more about PR2 and its completion of milestone 2 in the video after the break.

Continue reading “Willow Garage’s PR2 Robot”

Always On USB Charge Port


This simple and clever guide to installing an always on USB port comes from the Team Hack-a-Day forums (originally created for the team’s Folding@home efforts). [Cerberus] added a USB port to his computer case that always has power, even when the computer is off. The power comes from the +5VDC standby line in the motherboard connector. You can use this new port to charge any USB based device.