Full-size MRI Machine Replica

Foam MRI machine

It’s been a bit dusty lately in Seattle’s Metrix Create:Space. That’s because they’ve taken on their biggest project yet — a full scale replica of an MRI machine for university research.

[Tom Grabowski], a professor of Radiology & Neurology at the University of Washington, needed a replica MRI machine. This is because time on real MRI machines is very expensive, and when performing research on Autism, it is important to get the test subjects used to the process before using the real deal. He originally turned to the Center for Human Development and Disability, also at the University of Washington, but the project was just simply too big for their facilities. He did however get to meet a fellow researcher named [Fritz] who then contacted Metrix to see if it was possible, and like any good hackers, the members of the space were more than up for the challenge.

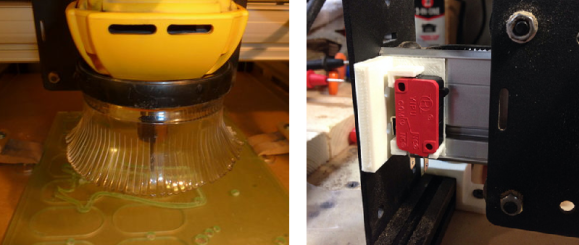
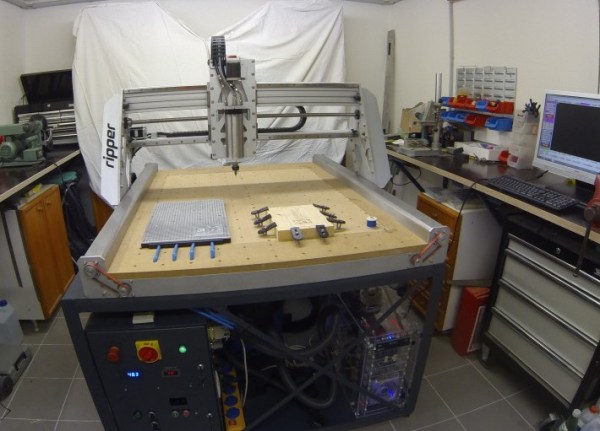
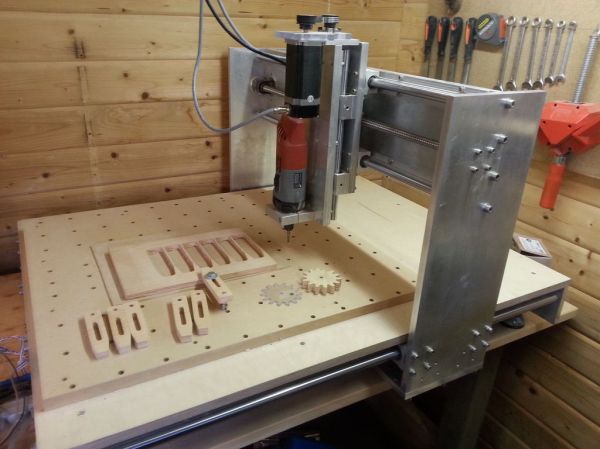
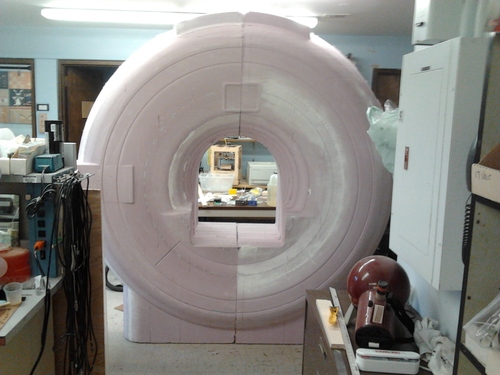
The replica MRI machine is made out 2″ thick, 4′ by 8′ foam insulation sheets, which is the maximum size their router can handle. Not having made use of the 3D z-cutting capabilities before, they had a bit of learning to do, but as you can see from the pictures, it worked out quite well. Over a few weeks they were able to construct the general shape of the MRI machine, and finish the surface nicely — it’s far from complete though, as they might even be adding lights and other features to make it one heck of a replica. It’s a great project, and those who have helped are happy to do so as the replica will benefit not only [Tom] but many other researchers at UW — for science, yeah!

A Very Professional Homemade CNC Router

[Benne] has a small workshop at home so he decided to make a very versatile CNC router for his final project at school. It took him around 6 months to arrive at the result you can see in the image above and what is even more impressive is that he was only 17 years old at the time.

[Benne] used the free cad program Google Sketchup to draw the different parts he needed around the linear rails and ball screws he already had lying around. The CNC’s travel is 730x650x150mm, uses Nema 23 (3Nm) steppers, 15mm thick aluminum plates and 30x60mm aluminum extrusions. In his article, [Benne] gives great advice to those who would like to design their CNC like his, providing very useful links to manufacturers. He estimated the cost of his CNC to be around 1500 euros (about $2000). We’ll let you browse the many lines of his very detailed build log, which makes us wish to be as talented as him even at our age…

PACCAM: Interactive 2D Part Packing

capture

Do you have a laser cutter or CNC router? How much material do you waste from project to project due to inefficient part packing? Enter PACCAM, a software interface designed by [Daniel Saakes] to aid in efficient 2D part packing.

Using a cheap webcam, it is possible to capture the outline of used material, exactly where it is located in the CNC machine. The software then can limit your workspace to the material available in the machine. New parts can then be dragged into place, automatically avoiding interferences — certain algorithms also exist to utilize the remaining material most efficiently.

Looking to engrave custom items? The software can do that too by showing you the material (or in this case, object), you can simply drag your design onto the material available, without having to worry about aligning your object inside the CNC machine!

In the video after the break, [Daniel] shows just how powerful and useful the software is by putting a crooked, cookie-cutter riddled piece of material in the machine, and then using the software to cut new parts out of what would be scrap material in any other shop.

Continue reading “PACCAM: Interactive 2D Part Packing”

Building A Bigger Shapeoko Router

Hackaday alumni [Will O’Brien] sent in a few projects he’s been working on lately while he’s in the process of upgrading his workspace. He’s building a 1200 x 1200 mm CNC router based on the Shapeoko router, and it sure looks like he’s having fun doing it.

The Shapeoko router is based on the Makerslide open source linear bearing system. This system uses common aluminum extrusions as the frame of a very simple, very inexpensive CNC router. The Makerslide system is designed to be expandable; if you want a larger axis, just bolt in a longer piece of aluminum extrusion. We haven’t seen many Makerslide builds take advantage of this fact, a shame as the stock Shapeoko only has a build area of 200 mm square.

[Will] is expanding this build area to 1200 mm square, but of course this means beefing up some parts of the build. He’s already moved up to very hefty 250 oz/in Nema 23 stepper motors (up from the Nema 17s for a standard Shapeoko), as well as beefing up the motor mount a great deal.

[Will] also sourced a few lengths of cable drag chain (yes, that’s what it’s called) to keep all the wires for his huge CNC routers out of the path of a moving gantry and spinning motors. It looks like he’s got a very nice build shaping up, and we can’t wait to see it in action.

Hackaday Links July 18, 2012

Apollo 13 DJ controller Follow Up

apollo13 DJ controller

[Adam] had a really impressive DJ controller build featured here recently. Many of you had more questions about the internals and such, so this post should clarify a few things. He’s still got a few more updates to make, but promises to reveal all if given enough time!

Noise Absorbing Headphones from Shooting Earmuffs

earmuffs-ipod

If the circuitry on your microphone-enabled shooting earmuffs has gone bad, the actual speakers may still be good. Why not convert them into some noise-blocking headphones? For that matter, if you’ve broken a pivot, there’s a simple solution for that too!

Help Choosing your CNC Router

cnc-kits

If you’re in the market for a CNC router, but aren’t sure where to start, Ponoko has put together a handy pricing guide to several of the more popular DIY routers available.

DIY AC Unit

ac-unit

It’s very hot out, so what is one to do when your shop or garage is burning up?  Why not build your own “AC unit?” Sure you have to supply your own ice, but at under $20 for this cooler-based unit, maybe it’s worth it. Here’s the Reddit thread explaining it as well as a picture of the finished product.

3D Topo Map on a CNC Router

3d-topo-map

Once you’ve purchased your CNC router using the above guide, why not make your own 3D top map? This tutorial features a map of Ross Island off of Antarctica. Why Ross Island? It was the first vector-format topo map found off of Wikimedia.

Cheap And Easy Linear Supported Rail

Some of the very largest – and coolest – CNC machines use supported linear rail for their movement axes. For any home tinkerer trying to reproduce these supported rails, the problem of cost comes up very quick; these rails can run over $100 for just a few feet. [Michael] came up with a great way to build his own supported rail so he can build his very large CNC router.

There aren’t many tools needed to build [Michael]’s rail. He put a 90° notch in a 2×4 to support his 25mm rail, and clamped it down with a piece of plywood. After drilling a 5/16″ hole every 12 cm, he tapped these holes out to receive 3/8″ threaded rod. Yes, we also hate the mix of metric and imperial units in that description, but the results speak for themselves.

The now-supported rail was mounted to a piece of MDF with a few bolts and washers. MDF isn’t the most dimensionally stable material, so [Michael] will be covering the whole thing in a coat of epoxy very soon. Now, he’s one step closer to his gigantic CNC gantry router.

You can check out [Michael]’s demo video after the break.

Continue reading “Cheap And Easy Linear Supported Rail”

Noise Reduction Techniques For Your Shop-Vac

shop vac noise-reduction setup

Shop-Vacs are great tools, but they do have the notable disadvantage of being loud.  Fortunately, much of the noise emanates from the exhaust, and with a muffler or “silencer”, this can be controlled. The results of my noise-recustion experiments were noticeable, reducing the noise by roughly 5.6 decibels. This may not sound like a huge improvement, but since the scale is logarithmic the sound intensity is actually cut by roughly two-thirds, according to this calculator.

As for how to actually make the muffler, I’ve outlined everything in this post.  As of now, the Shop-Vac muffler is used in a static configuration, but with some changes it could be used on a mobile vacuum.  The disadvantage of this reduction in noise is a slight reduction in suction, but it seems to be an acceptable trade-off in this situation – used for a little CNC router with this adapter.

For a video of the Shop-Vac in action with the CNC router in question, check out the video after the break.  Note that this is pre-silencer, so you can definitely hear the vacuum noise! Continue reading “Noise Reduction Techniques For Your Shop-Vac”