Your Laundry Is Done!

Have you ever put a load of dirty clothing in the washing machine and set the cycle running, only to forget all about it and discover a mouldering congealed mass in the machine a few days later? [Xose Pérez] has more than once, and to stop it happening again he’s got a project that monitors the machine in his basement and notifies him when his wash is done.

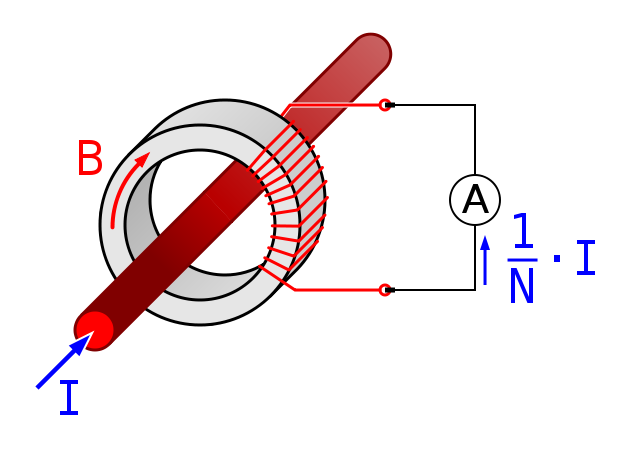
At the centre of his washing machine monitor is an ITead Sonoff IoT mains on-off switch. This device contains a 10A mains relay, an ESP8266 chip to control it, and a small mains switch-mode power supply. The Sonoff doesn’t use the ESP’s ADC pins, so he’s broken one of them out on a lead to a current transformer which captures the power level being consumed by the washing machine. The Sonoff is one of those IoT devices that relies on a proprietary cloud service and doesn’t have its own API, so [Xose] has created his own firmware for it incorporating an ESP port of an Arduino current sensing library. To round off the project and because he could, he’s added an ambient humidity sensor to the device.

The resulting boxed-up unit returns minute-by-minute current readings for the entire wash cycle. To spot when the cycle has finished, he waits for a moment when it has been using no power for more than five minutes, at which point his Node-RED system sends him a notification via Pushover.

This project is a very neatly executed hack on an extremely cheap piece of hardware whose capabilities would ordinarily be somewhat curtailed due to its proprietary interface. Surprisingly it’s not the first laundry monitor we’ve seen here at Hackaday, we’ve had this apartment laundry monitor using an accelerometer and a Raspberry Pi, and a notifier for a finicky dryer that insisted on stopping mid-cycle.

Finally, A Power Meter Without Nixies

We’ve had quite a spate of home-brew energy meters on the tip line these days, and that probably reflects a deep inner desire that hackers seem to have to quantify their worlds. Functionally, these meters have all differed, but we’ve noticed a distinct stylistic trend toward the “Nixies and wood” look. Ironically, it is refreshing to see an energy meter with nothing but a spartan web interface for a change.

Clearly, [Tomasz Salwach] had raw data in mind as a design goal, and his Raspberry Pi-based meter delivers. After harvesting current sensing transformers from a bucket of defunct power meter PC boards, [Tomasz] calibrated them with a DIY oscilloscope and wired them and the voltage sensors up to an STM32 Nucleo development board. Data from the MCU goes to the Pi for processing and display as snazzy charts and GUI elements served internally. [Tomasz] was kind enough to include a link to his meter in his tip line post, but asked that we not share it publicly lest HaD readers love the Pi to death. But we can assure you that it works, and it’s kind of fun to peek in on the power usage of a house in Poland in real time.

It’s a nice project that does exactly what it set out to do. But if you missed the recent spate of Nixie-based displays, check out this front hallway meter or this one for a solar-power company CEO’s desk.

Self Built Power Meter Uses Dual Sense Transformers

[Renaud] built a AC power meter from scratch. While commercial power meters like the Kill A Watt are available [Renaud’s] build gives an interesting insight into the methods used.

currentAt the heart of [Renaud’s] design lie two sense transformers. The first is a typical voltage stepdown transformer. This brings the AC line voltage down to +/- 10V, which is more amenable to digital sampling. The second is a current sense transformer. In current transformers the primary is typically a single wire (the AC line in this case) passing through the middle of a ring (see the picture to the right from wikipedia). The secondary is wrapped round the ring. When the secondary coil is shorted a current in the primary wire/coil induces a current in the secondary coil.

In practice, the voltage drop across a low value resistor is used to detect the current in the secondary. Clamp meters use this principle to make non-contact current measurements. Other power meters often use hall effect sensors for current measurements. It will be interesting to see how these methods compare when [Renaud] benchmarks this build.

[Renaud] takes the voltage and current readings from these transformers and samples them with a PIC in order to calculate power. As the AC voltage is periodic [Renaud] uses a method similar to Equivalent Time Sampling (ETS) to combine waveforms from multiple cycles and increase the effective sample rate.

Great stuff [Renaud]!

Non-Invasive Smart Electricity Meter

There are a lot of ways to measure energy usage in the home, but most of them involve handling mains voltage. Not only that, but sometimes they require handling mains voltage before it gets through a breaker panel or fuse box, meaning that if you make a mistake there are a lot of bad things that can happen. [Yonas] has been working on this problem, and has come up with a non-invasive, safer way to monitor electricity consumption without having to work directly on live wires.

Please note that you should still not be working on mains voltage without proper training, but if you have the required know-how then the installation should be pretty straightforward. The project is based on the Spark Core, and uses clamp-on current sensors to measure energy use. The sensors wrap around the mains cable, meaning you don’t have to disconnect anything to hook them up. The backend runs on a LAMP server which could be a Raspberry Pi if you have one. [Yonas] runs it on a hosted server as a matter of preference.

All of the source code for this is available, and assuming you can get your hands on the current sensors this could be a great way to get started monitoring your energy usage in the house. Be sure to check out the video below for a demonstration of the operation of this device. Of course, if you have a gas line you’ll need this energy monitoring setup too.

Continue reading “Non-Invasive Smart Electricity Meter”