Mini Meters Monitor Microprocessor Maximization

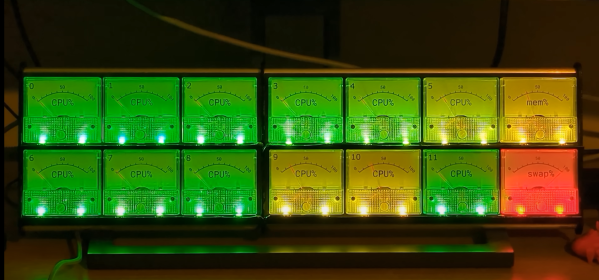
[Lex] over at Computing: The Details loves to make fun projects. Recently, they have created a hardware CPU monitor that displays how PCs are parallelizing compile tasks at a glance. The monitor is built from 14 analog meters, along with some WS2812 RGB LEDs.

Each meter represents a core on [Lex]’s CPU, while the final two meters show memory and swap usage. The meters themselves are low-cost 5 mA devices. Of course, the original milliamps legends wouldn’t do much good, so [Lex] designed and printed graduations that glue over the top. The RGB LED strip is positioned so two LEDs fit under each meter. The LEDs allow a splash of color to draw attention to the current state of the machine. The whole bank going red would sure get our attention!

The system is controlled by an Arduino Mega, with the meters driven using the PWM pins. The only extra part is a 1 kΩ resistor. The Arduino wrangles the LEDs as well. Sadly [Lex] did not include the software. They did describe it though. Basically they are using a Rust program to call systemstat, obtaining the current CPU utilization data in Linux. A bit of math converts this into pointer values and LED colors. The data is then sent via USB-serial to the Arduino Mega. The software savvy will say it’s pretty easy to replicate, but the hardware-only hackers among us might need a bit of help.

This isn’t the first custom meter we’ve seen on Hackaday. Your author’s first project covered by Hackaday was for a meter created using an automotive gauge stepper motor. I didn’t include source code either – but only because [Guy Carpenter]’s Switec X25 library had me covered.

Continue reading “Mini Meters Monitor Microprocessor Maximization”

Pi Pico Calculates Water Usage

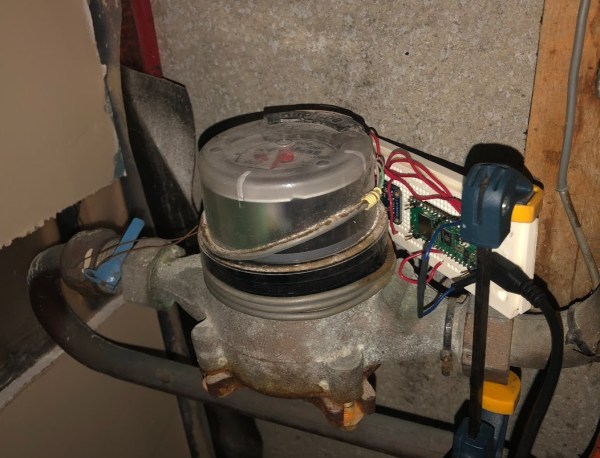
Modern WiFi-enabled microcontrollers have made it affordable and easy to monitor everything from local weather information to electricity usage with typically no more than a few dollars worth of hardware and a little bit of programming knowledge. Monitoring one’s own utility data can be a little bit more difficult without interfering with the metering equipment, but we have seen some clever ways of doing this over the years. The latest is this water meter monitoring device based on a Raspberry Pi Pico.

The clever thing here isn’t so much that it’s based on the tiniest of Raspberry Pis, but how it keeps track of the somewhat obscured water flow information coming from the meter. Using a magnetometer placed close to the meter, the device can sense the magnetic field created as water flows through the meter’s internal sensors. The magnetic field changes in a non-obvious way as water flows through it, so the program has to watch for specific peaks in the magnetic field. Each of these specific waveforms the magnetometer detects counts to 0.0657 liters of water, which is accurate for most purposes.

For interfacing with a utility meter, this is one of the more efficient and elegant hacks we’ve seen in a while. There have, of course, been other attempts to literally read the meter using web cams and computer vision software, but the configuration for these builds is much more complex than something like this. You can interface with plenty of utility meters other than water meters, too, regardless of age.

Peer-Reviewed Continuity Tester

One of the core features of the scientific community is the concept of “peer review” where any claims made by a scientist are open to be analyzed and reproduced by others in the community for independent verification. This leads to either rejection of ideas which can’t be reproduced, or strengthening of those ideas when they are. In this community we typically only feature the first step of this process, the original projects from various builders, but we don’t often see someone taking those instructions and “peer reviewing” someone’s build. This is one of those rare cases.

[oxullo] came across [Leo]’s original build for the ultimate continuity tester. This design is much more sensitive than the function which is built in to most multi-meters, and when building this tool specifically some other refinements can be built in as well. [oxullo] began by starting with the original designs, but made several small modifications. Most of these were changing to surface-mount parts, and switching some components for ones already available. Even then, there was still a mistake in the PCB which was eventually corrected. The case for this build is also 3D printed instead of being made out of metal, and with the original video to work from the rest fell into place easily.

[oxullo] is getting comparable results with this continuity tester, so we can officially say that this design is peer reviewed and tested to the highest of standards. If you’re in need of a more sensitive continuity sensor, or just don’t want to shell out for a Fluke meter when you don’t need the rest of its capabilities, this is the way to go. And don’t forget to check out our original write-up for this tester if you missed it the first time around.

Multimeters Go Big Screen

We’ve noticed lately that some cheap meters have gone to having big colorful screens. The screens aren’t dot matrix, but still have lots of graphics that could be useful or could be distracting eye candy, depending. The really cheap ones seem more like a gimmick, but [OM0ET] took a look at one that looked like a fair midrange instrument with some useful display features, the GVDA GD128.

A lot of the display shows the current function of the meter. No need for an expensive multiposition switch or rows of interlocking pushbuttons. Many of these new meters also have non-contact voltage sensors, which is handy. Otherwise, it looks like a pretty conventional cheap meter. Continue reading “Multimeters Go Big Screen”

Prepare For Wildfire Season With An Air Quality Monitor

For some reason, wildfire seasons in Australia, North America, and other places around the world seem to happen more and more frequently and with greater and greater fervor. Living in these areas requires special precautions, even for those who live far away from the fires. If you’re not sure if the wildfires are impacting your area or not, one of the tools you can build on your own is an air quality meter like [Costas Vav] shows us in this latest build.

The air quality indicator is based around an Adafruit Feather RP2040 which is in turn based on the 32-bit Cortex M0+ dual core processor. This makes for a quite capable processor in a small package, and helps accomplish one of the design goals of a rapid startup time. Another design goal was to use off-the-shelf components so that anyone could easily build one for themselves, so while the Feather is easily obtained the PMS5003 PM2.5 air quality sensor needed to be as well. From there, all of the components are wrapped up in an easily-printed enclosure and given a small (and also readily-available) OLED screen.

[Costas Vav] has made all of the files needed to build one of these available, from the bill of materials to the software running on the Pi-compatible board to the case designs. It’s a valuable piece of technology to have around even if you don’t live in fire-prone areas. Not only can wildfire smoke travel across entire continents but simple household activities such as cooking (especially with natural gas or propane) can decimate indoor air quality. You can see that for yourself with an army of ESP32-based air quality sensors.

Supersized Weather Station Uses Antique Analog Meters

For most of us, getting weather information is as trivial as unlocking a smartphone or turning on a computer and pointing an app or browser at one’s weather site of choice. This is all well and good, but it lacks a certain panache that old weather stations had with their analog dials and stained wood cases. The weather station that [BuildComics] created marries both this antique aesthetic with modern weather data availability, and then dials it up a notch for this enormous analog weather station build.

The weather station uses 16 discrete dials, each modified with a different label for the specific type of data displayed. Some of them needed new glass, and others also needed coils to be modified to be driven with a lower current than they were designed as well, since each would be driven by one of two Arduinos in this project. Each are tied to a microcontroller output via a potentiometer which controls the needle’s position for the wildly different designs of meter. The microcontrollers themselves get weather information from a combination of real-world sensors outside the home of [BuildComics] and from the internet, which allows for about as up-to-date information about the weather as one could gather first-hand.

The amount of customization of these old meters is impressive, and what’s even more impressive is the project’s final weight. [BuildComics] reports that it took two people just to lift it onto the wall mount, which is not surprising given the amount of iron in some of these old analog meters. And, although not as common in the real world anymore, these old antique meters have plenty of repurposed uses beyond weather stations as well.

Continue reading “Supersized Weather Station Uses Antique Analog Meters”

A Clock From An Electricity Meter

Electric utilities across the world have been transitioning their meters from the induction analog style with a distinctive spinning disc to digital “smart” meters which aren’t as aesthetically pleasing but do have a lot of benefits for utilities and customers alike. For one, meter readers don’t need to visit each meter every month because they are all networked together and can download usage data remotely. For another, it means a lot of analog meters are now available for projects such as this clock from [Monta].

The analog meters worked by passing any electricity used through a small induction motor which spun at a rate proportional to the amount of energy passing through it. This small motor spun a set of dials via gearing in order to keep track of the energy usage in the home or business. To run the clock, [Monta] connected a stepper motor with a custom transmission to those dials for the clock face because it wasn’t possible to spin the induction motor fast enough to drive the dials. An Arduino controls that stepper motor, but can’t simply drive the system in a linear fashion because it needs to skip a large portion of the “minutes” dials every hour. A similar problem arises for the “hours” dials, but a little bit of extra code solves this problem as well.

Once the actual clock is finished, [Monta] put some finishing touches on it such as backlighting in the glass cover and a second motor to spin the induction motor wheel to make the meter look like it’s running. It’s a well-polished build that makes excellent use of some antique hardware, much like one of his other builds we’ve seen which draws its power from a Stirling engine.

Continue reading “A Clock From An Electricity Meter”