Homebrew Relay Computer Looks Like It Could Be A Commercial Product

You may not have noticed, but we here at Hackaday really love our clicky stuff. Clicky mechanical keyboards, unnecessarily noisy flip-dot displays, and pretty much anything made with a lot of relays — they all grab our attention, in more ways than one. So it’s with no small surprise that we appear to have entirely missed perhaps the clickiest build of all: a fully operational 8-bit computer using nothing but relays.

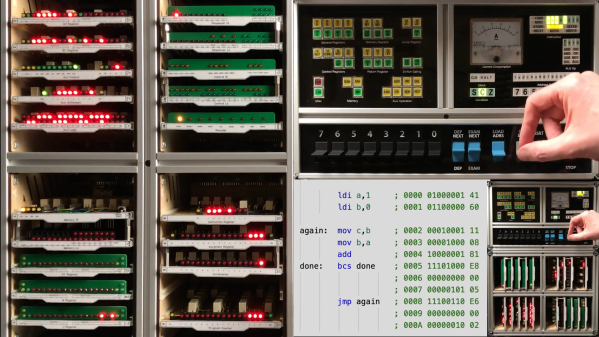
What’s even more amazing about our failure to find and feature [Paul Law]’s excellent work is that he has been at it for the better part of a decade now. The first post on his very detailed and very well-crafted blog describing the build dates from 2013, when he was just testing LEDs in the arithmetic-logic unit (ALU). Since then, [Paul] has made incredible progress, building module after module, each containing a small portion of the computer’s functionality. The modules plug into card cages with backplanes to connect them, and the whole thing lives in an enclosure made from aluminum extrusion and glossy black panels for a truly sleek look. The computer is incredibly compact for something that uses 400+ DPDT relays to do its thinking.

In addition to the blog, [Paul] has a criminally undersubscribed YouTube channel with a quite recent series going over the computer in depth. We included the overall tour below, but you should really check out the rest of the videos to appreciate how much work went into this build. We’ve seen relay computers ranging in size from single-board to just plain ludicrous, but this one really takes the prize for fit and finish as well as functionality.

Continue reading “Homebrew Relay Computer Looks Like It Could Be A Commercial Product”

Becoming A State Machine Design Mastermind

Imagine a robot with an all-around bump sensor. The response to the bump sensor activating depends on the previous state of the robot. If it had been going forward, a bump will send it backwards and vice versa. This robot exhibits behavior that is easy to model as a state machine. That is, the outputs of the machine (motor drive) depend not only on the inputs (the bump sensor) but also on the current state of the machine (going forward or backward).

As state machines go, that’s not an especially complicated one. Many state machines have lots of states with complex conditions. For example, consider a phone switchboard. The reaction to a phone going off hook depends on the state of the line. If the state is ringing, picking up the phone makes a connection. If the state is idle, the phone gets a dial tone. The switchboard also has to have states for timeouts, connection failures, three way calling, and more.

If you master state machines your design and debug cycles will both move along faster. Part of this is understanding and part is knowing about the tools you can choose to use. I’ll cover both below.

Continue reading “Becoming A State Machine Design Mastermind”

Flying Spaghetti Monster Display

[Anthony Liekens], one of our favorite hackers from Belgium, recently completed this large (and awesome!) Flying Spaghetti Monster LED display!

With so many different holidays in December, [Anthony] decided he wanted his family to celebrate a slightly less traditional deity. The body is a massive 4′ by 8′ wooden board that we think [Anthony] cut out by hand, with a total of 300 RGB LEDs driven by an Arduino. Chicken wire mesh provides support for the LEDs in the FSM’s mouth and eyes. [Anthony] built everything in his very own backyard hackerspace called the Open Garage, which is a fantastic neighborhood hackerspace (and we should know—we stayed at his place during our European Hackerspace Tour!)

[Anthony] has a bunch of videos showing off the display on his personal YouTube channel, but stick around after the break for a quick sample that features the Flying Spaghetti Monster in the front window of his home.

Continue reading “Flying Spaghetti Monster Display”