UsbXlater For PS4 Keyboard And Mouse Action

USB

[Frank Zhao]—an awesome guy, an inadvertent Hackaday contributor, and an Adafrut fellow—has come up with a device to use a keyboard and mouse with Playstation 4 games. He calls it the UsbXlater, and even if [Frank] can’t get it working with his PS4, it’s still going to be an awesome tool.

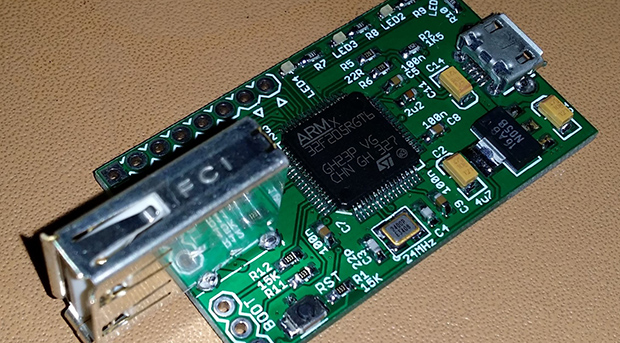
On the board are two USB ports and an STM32F2 microcontroller. The micro provides a USB host interface and a USB device interface, enabling it to translate mouse movements and keystrokes into something a PS4 can understand.  While this project was originally designed to use a keyboard and mouse on [Frank]’s shiny new PS4, it’s not quite working just yet. He’s looking for a few gamer/dev folks to help him suss out the communication between a keyboard/mouse, the UsbXlater, and a PS4.

Of course, even if this device is never used for what it’s designed for, it’s still a very, very interesting tool. With two USB ports, the UsbXlater could act as a signal generator for USB devices and hosts, analyze USB traffic, or provide other applications that haven’t even been thought of yet.

[Frank] is hitting his head against the wall trying to figure out the PS4 protocol, so if you have some USB skills, feel free to hit him up for a blank PCB, though preference falls to people who will game with it and to those with a USB traffic analyzer. If you lack the skills for USB development, [Frank] is still looking for a better name for his device.

Flying Spaghetti Monster Display

[Anthony Liekens], one of our favorite hackers from Belgium, recently completed this large (and awesome!) Flying Spaghetti Monster LED display!

With so many different holidays in December, [Anthony] decided he wanted his family to celebrate a slightly less traditional deity. The body is a massive 4′ by 8′ wooden board that we think [Anthony] cut out by hand, with a total of 300 RGB LEDs driven by an Arduino. Chicken wire mesh provides support for the LEDs in the FSM’s mouth and eyes. [Anthony] built everything in his very own backyard hackerspace called the Open Garage, which is a fantastic neighborhood hackerspace (and we should know—we stayed at his place during our European Hackerspace Tour!)

[Anthony] has a bunch of videos showing off the display on his personal YouTube channel, but stick around after the break for a quick sample that features the Flying Spaghetti Monster in the front window of his home.

Continue reading “Flying Spaghetti Monster Display”

Arduino Controlled Beer Brewing Machine!

[the_meatloaf] just put the final touches on his fully automated beer brewing machine using an Arduino.

The project was part of his computer engineering degree, and it took [the_meatloaf] and two mechanical engineer friends a year to design and build the entire system from scratch. An Arduino Mega with a 4-button interface allows you to program, save, load, rename, and run up to 26 different recipes saved to the EEPROM.

An automated system like this removes most of the guesswork from an otherwise complex brewing process. The machine starts by heating the water in the first keg using a 2000W heating element, after which the water transfers into the mash vessel via servo valves, where it’s stirred by a mixing motor. The machine then drains the wort (the resulting liquid after mashing) and sparges (adds more water to the mash tun) the grains as programmed: thanks, [Chris,] for clarification! The wort is brought to a boil for the programmed amount of time, while a servo-controlled “hopper” automatically adds the hops.  Finally, a counter-flow heat exchanger rapidly cools the solution to room temperature using ice water, then dispenses the solution for fermentation.

Though [the_meatloaf’s] biggest project to date was quite the accomplishment, he unfortunately won’t get to enjoy it. The sponsors who covered the $1000 budget reclaimed the machine. Drat.

[via Reddit]

3D Printed, Solderless Circuits

3d printed board

If you’re looking for yet another alternative to etching your own PCBs, then check out this new Instructable on 3D printing test circuits!

[Mikey] decided to try out this method when he needed a small board prototype. He designed the perfboard to have a standard thickness—only 1/16th thick (~1.6mm)—with thin, recessed channels on one side and through holes on the other. [Mikey’s] circuit board allows you to stuff your components in, hold them down with a piece of tape, and then fill the channels with some kind of conductive material. In this example he’s used a highly conductive paint.

This 3D printed option probably won’t suit all your circuit-building needs, but it could provide an excellent shortcut for your next hack! As always, there’s a video after the break.

Continue reading “3D Printed, Solderless Circuits”

Roboxotica (Barbot Festival In Vienna)

minecraft-cocktailbot--verse-publications

Just this past week was this year’s Roboexotica 2013! The annual event was the world’s first and is perhaps the finest festival of cocktail serving robotics out there!

Founded 15 years ago in San Francisco, Roboexotica brings together scientists, hackers, and artists from all around the world to build the most awesome drink dispensing technologies. It’s also an opportunity to discuss innovation, science fiction, and the world of robotics to come — after utilizing some of the robots of course!

The photo above is of one of the popular bots from this year — it’s called the Minecraft Cocktailbot. It dispenses the liquor out of its floppy drive, but only when you control it from inside a game of Minecraft!

More of the barbots present at Roboxotica can be found on the main site. We think our second favorite is the Bunnybot. It defecates peanuts — the mightiest of all  in pellet-form bar food.

Stick around after the break to see the Minecraft Cocktailbot in action!

Continue reading “Roboxotica (Barbot Festival In Vienna)”

Hacking A Reader For Medical Test Strips

med

[Rahul] works at a startup that produces cutting edge diagnostic test cards. These simple cards can test for enzymes, antibodies, and diseases quickly and easily. For one test, this greatly speeds up the process of testing and diagnosis, but since these tests can now be administered en masse, health services the world over now have the problem of reading, categorizing, and logging thousands of these diagnostic test cards.

The normal solution to this problem is a dedicated card scanner, but these cost tens of thousands of dollars. At a 24-hour hackathon, [Rahul] decided to bring down the cost of the card scanners by whipping up his own, built from a CD drive and an Arduino.

The card [Rahul] used, an A1c card that tests for glucose bound to hemoglobin, has a few lines on the card that fluoresce with different intensify depending on the test results. This can be easily read with a photodiode connected to an Arduino. The mechanical part of the build consisted of an old CD drive with a 3D printed test strip adapter. Operation is very simple – just put the test strip in the test strip holder, press a button, and the results of the test are transmitted over Bluetooth.

Not only is [Rahul]’s build extremely simple, it’s also extremely useful and was enough to net him the ‘Most Innovative Project’ prize at the hackathon in his native Singapore.

Developed On Hackaday: Setting Up The Project’s Infrastructure

2013-12_Developed_on_Hackaday

We’re pretty sure that most of our readers already know it by now, but we’ll tell you anyway: the Hackaday community (writers and readers) is currently developing an offline password keeper. In the first post of our first DoH series, we introduced the project and called for contributors. In the comments section, we received very interesting feedback as well as many feature suggestions that we detailed in our second write-up. Finally, we organized a poll that allowed everyone to vote on the project’s name.

The results came in: the project’s name will be mooltipass. We originally had thought of ‘multipass’ but [asheets] informed us that Apple and Canon had both applied for this trademark. [Omegacs] then suggested ‘mooltipass’ as an alternative, which we loved even more. A few days ago we set up a google group which is already very active.

An often under-estimated side of a community driven project is its infrastructure and management. (How) can you manage dozens of motivated individuals from all over the globe to work on a common project? How can you keep the community informed of its latest developments?

Continue reading “Developed On Hackaday: Setting Up The Project’s Infrastructure”