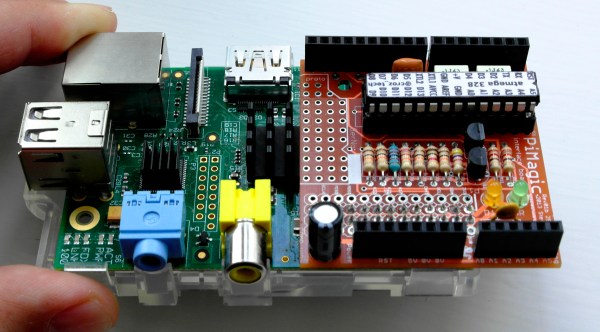
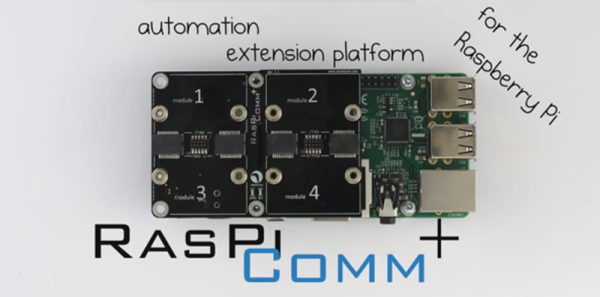
Controlling Music With The Wave Of A Hand

2301141406514425783

[Thomas] created a magical music player that gives the listener the ability to change songs and alter the volume levels without having to touch anything but air. Called the LighTouch, this device puts the control in the hands of the user by interpreting input from an ultrasonic sensor and plays back tracks based on waving gestures.

It is the 2nd iteration of a prototype that he completed about a year ago and functions as a streaming radio/alarm clock. The sensor is hooked up to a Raspberry Pi with a fading LED. Everything is highly customizable including the distances used for playback features. The criteria [Thomas] put in place has the pause method trigger when an object is detected between 0-10cm from the sensor. The volume control on the next level up brightens and dims the LED light just for some added flair.

Continue reading “Controlling Music With The Wave Of A Hand”

Unlocking A Door With A Phone – Easy As Pi!

doorman2

[Ian] has created a way for his office colleagues to get inside the door, even if they have forgotten their keys. This office automation, Raspberry Pi set up is appropriately named the ‘Doorman’ and provided an alternative method of unlocking the entry system.

His solution tapped into the existing security circuit, which is closed by a simple relay, which is connected to the main piece of hardware; a Raspberry Pi. On one side of the Pi is the GPIO pins that allow control access while the other side links to the internet. The company’s internal system is responsible for authenticating users, issuing keys and processing access requests. A mobile client, aka a smartphone, can request a set of keys from the Doorman.

[Ian] used the Golgi SDK to speed up the development of the in-house app. With the wires in place, the Doorman has become a great success, and now forgotten keys are a thing of the past. And even though staff members no longer need to buzz into the office interrupting their co-workers, the development team has plans to beef up their office automation system. Already other innovations are being created to be integrated in with the Doorman.

Now all that’s left is to show a video demonstration of the Doorman, which can be seen after the break:

Continue reading “Unlocking A Door With A Phone – Easy As Pi!”

Adding GPIOs To The Raspberry Pi With The Camera Interface

GPIOs

The Raspberry Pi Model B+ was just released, and now everyone who picks one of those up has a few more GPIO pins to play around with. For the millions of people with the two-year-old version of the Pi, we’re still stuck with the same old, same old: 17 GPIOs on the big header, and that’s about it as far as toggling pins goes.

The Broadcom SoC on the Pi has far more GPIO pins than are broken out on the large header, and a few of those go to the CSI camera interface. These GPIOs can be broken out with a few flat cables (Portuguese, Google Translatrix), giving you four more GPIOs, and this technique can also be used with the new, expanded Model B+.

The CSI camera connector has two I²C lines that go directly to the camera, controllable in Linux as GPIO0 and GPIO1. There are two more GPIO connectors on the CSI connector controllable as GPIO5 and GPIO21. By carefully slicing and soldering wires to a flat cable, these GPIO lines can be broken out onto a breadboard.

There’s a video below demonstrating these GPIO lines being used to control a few LEDs. Of course, anything that is possible with a normal Raspi GPIO is possible with the CSI connector GPIO lines.

Continue reading “Adding GPIOs To The Raspberry Pi With The Camera Interface”

Controlling RC Toys With The Raspi

signal

An interesting trick you can do with a a fast CPU and a GPIO pin mapped directly to memory is an FM transmitter. Just toggle a pin on and off fast enough, and you have a crude and kludgy transmitter. [Brandon] saw a few builds that turned a Raspberry Pi into an FM radio transmitter and realized a lot of toy remote control cars use a frequency in the same range a Pi can transmit at. It’s not much of a leap to realize the Pi can control these remote control cars using only a length of wire attached to a GPIO pin.

The original hack that turned a Pi GPIO pin into an FM transmitter mapped a GPIO pin to memory, cycled through that memory at about 100 MHz, and added a fractional divider to slightly adjust the frequency, turning it into an FM transmitter. Cheap RC cars usually listen for radio signals at 27 and 49 MHz. It doesn’t take much to realize commanding RC cars with a Pi is possible.

The only problem with this idea is that most RC cars use pulse modulation. For an RC transmitter to send the command for ‘forward’, a synchronization pulse is sent, then a series of pulses and pauses. The frequency doesn’t change at all, something the originally FM code doesn’t do. [Brandon] realized that if he just moved the frequency up to something the RC car wasn’t listening to, that would register as a zero.

All that was left was to figure out the command codes for his RC truck. For this, [Brandon] decided brute force would be the best option. Armed with a script and a webcam, he cycled through all possible combinations until the webcam detected a moving truck. Subtlety brilliant, if you ask us. Of course more complex commands required an oscilloscope, but now [Brandon] has a git full of all the code to control a cheap RC car with a Pi.

Input And Output On A Single Pin

IO

[Emilio] has a Raspberry Pi with a few sensors running totally headless. It’s a great way to gather data and post it on the Internet, but for the rare occasions when the Pi needs to be turned off for maintenance, [Emilio] needs to connect a monitor, a keyboard, and a mouse. Not a perfect solution when a simple pushbutton and indicator LED would suffice. There’s one problem with adding a simple button and LED combo: there’s only one GPIO pin available in the setup. That’s nothing a few resistors won’t fix.

After wiring up a very simple circuit on a piece of perfboard, [Emilio] met his design goal of being able to tell if the Pi was running and giving it a software reset button using only a single GPIO pin. The circuit requires only two resistors, and the software to make everything run – a simple Python script – toggles the pin between input and output, checking if the button is held down for five seconds. If it is, the Raspi powers off for [Emilio]’s routine maintenance.

Speeding Up BeagleBone Black GPIO A Thousand Times

For both the Raspberry Pi and BeagleBone Black, there’s a lot of GPIO access that happens the way normal Unix systems do – by moving files around. Yes, for most applications you really don’t need incredibly fast GPIO, but for the one time in a thousand you do, poking around /sysfs just won’t do.

[Chirag] was playing around with a BeagleBone and a quadrature encoder and found the usual methods of poking and prodding pins just wasn’t working. By connecting his scope to a pin that was toggled on and off with /sysfs he found – to his horror – the maximum speed of the BBB’s GPIO was around three and a half kilohertz. Something had to be done.

After finding an old Stack Overflow question, [Chirag] hit upon the solution of using /dev/mem to toggle his pins. A quick check with the scope revealed he was now toggling pins at 2.8 Megahertz, or just about a thousand times faster than before.

Unbricking A Router With A Raspi

About a decade ago, [Mansour] learned of the Linksys WRT54G, a wireless router that’s been shoved into just about every project under the sun. After learning of this device’s power, he decided a firmware upgrade was in order. Unfortunately, he accidentally bricked this router and left it sitting on a shelf for a few years.

Idle devices are the devil’s playthings, and when [Mansour] discovered a Samsung hard drive with a an SDRAM that was compatible with the WRT54G, he decided he would have a go at repairing this ancient router. There was only one problem: the most popular utility for programming the router through the JTAG header required a PC parallel port.

No problem, then, as [Mansour] had a Raspberry Pi on hand. The parallel port utility bit-banged the new firmware over to the router, something the GPIO port on the Pi could do in spades. By adding Pi support to the debricking utility, [Mansour] had a functional WRT54G with just a little bit of patience and a few wires connecting the GPIO and JTAG header.