20 Android Tablets Form An Interactive Photo Collage

You might not have a small army of unused tablets lying around, but if you did, you should try turning them into what Minn calls a “Giant Interactive Photo Array Display:” A Giant IPAD. Har har.

[Minn’s] first step was to hit eBay, hoping to find a score of low-priced, broken-yet-easily-repairable tablets. The only ones available (and for cheap), however, were resistive touch screens with narrow viewing angles. After waiting patiently for nearly half a year, [Minn] hit the capacitive touch jackpot: snagging a pile of 10″ and 7″ Android tablets. The frame is custom made to provide a solid surface for mounting and enough depth for the tablets to fit correctly. Rather than form his own brackets to hold each device, [Minn] re-purposed some IKEA cupboard handles, screwing them into the MDF backboard and clamping the tablets to them with bolts that press against the case. An adhesive rubber bumper stuck to the top of the bolts prevents any damage.

Providing power to the diverse collection required another custom solution; two 5V 10A supplies and one 9V 16A supply fit into an accompany box safely deliver the needed juice. [Minn] chose an app that will grab photos from cloud storage so he can update the collection without having to dig around inside the frame. See the result in a video below! Want to try this project but only have one tablet to spare? The in-wall tablet mount might help.

Continue reading “20 Android Tablets Form An Interactive Photo Collage”

Automated Aquarium Is Kitchen-Sinky

fishtankAutomation

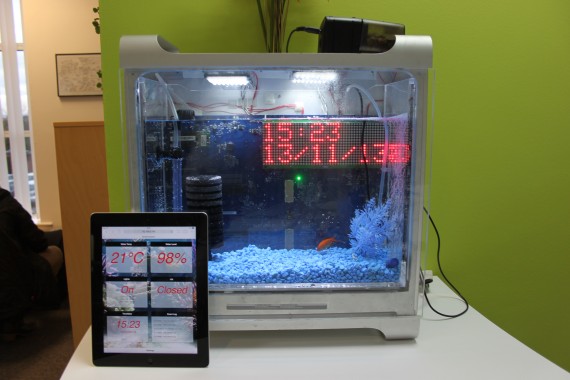
People have been converting their old Power Macs and Mac G5s into fish tanks for a few years now, but [Hayden’s] Internet-enabled tank is probably the most awesome ever crammed into an aquarium along with the water and the fish—and we’ve seen some fascinating builds this summer. After gutting the G5 and covering the basic acrylic work, [Hayden] started piling on the electronics: a webcam, timed LED lighting, an LCD for status readouts, filter and bubble control via a servo, an ultrasonic sensor to measure water levels, thermometer, scrolling matrix display, an automatic feeding mechanism, and more. He even snuck in the G5’s old mainboard solely for a cool backdrop.

The build uses both a Raspberry Pi and an Arduino Mega, which sit underneath the tank at the base. The Pi provides a web interface written in PHP and jQuery, which presents you with the tank’s status and allows changes to some settings. Nearly every component received some form of modification. [Hayden] stripped the webcam of its case and replaced the enclosure with a piece of acrylic and a mountain of silicone, making it both waterproof and slim enough to fit in the appropriate spot. Though he decided to stick with an Amazon-bought Eheim fish feeder, he disabled the unit’s autofeed timer and tapped in to the manual “feed” button to integrate it into his own system.

It’d take half of the front page to explain the rest of this thing. We’ve decided to let the aquarium tell you the rest of its features in the video below. Yeah…it can talk.

Continue reading “Automated Aquarium Is Kitchen-Sinky”

Producing Ozone At 3500 RPM

motor

Motors are fun, and high voltage even more so. We’re guessing that’s what went through [brazilero2008]’s mind when he put together an electrostatic motor using upcycled parts he found lying around.

The electrostatic rotor works by connecting a very high voltage, low current power supply – in this case an industrial air ionizer – to a set or rotors surrounding a plastic rotor. The hot electrodes spray electrons onto the rotor, which are picked up by the ground electrodes. If the system doesn’t arc too much, you have yourself a plastic rotor that spins very, very fast.

[brazilero]’s device is made out of an aluminum turkey pan, a few acrylic tubes, and a few cardboard disks; all stuff you can find in a well-stocked trash can. After completing the device, it was taken apart and finished and screwed onto a beautiful painted jewelry box. Very cool for something you can make out of trash, and dangerous enough to be very interesting.

Continue reading “Producing Ozone At 3500 RPM”

[Charles] Tears Into A Ford Fusion Battery

Any time we hear from [Charles Z. Guan], we know it’s going to be a good feature. When he’s linking us to a blog post with phrases like “If you touch the wrong spots, you will commit suicide instantly”, we know it will be a really good feature. [Charles] is no stranger to Hackaday – we’ve featured his GoKarts, Quadcopters, and scooters before. He was even generous enough to let a couple of Hackaday writers test drive ChibiKart around Maker Faire New York last year.

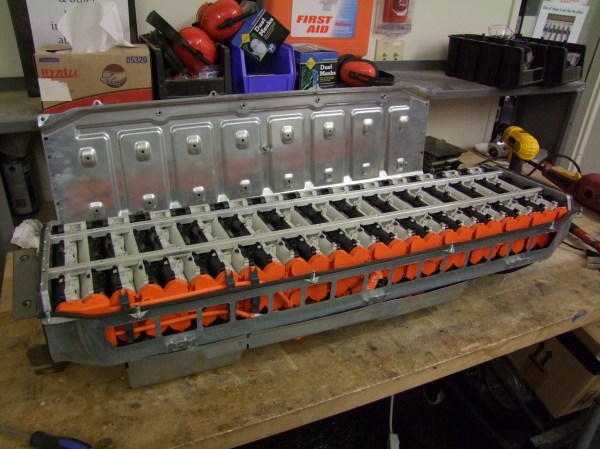
This time around, [Charles] is working on a power system for chibi-Mikuvan, his proposed entry of the Power Racing Series. He’s decided to go with a used battery from a hybrid vehicle. As these vehicles get older, the batteries are finally becoming available on the used market. [Charles] was able to pick up a 2010 Ford Fusion NiMh battery for only $300. These are not small batteries. At 20” wide by 48” long, and weighing in at 150 pounds, you’ll need 2 or 3 people to move one. They also pack quite a punch: 2.1kWh at 275V. It can’t be understated, taking apart batteries such as these gives access to un-fused lethal voltages. Electrocution, arcs, vaporized metal, fire, and worse are all possibilities. If you do decide to work with an EV or hybrid battery, don’t say we (and [Charles]) didn’t warn you.

As [Charles] began taking apart the battery, he found it was one of the most well thought out designs he’d ever seen. From the battery management computers to the hydrogen filled contactors, to the cooling fan controller, everything was easy to work on. The trick to disassembly was to pull the last module out first. Since all the modules are wired in series, removing the last module effectively splits the pack in half, making it much safer to work on. The battery itself is comprised of 28 modules. Each module contains two 4.8V strings of “D” cell sized NiMh batteries. The battery’s capacity rating is 8000 mAh, and [Charles] found they still took a full charge. Since he doesn’t need the pack just yet, [Charles] removed the final bus bars, rendering it relatively safe. Now that he has a power source, we’re waiting to see [Charles’] next stop on the road to chibi-Mikuvan.

Unbricking A Router With A Raspi

About a decade ago, [Mansour] learned of the Linksys WRT54G, a wireless router that’s been shoved into just about every project under the sun. After learning of this device’s power, he decided a firmware upgrade was in order. Unfortunately, he accidentally bricked this router and left it sitting on a shelf for a few years.

Idle devices are the devil’s playthings, and when [Mansour] discovered a Samsung hard drive with a an SDRAM that was compatible with the WRT54G, he decided he would have a go at repairing this ancient router. There was only one problem: the most popular utility for programming the router through the JTAG header required a PC parallel port.

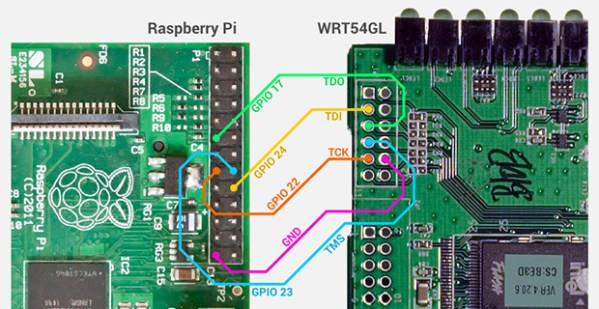
No problem, then, as [Mansour] had a Raspberry Pi on hand. The parallel port utility bit-banged the new firmware over to the router, something the GPIO port on the Pi could do in spades. By adding Pi support to the debricking utility, [Mansour] had a functional WRT54G with just a little bit of patience and a few wires connecting the GPIO and JTAG header.

Arduino Astronomic Clock Automates Lights

ardAst

[Paulo’s] garden lights are probably a bit more accurately automated than anyone else’s on the block, because they use latitude and longitude clock to decide when to flip the switch. [Ed Note from the far future: this page no longer exists, but you can still read it on the Wayback Machine. The TimeLord library has also been superceded, so you’ll have some porting to do.]

Most commercial options (and hobbiest creations) rely on mechanical on/off timers that click on an off every day at the same time, or they use a photosensitive element to decide it’s dark enough. Neither is very accurate. One misplaced leaf obscuring your light-dependent resistor can turn things on unnecessarily, and considering the actual time of sunset fluctuates over the year, mechanical switches require constant adjustment.

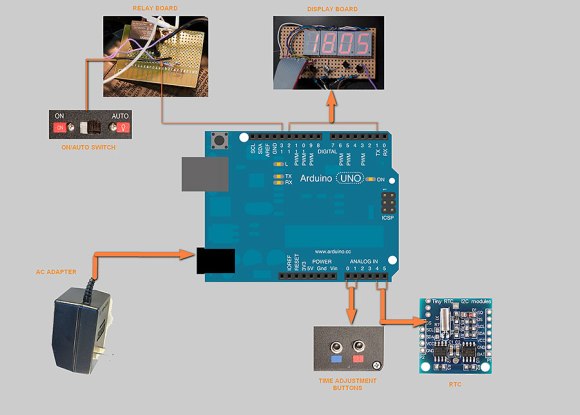
[Paulo’s] solution addresses all of these problems by instead relying on an algorithm to calculate both sunrise and sunset times, explained here, combined with swiftek’s Timelord library for the Arduino. The build features 4 7-segment displays that cycle through indicating the current time, time of sunset and of sunrise. Inside is a RTC (real time clock) with battery backup for timekeeping along with an Omron 5V relay to drive the garden lamps themselves. This particular relay comes with a switch that can force the lights on, just in case.

Check out [Paulo’s] project blog for the full write-up, links to code and more details, then take a look at some other home automation projects, like the SMS-based heater controller or occupancy-controlled room lighting.

Recreate A PCB With A Scanner And Inkscape

turnsig

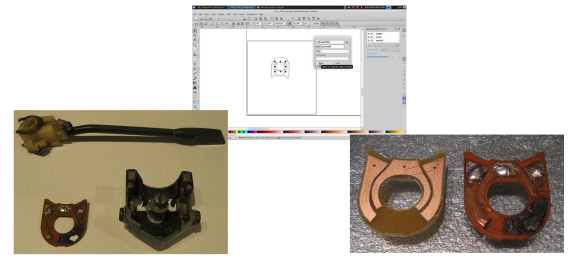
[John] has managed to replace a broken turn signal PCB by scanning it and converting to Gerber format. [John] purchased a Triumph Spitfire with toggle switch wired up for turn signal control. The “official” replacement part worked better than the toggle switch, but it didn’t cancel after turning. He was able to get the original switch, only to find it had a hole completely burned through the phenolic board. This isn’t completely surprising, as Triumph used a Lucas Industries electrical system. As anyone who has owned a car with a Lucas “prince of darkness” electrical system will tell you, Lucas systems were not known for quality. A quick Google search brings up plenty of pages attesting to this.

Phenolic resin/paper was a common early PCB material.  The FR-4 fiberglass boards most commonly used today could be considered descendants of FR-1 and FR-2 phenolic. (The FR in this case stands for Fiber Reinforced). The standardization worked in [John’s] favor, as his burned board was 31 mils thick, which is still a standard PCB thickness. Re-creating an odd sized board such as this isn’t a hard job. It would however mean spending quite a bit of time with a ruler and a caliper. Rather than spend all that time measuring and re-drawing, [John] scanned his PCB on a flatbed scanner. He used graph paper as a background to verify the image wasn’t being stretched or skewed.

[John] brought his scan into inkscape, and traced both the outline and copper areas. The outline and copper had to be exported as two separate files, so he added corner marks outside the board outline as fiducials.  He then used pstoedit to convert inkscape’s eps output files to gEDA pcb format. The two files were rejoined in gEDA. From there [John] exported a Gerber, and ran it on his home PCB milling machine.  The results look good. [John] plans to make another revision of the board from a professional PCB house with vias to hold the copper to the substrate.